Welcome back to the third installment of the Figuring Out Fit series! In the first part of this series we looked at how to start fitting a bra pattern, and in the second part we examined how to diagnosing common fit problems. In today’s post we will take a look at how to make some common pattern alterations for the fit issues we discussed in the second post.
Although I’ve done quite a few pattern alterations in my Adventures in Bra Sewing series, I haven’t really documented the process systematically, and more just shown some alterations that have worked specifically for me. Today I am going to try to look at alterations more broadly, especially as they relate to the fit issues discussed in the previous Figuring Out Fit post. One thing I do want to note is that this discussion will be based on pattern alterations for fit; I am not planning to discuss alterations for style lines in this post. I am therefore still going to be working off the assumption that the goal is to fit a full-band, full-coverage bra, so the diagrams in this post will likely look more similar to those styles of bras, rather than, say, a plunge style, for example. With that being said, pattern pieces and shapes can be very unique in some patterns, so I am going to attempt to use common style lines just to keep the diagrams as generic as possible. I am also going to draw heavily on the fitting resources from the previous Bra Sewing Bees as my references for the content in the remainder of this article.
The Basics of Slash & Spread
On a very fundamental level, the idea of adjusting pattern pieces is to add more coverage where you need it, and take it away where you don’t. In principle, this is simple, but sometimes it can be challenging to see where to add and where to subtract, or it can be difficult to understand how to do this on patterns with unique shapes for special designs. With bra sewing, this can be even more true, as very small changes can have a big impact on fit because the garment is based on a very close fit and creating tension forces to provide support.
Although each fitting situation will be unique, there are a few general ideas that we want to keep in mind when using the slash and spread technique:
- Pay attention to the grain or the DOGS (degree of greatest stretch). Most undergarment patterns I have seen tend to mark the DOGS, but some prefer to use the grain. Make sure you check which your pattern uses, because the DOGS indicate a need for stretch, and the grain will indicate a need for stability. Typically, if you want something to stretch (like the back band), you want the DOGS to run around the body, but if you want it to be stable (like the front cradle), you would want the grain to be going around the body. This being said, I’ve seen a lot of different patterns drafted a lot of different ways, so pay attention to the markings on your particular pattern, because some do draft with the DOGS being utilized in the front frame, and the expectations of stretch or no stretch can drastically impact the fit.
- If you are trying to reduce or increase an overall length of something, you typically want to cut the pattern perpendicular to the DOGS line or to the grainline, then shift the pattern pieces to increase or decrease the length.
- If you need to add a wedge or remove a dart, make sure you are using the seam line as your point of reference. Some people prefer to remove the seam allowance, adjust the pattern, then add back on the seam allowance, and others will slash to a point on both the main pattern piece and the seam allowance to create a hinge, make the adjustment, then smooth out the edges. Both are valid techniques, but I think that removing the seam allowance may be easier for more drastic adjustments, whereas the double slash method may be quicker for more basic or simple wedge adjustments.
- Remember that seams are just fancy darts. This is especially true in a bra, where you can get a lot of curvature from the seams. While it might not always be possible to make an alteration along a seam line, it can be a good place to take off or add to the pattern piece because it is already part of the design lines of the pattern.
- After you make an adjustment, walk your seam lines! To do this, you will overlay the pattern pieces along the seam lines and rotate or “walk” one pattern pieces to make sure the seam line is the correct length so that everything will still match up when shown. If the seam lines don’t match up, you may need to add or remove a bit from the pattern pieces to make sure the seam lines are consistent. Walking the seam lines is easier if the pattern piece doesn’t include seam allowances (you can just lay them edge to edge), so this is another benefit of using the no-seam allowance technique.
- Respect the wire line, unless you are intentionally trying to adjust the wire line. Because the wire line is where the cups fit into the frame, it is important that these seam lines match up. Unless you are intentionally trying to make an adjustment that should impact the wire line, make sure that you are not altering the length of the wire line seam otherwise it can really distort the fit.
- True your lines after any adjustment. Truing a line means smoothing it out, but how you do this will depend on if it is supposed to be a straight line or a curve. For straight lines you will want to connect the endpoints and use a ruler to draw a straight line between. For curves, you may want to use a French Curve or other type of curved ruler to help get a smooth curve, though sometimes I still prefer to freehand it. If you don’t have any curved rulers, you can get a decent set pretty inexpensively on Amazon. The Clover ruler kit is pretty handy for bra drafting, though there are lots of other options, in both metric and imperial scales.
For the rest of this article, I will be looking at the pattern pieces of the bra, and showing how to apply these common principles to adjust pattern pieces to improve fit.
Common Alterations: The Back Band
The back band is typically the stretchiest part of the bra, so in some sense it can me the most impacted by the fabric chosen, depending on stretch percentages and if you are using a regular or heavy weight power net, so it is best to use a consistent type of fabric when working on initial fit, and being prepared to adjust the pattern a bit if the fabric changes. When looking at the back band, it connects to the hook closure, the back strap attachment, and the front frame at the side seam. That means that alterations on the back band can be used to impact the fit in all of these areas, as well as the overall snugness of the bra band. Let’s look at some common adjustments for the back band:
- Increase or decrease length. This is an easy adjustment; you will simply slice the pattern perpendicular to the dogs, overlap or spread apart the two pieces, then tape them down and true up the pattern lines. Remember that any adjustment here is multiplied by 2, because it happens on both sides of the body. So if you need to take out 2 inches overall, you would overlap the pattern pieces by 1 inch.
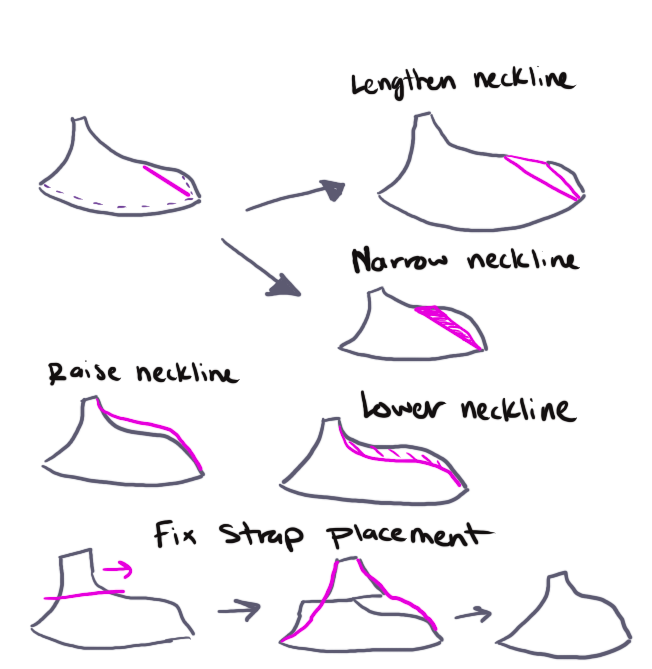
- Move the strap attachment. Straps being too wide or falling off the shoulders is a common complain with bras. Although you can adjust the strap placement on the front of the pattern, you can also adjust it on the back of the pattern by moving the attachment point towards the center back. This can be enough to fix the strap issue without distorting the lines on the front of the bra.
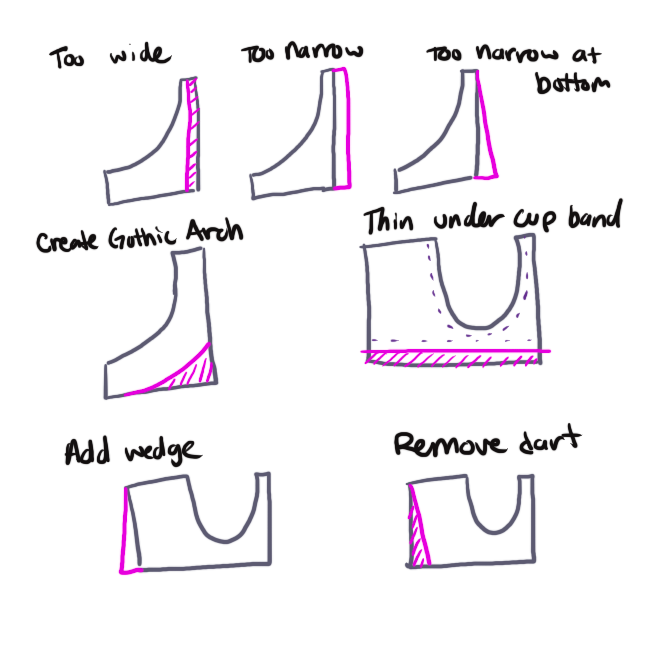
- Add a wedge or remove a dart from the side seam. Depending on the shape of your torso and rib cage, you may need to take in or let out the pattern along the side seam using a wedge or a dart. This adjustment will also impact the front frame pattern piece.
- Add or remove height along the side of the pattern. If the band feels too high or low at the underarm, or seems to roll up at the bottom edge, you may need to adjust the length of the side seam by increasing or decreasing the height. This alteration will need to be matched on the front frame as well.

Common Alterations: The Front Frame and Bridge
The fit on the bridge is really important because it is a typically small area and should sit against the chest wall, so it can have a big impact on comfort. In some patterns the bridge and cradle are one piece (sometimes called the frame), and in other patterns they are two separate pieces that are sewn together. Here we are going to consider a single piece frame, but this could be different depending on the pattern:
- Bridge is too wide or narrow. This will require adding or removing from the pattern in the center front. Because the bridge is already a very small area, it is best to not be too over-zealous in removing width from the bridge (it is often advised to work in 1/8″ increments). It is also important to be mindful of the width of the channeling in this area. Although it is possible to overlap channeling for extremely narrow bridges, generally speaking, you need the minimum width of the bridge to be at least double the width of the channeling, plus seam allowances.
- Center front is too low. Although the gothic arch is a design feature, it can also be used to improve fit as well. To create this on the pattern, you will want to scoop the center front of the pattern upward so that it creates an arch in the center front of the bridge.
- Band rolls up under the cup. If the band rolls upward, you can narrow the under-cup band to the width of the bottom elastic, plus the elastic allowance and the seam allowance for the cups. When you construct this, the channeling with sit over the elastic and it can be very comfortable, and very sturdy to prevent rolling.
- Cradle does not fit at the side seam. These alterations will all be made in tandem with the band alterations discussed previously. This could include increasing or decreasing the height of the band, or removing area from the side seam in the form of a wedge or a dart.
Common Alterations: The Wire Line
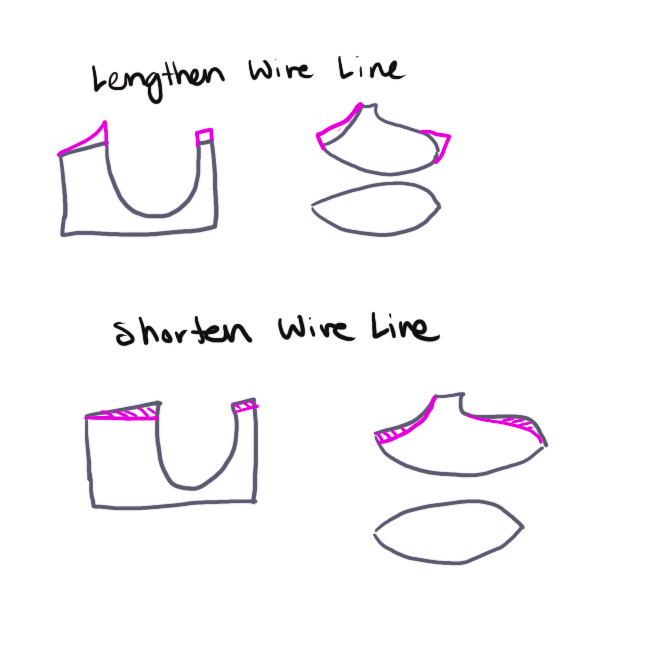
Generally speaking, you shouldn’t need to adjust the wire line if you followed the fitting process from the first post to pick your correct wire size, then picked your pattern’s frame size to fit your wire. However, you may need to make some modifications if your wire is slightly longer or slightly shorter than the pattern is drafted for. To adjust the wire line, you will need to adjust the frame and the cups:
- Lengthening the wire line. This is pretty easy on the frame; you can lay your wire along the pattern and see if you need to add extra height at the front or at the side of the bowl on the pattern, then increase the height of the pattern in that area. One thing to be mindful of is that you want some “wire play” – extra space for the wire to move slightly as the bra is being worn. It is usually advised to have at least 1/4″ of wire play on both the center front and the side of the wire line in the pattern. If you lengthen the wire line on the frame, you will also need to lengthen the wire line on the cups. For this, you can take the total length added, then divide it by double the number of seam lines that touch the wire line. This will typically mean adding very small amounts to each of the cup seam lines, therefore barely distorting the style lines of the cup.
- Shortening the wire line. This is the same as lengthening the wire line, but in reverse.
Common Alterations: The Lower Cup
The lower cup often needs adjustments that are related to the volume requirements of the breast tissue:
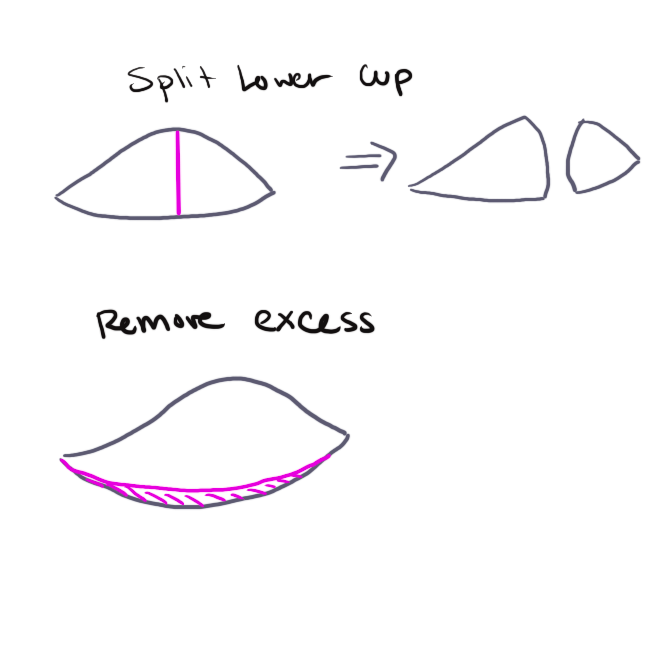
- Splitting the lower cup. For two-piece cups, it is a common alteration to split the lower cup so that some additional volume can be created. To do this, you will split the lower cup in half (usually from the apex point to the bottom point), then add some curvature to the new seam line. It is important to make sure that the new curved seam lines match in length, but this can be easily accomplished by using a curved ruler and flipping it so that the curve is symmetrical on both of the new pattern pieces.
- Removing excess from the lower cup. Sometimes there is a flat spot at the very bottom of the cup, where excess fabric can be pinched out along the wire line. This tends to happen if the breast is flatter along the IMF than the pattern is drafted for. To fix this, simply pinch out the excess on the fitting bra, then transfer that to the pattern and remove the unnecessary fabric.
- Other adjustments. This tends to be very individual and will often require small adjustments along the seam lines to pinch out or add small amounts to the pattern to get a perfect fit. This will most likely happen during a third or fourth fitting, after the major fit issues have been corrected.
Common Alterations: The Upper Cup
The upper cup impacts the fit of the neckline and often impacts the strap attachment:
- Neckline is too wide or too narrow. If the neckline of the cup is gaping open or pinching the breast tissue, then you may need to adjust the length of the upper cup edge. This is done by taking our a dart or adding a wedge. You typically want to draw a line running from the upper edge to the inner front corner and expand or overlap from there. This piece often interacts with most of the other pattern pieces, so it is important to make sure you are not changing the wire or seam lines when you are making this adjustment. It is also very important to true up the upper edge of the cup after making this adjustment.
- Neckline is too high or too low. For this, we are specifically talking about the neckline where it attaches to the cups, NOT where it attaches to the center front bridge or along the wire line. For this adjustment, you need to figure out how much you want to add or subtract, and do this while keeping the end points fixed. This is often easier to do with a curved neckline; if you are using a straight upper edge for use with lace, there is not as much opportunity to adjust the height of the neckline without adjusting the wire line or other pattern pieces.
- The strap placement is wrong. If adjusting the strap attachment point on the back band does not resolve the strap fit issue, you may need to adjust the front strap attachment point by sliding the strap tab inwards towards the center of the body, or outwards towards the shoulder. If the strap placement is correct, it should be sitting comfortably in the small divit between the shoulder bone and the neck as it comes over the top if the shoulder point.
Common Alterations: East-Westing
East-Westing is when the breasts to point towards the sides rather than straight ahead. Depending on the severity, there are a few options for how to adjust the pattern for this issue:
- Rotate the cups. One method to deal with this is to rotate the cups in the wire line. This will also require additional height be added to the piece on the center front, and removed from the wire line near the under arm so that the overall wire line will stay the same length on the cup pieces.
- Adjust the seam lines. If the problem is very minor, it might be possible to fix this by reducing the curve on some seam lines and increasing it on others, to help the volume move towards the center front of the body. This method will probably not be sufficient if the east-westing is significant.
- Shift the apex. This adjustment involved sliding the apex point towards the center front of the body and smoothing out the curve, thereby reducing the volume towards the sides of the cup. This adjustment tends to be easier on a cup with a horizontal seam, as it is easy to see where the apex is located. For a pattern with more cup pieces, you may need to tape pieces together before making the alteration, then re-separate them to get the style lines back.
- Add a power bar or internal sling. This involved creating a new pattern piece that will sit inside the outer cup and help press the breast tissue forward.

Common Alterations: Asymmetry
Although we discussed the pros and cons of different types of different ways to deal with asymmetry in the last post, there are some common alterations that can be done in cases of extreme asymmetry, where each side needs to be fit independently:
- Blending frame sizes to accommodate different wires. If the asymmetry is such that different wire sizes need to be used, it is possible to blend two different frames together to create a pattern for the entire front of the bra. This will likely require blending of some of the pattern lines to make sure that the bra is as symmetrical as possible, aside from the bowls and the cups. It will also mean having cup patterns for the right and left sides, to accommodate the different sizes.
- Sewing bust pads. This isn’t really an alteration to the pattern, but it is possible to sew pads to insert into the bra using layers of bra foam. The size of this and the number of laters will depend very much on how much padding is required, and the size of the cup being filled.
Common Alterations: Omega Adjustment
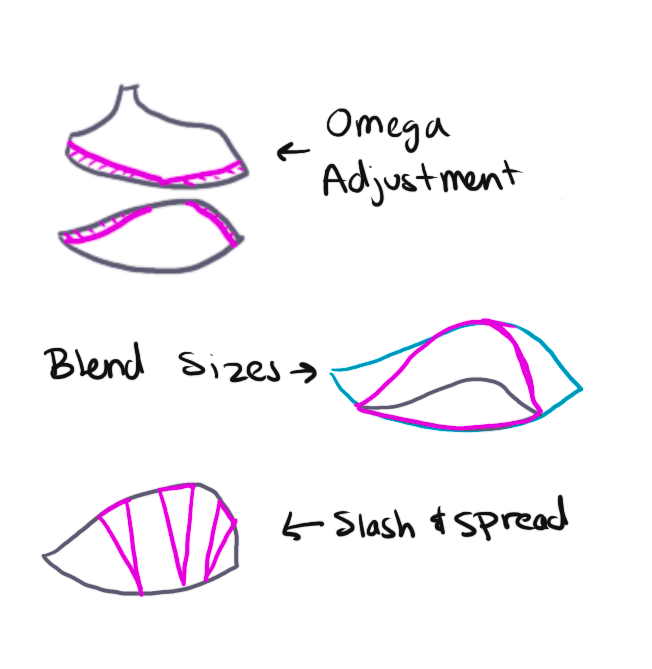
I have written about the omega shape and why it’s such a hot topic in my previous posts on this series, but today we are finally going to look at how to deal with it when adjusting the pattern. I have to make this adjustment on all of my patterns, so I have gotten a fair bit of experience on different ways you can adjust patterns to deal with this fit issue. One thing to note is that the “omega adjustment” can also be used to add projection, even if you aren’t a true omega shape:
- Omega Adjustment. In this adjustment, you select the cup pattern that gives you the best overall volume for the breast shape, but then remove wedges from all of the seam lines to get it to fit the smaller wire line of the band. When removing the wedges, it is best to try and evenly distribute the amount being removed between all of the pattern pieces so that the overall style lines are maintained.
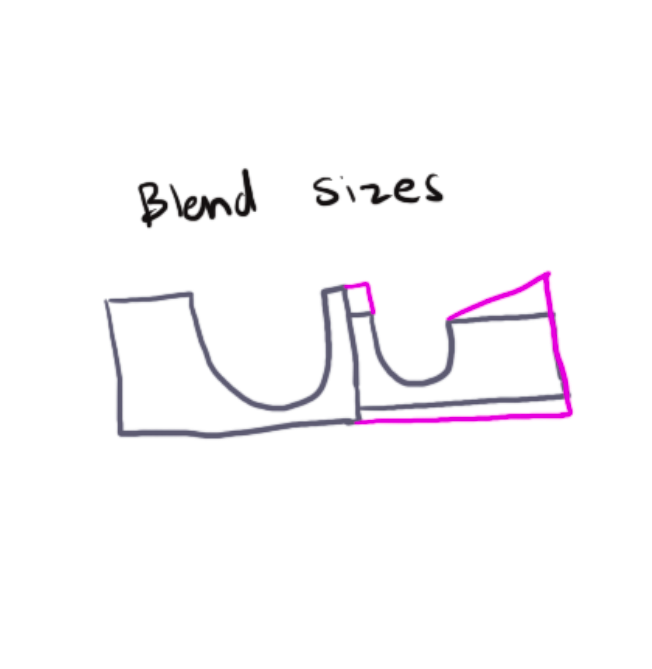
- Blending Sizes. I like to use this method to get a good starting point, if the pattern has the right size options. For this method, you trace off the pattern that fits into the cradle and fits the correct wire size. Then you lay it over the pattern pieces that should give the correct volume, and blend from the smaller wire size to the correct overall volume towards the center of the cup. You will need to walk the seam lines and probably do additional adjustment, but it can get a much better starting point than using a pattern that is already too small or too big.
- Adding volume with slash and spread. If the size range on a pattern is limited, it might be best to pick the pattern that corresponds to the correct wire line, then slash and spread the pattern to add volume in the necessary areas. I have used this technique a few times, and it can be challenging to know how much to add when you are starting out too small, but it does work if you need to add volume beyond what the pattern allows.
Challenges of Applying Pattern Alterations
As with our the previous post, it remains true that with bra fitting, everything impacts everything. Making any of these alterations will hopefully correct fit issues, but may lead to needed fit changes elsewhere. The general rule of thumb is to not make too many changes at the same time, because often one fit change can fit many issues with the tension, but I will say that sometimes it’s clear that you need to make multiple changes (especially after the first fitting) and it can be efficient to do that all at once.
It’s also important to note that changes in materials can significantly impact fit, so a great pattern might still need alterations if you are planning to make it in different fabrics. This is why many of the Bra Bee speakers have said they try to use a consistent material for lining (often sheer cup lining, though some prefer bra tulle for smaller cup sizes), so that the inner layer has consistent properties of stretch or stability, regardless of the outer fashion fabric.
I think it’s also important to reiterate the idea that “close enough may be close enough.” Although everyone agrees that chasing the perfect fit is a bit of a lifelong journey, making something that fits much better than a store bought garment is always exciting, and something that is very much achievable!
Where to Get More Information
Although I have utilized a number of different resources in trying to understand fit over the past year, my first real understanding of fit came from many of the classes held at the 2023 International Bra Sewing Bee. Happily, I have been able to partner with them in creating this post, and was provided access to some additional class materials from previous Bees as part of the research for this “Figuring Out Fit” blog series. I found last year’s Bra Bee to be an invaluable and inspirational experience, and I highly recommend attending this year’s International Bra Bee to anyone who has an interest in sewing lingerie and has the opportunity to participate.
For those interested in attending the International Bra Bee, here is some additional information:
The International Bra Bee’s annual 2024 conference is going to help you take your bra and lingerie sewing journey to the next level and make lifelong friends along the way. The 2024 Conference runs April 13th – May 18th with a live classes day on April 27th 2024. There is also a Beginner Bee starting tomorrow, March 30, focusing on sewing the Sahaara pattern as a first bra. The Conference is going to be focused on getting your perfect fit, starting with your fitting band. Getting the perfect fitting band without cups gives you a foundation for the best fit that can be incorporated into any bra. In 2024, the Bra Bee team is also launching more informal “community” events to gather, sew, and perfect our fit together in a new platform called The Hive. Registration is now open at brasewingbee.com and you will get access to The Hive as soon as you join!
Even though the beginner experience doesn’t start until tomorrow, there has already been a lot going on in The Hive, including member posts and discussions, reviews of past projects, meet-ups, and special access to some videos from previous Bees! I’m really looking forward to using the structure of this year’s Bee, which feels more focused on sewing and learning together as a community, to make some projects I wanted to try after last year’s Bee. April is going to be a busy month, but I’m excited to spend part of it participating in the Bra Bee sew alongs and classes!

I’m bookmarking this for if I ever fall down the bra sewing rabbit hole!
LikeLiked by 1 person