Welcome back to the second installment of the Figuring Out Fit series! In the first part of this series we looked at how to start fitting a bra pattern and the important measurements and considerations when figuring out where to start. In this post we are going to look at the next part of working towards a good fit: diagnosing common fit problems.

Before really diving into the topic at hand, I do want to comment on one thing it took me a long time to accept about bra sewing: you can’t really know how a bra is going to fit until after you actually make it and wear it for a while. Since I started off sewing other types of garments, I was used to fitting by making mock-ups out of very inexpensive materials, drawing all over them with Sharpies, editing the patterns as needed, and forging onwards feeling relatively confident about the resulting adjustment before cutting into the good fabric. However, because bras are such close fitting garments and are very dependent on both the pattern and the fabrics to provide the necessary structural support, it is much more difficult to do this type of slapdash fitting on a budget and still end up with the desired results. There are methods to make fitting easier and more affordable, including making fitting bands (which are a central topic of the 2024 Bra Sewing Bee), using wash away threads to “reclaim” elastics and other materials, and choosing less expensive fabrics that work well for mock ups (sheer cup lining in my new go-to). Despite this, you can’t really get away from needing to use the correct combination of stable and stretch fabrics and elastics that are similar to the final bra in order to properly assess things during the fitting phase. When I first started sewing bras it felt really hard to “sacrifice” materials to do this at the start of my fitting journey, especially after buying a bunch of fancy kits full of beautiful materials that I had to specially purchase for bra sewing. However, I think everyone who really gets into bra sewing (myself included) will say that it is worth planning to spend time and resources on figuring out the fit up front before you jump into the construction of something fun and fancy. I recognize it’s definitely a “do as I say, not as I do” situation, but it will hopefully lead to better results in the long run. At the very least, it should maybe help you start off with a better fitting pattern before being three bras in and realizing nothing fits right and you really need to go back to the drawing board like I did (you can check out previous posts in my Adventures in Bra Sewing series for the backstory on that).
So, with all that being said, the rest of this article is going to assume that you’ve made either a full bra or at least a well constructed fitting band and are trying to assess how it’s fitting and what steps to try next based on the results. I’m not getting into pattern alterations today – that will be in the next post – but the goal is to help classify fit issues and consider what might be causing them. Also, since my fitting journey has primarily been for myself, I am going to draw heavily on the fitting resources from the previous Bra Sewing Bees as my references for the content in the remainder of this article.
Diagnosing Common Fit Issues
As with the previous post in this series, I am moving forward with the assumption that the goal is to fit a fairly standard full band, full coverage, underwire bra pattern. While many of these fit considerations will apply to any bra pattern, working from the basis of discussing fit of an underwired bra will help the discussion be a bit more specific.
Common Fit Issue: The Frame and Band
Most of the support in a bra comes from the fit of the frame and band, so checking the fit of this part of the bra is critical to a good result. Because there are so many possible fit issues with the band, there is quite a list of things to check for when assessing band fit:
- Band is too loose. A good way to check this is if the center back of the band is riding up, or if it is easy to pinch out excess fabric in the back band without the overall bra feeling too tight. This may require adjusting the back pattern piece to take out the extra, or going to a smaller size of the pattern. If it is only a bit loose or seems to stretch out quickly you may be able to just use a firmer weight of power net to reduce the stretch factor of the back band.
- Band is too tight. This will probably be obvious because the band will be cutting in or pinching around the body. If it is only a little tight, you might be able to use a less firm power net or stretchier elastics, but generally this means that you will need to use a larger band pattern or make an alteration to increase the back band amount.
- Band gaps on the top or bottom. It is possible the band could fit comfortably around the lower edge but be gapping along the top edge (often but not always at the underarm side seam), or vice versa. This often happens if the torsos is shaped differently than the pattern is drafted for. An easy way to check this is if you can pinch out a dart along the band. This will require alterations to the pattern to remove the excess fabric.
- Band pinches on the top or bottom. Similar to the previous issue, it is possible the band could fit comfortably around the top or bottom, but be too tight along the other edge. Rather than taking out a dart, this will require a pattern alteration to add a wedge to give a bit more fabric coverage and reduce the pinching.
- Band wrinkles or flips up along the bottom at the side seam or under the cups. This fit issue generally comes about because previous bras have left an indent in the side of the body where the elastic sits, but could also result from the shape of the ribs or torso. This may require shaping the bottom edge of the band at the side seam so that it gently curves up and removes the excess fabric that is wrinkling or by thinning out the band under the cup area.
- Band is too low/high along the side. If the side of the band is too low, there will be excess body tissue spilling out over the top edge of the band, or it will feel like there isn’t enough support at the top edge of the bra. Alternatively, if the band is too high along the side, it can feel like the bra is irritating or rubbing the underarm. Both of these issues can be fixed by adjusting the top edge of the band on the pattern. If this isn’t enough to resolve the fit issue, it may also be necessary to increase or decrease the height of the hook attachment in the back to additional support.

Common Fit Issue: The Bridge
Once the basic fit of the band has been reviewed, the next important area to check is the bridge, which is the triangular area of fabric that sits between the breasts. Getting the bridge to sit flat against the sternum or “tack” in this area is a key indicator that the fit is correct, and is considered a major win for anyone who sews their own bras. Most bridge shapes can be classified as “narrow high triangles” or “short wide triangles” so once you figure out your body structure it can help a lot in assessing a pattern even before starting the fitting process. When assessing the fit of the bridge, here are some things to look for:
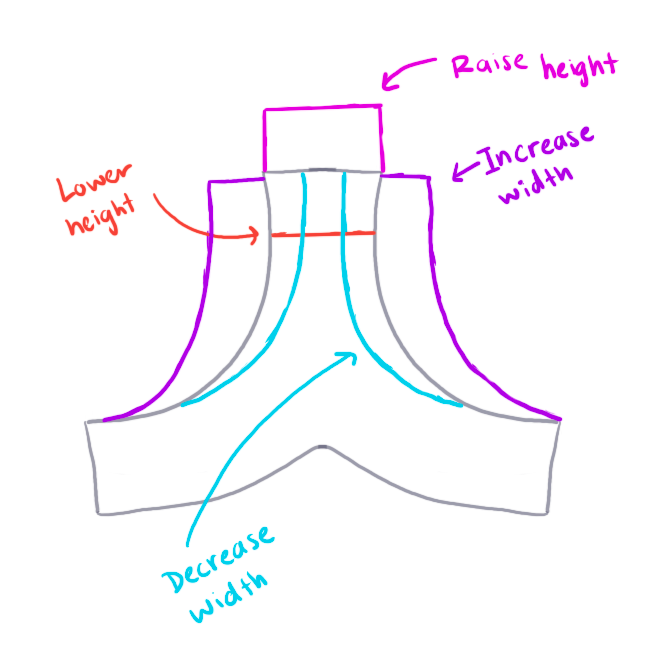
- Bridge is too wide. If the bridge is too wide it will cause the wires to press into the inner breast tissue, will cause the bra to sit away from the chest, or will result in folds of fabric that can be pinched out. This must be fixed with pattern alterations to narrow the shape of the bridge. It is possible for a bridge to be too wide at the bottom but not at the top (or vice versa) which means that the alteration will be in the shape of a wedge.
- Bridge is too narrow. If the bridge is too narrow it will pull away from the body because it can’t properly sit between the breasts. This must be fixed with pattern alterations to widen the shape of the bridge. It is possible for a bridge to be too narrow at the bottom but not at the top (or vice versa) which means that the alteration will be in the shape of a wedge.
- Bridge is too high or too low. When first fitting a bra, the recommendation is to do a full coverage bra, so the bridge should come up to the top of the breast tissue. Most bra patterns aren’t drafted for this, so it might be necessary to add height to the top of the bridge. Conversely, if a pattern is drafted for a “narrow high triangle” bridge but your anatomy is for a “short wide triangle” you may need to lower the bridge to get a correct fit.
Common Fit Issue: The Wire Line
Most bra drafting instructions I have seen build out the pattern around the wire line, so it is critical for a correct fit. The wire line may or may not be drafted with wire spring (most commercial patterns are), and this can have a big impact on fit (for more discussion on wire spring, you can refer to a side tangent in my previous post). The important things to consider when looking at the wire line are if the wire is sitting in the inframammary fold (IMF) and if the wire is sitting on the front plane of the body (not into/under the armpit or wrapping around the torso). Some things to check for when looking at the wire line:
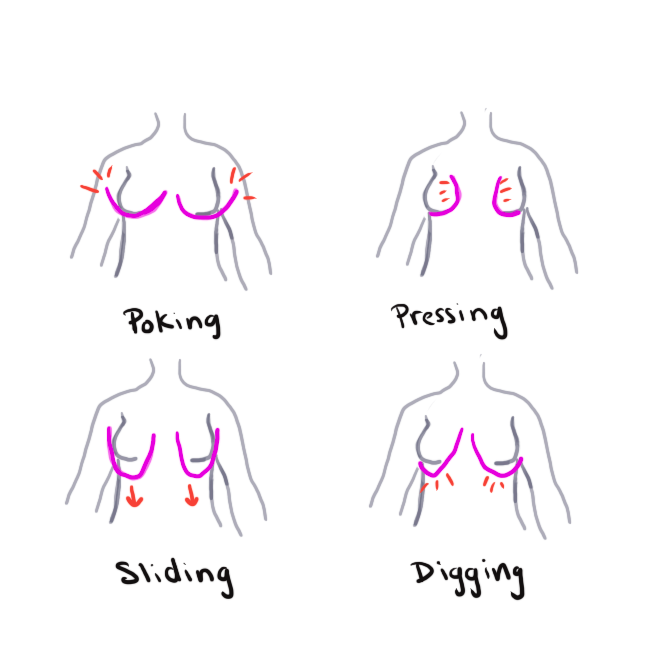
- Wire is poking the underarm. This could mean that the wire is too long, or that the wire has too much spring, or possibly both. If this is the case, you may need to go back to your breast root trace (BRT) and reconsider your wire size, or compare the pattern to the BRT to see if the wire spring is forcing the wire to poke the underarm. You may need to reconsider your starting size or choose a different starting pattern.
- Wire is pressing on the breast tissue. This likely means the wire is too small, is the wrong shape, or it could be that there isn’t enough wire spring in the pattern (or all of the above). This might be fixed by swapping out the wire, or it could mean starting over with a different size of the pattern.
- Wire is sliding down. Assuming that the band is fitting correctly, this could mean that the wire is too big, the wrong shape, over-sprung, or may be too light of a wire gauge. You may need to test out different wires sizes, wire shapes, or patterns to see how the wires and wire spring impacts the fit.
- Wire is digging into the ribs. This happens if the wire is not sitting in the IMF and is often the result of a combination of an ill-fitting band and bridge along with issues in the wire line or wire size, but could also be caused by incorrect fit in the cups. This means there is an incorrect tension somewhere in the bra, but it can be a bit challenging to identify the cause of this issue and usually requires looking at multiple areas of fit to find out why this is happening.
Common Fit Issue: The Strap
I think one of the most common complaints about wearing a bra is that the straps fall down. Correct fit would have the straps sitting in the indent between the neck and the shoulder bone, but this can be challenging for those with sloping shoulders or other body asymmetry. Assuming that the straps are the correct length, it is important to check for the following when looking at the strap placement while fitting a bra:
- Straps too wide (falling off the shoulders). This is probably one of the most common issues, but it is actually an easy fix if you sew your own bras. Moving the back strap attachment point towards the center back can help a lot with this, but it is also possible to move the front strap attachment closer to the center front to prevent this issue. Further considerations could involve style changes, such as using a racerback or crossed strap style. It’s also possible the straps are just too long, which is easily adjusted by shortening the straps.
- Straps too narrow (cutting in at the neck). This is a less common complaint, but it is possible that the straps can be too narrow and press against the neck. This can be fixed with the opposite procedure as above, by moving the strap attachment points away from the center of the body.
- Straps digging in. The majority of the support of a bra should come from the band, so this could actually be a sign of a band issue. However, if the band is fitting correctly and the straps are the right length, it could indicate that the cups are too small. It could also be the case that the breast tissue is extremely heavy, so using cut and sew foam in the straps to help pad them, or widening the shape of the strap could help increase comfort by reducing the pressure points.
- Wrinkles or flat spots pointing to the strap attachment. Generally speaking, the strap attachment should be above the apex so that it can apply tension to the center of the breast mass and keep it in place (though this is not strictly true for all styles of bra). Even if the strap is sitting correctly as it goes over the shoulder, the placement may need to move to help give more support to the apex or redistribute the tension around the strap attachment point.

Common Fit Issue: The Cups
Even though fitting the frame, band, and bridge and checking the wire line are critical for getting the structural foundation of the bra correct, adjusting the fit issues on these parts of the bra tend to be much easier (even if the fix is “start with a different size of pattern”). Fixing the fit on the cups is much more challenging because it is a curved surface and there is a lot of variation in the size, shape, and density of breasts. However, there are some common things to look for in terms of assessing the cup sizing:
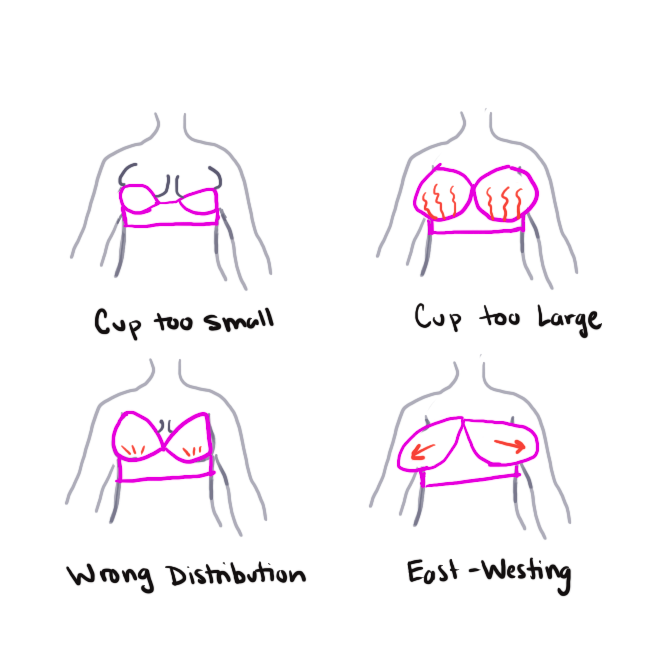
- Cup is too small. This is usually easy to diagnose because the breast tissue will spill over the top of the cup (“muffin top” or “double boob”), or will cause the previously well fitting band to pull away from the chest, and probably give an overall sensation of the bra being too tight. To fix this you will either need to go back to the pattern and use a larger cup pattern (and probably alter it to fit the wire line) or add volume to the cup using slash and spread techniques.
- Cup too large. This will also typically be easy to diagnose because the cup won’t provide any support to the breast tissue, will have excess fabric folds, and will generally look loose. To fix this you will either need to go back to the pattern and pick a smaller size cup or you will need to alter the pattern to remove the excess fabric.
- Cup volume is correct, but distribution is wrong. This fit issue will be highly individual and depend very much on the shape of the breasts. Some shapes are bottom or top heavy, or may have more fullness on the inner or outer quadrants of the breast. If the cup shape does not match the breast shape, you may get weird flat spots in the cup where it is over-compressing the breast tissue, or there may be areas with excess fabric that can be darted out. Sometimes this can be an easy fix by altering the pattern (such as splitting the lower cup to add enough volume for the breasts to “drop” into place), and sometimes this takes a few iterations to get right. This is probably where most of the experimentation and adjustments will happen, especially if the pattern is drafted based on a shape that is very different from the person it is being sewn for.
- East-Westing. This is a fit issue where the pattern causes the breasts to point towards the sides rather than straight ahead. This can usually be fixed by rotating the cups a bit and adjusting some of the curvature of the cup seams, but it is easier to do on some patterns compared to others depending on the style lines. It might also be possible to add an internal power bar to help push the tissue towards to the front of the body.
Common Fit Issue: Asymmetry
Another common issue is having asymmetry in the breasts. This is something that is more easily diagnosed during the body analysis when doing the measurements and fitting steps outlined in the previous post, but there are several ways that this can be addressed when reviewing the fit or planning the sewing of the bra:
- Pad out the extra space. If the asymmetry is relatively minor, you can fit the larger breast and then create extra padding to fill out the cup of the smaller breast to give the illusion of symmetry. If there is an extreme asymmetry, you can also look at getting larger bust-shaped padding to fill out the smaller side.
- Fit the “average” size. Another option if the asymmetry is relatively minor is to fit something that is a bit small for the larger side and a bit big for the smaller side to end up with something that is the average between them and should almost fit both sides.
- Fit each side independently. This may be necessary if the asymmetry is more pronounced or if each side requires a different wire size. During the Bra Bee clinics it was cautioned that building asymmetry into a bra may cause other structural issues, but it was also acknowledged that it might be the only way to achieve fit if there is extreme asymmetry and a need or desire to avoid padding.
- Ignore it. Fitting the larger side and not worrying about the fit being “perfect” on the smaller side is also a valid option!
I will also say that those considering mastectomy bras could fall in this category, but also that there are additional considerations with discussing bras after a mastectomy. I don’t feel qualified to discuss all of those options at this point, but looking at dealing with asymmetry could be a good place to start if you want more information about how to deal with the technical issues of altering a bra pattern for this need.
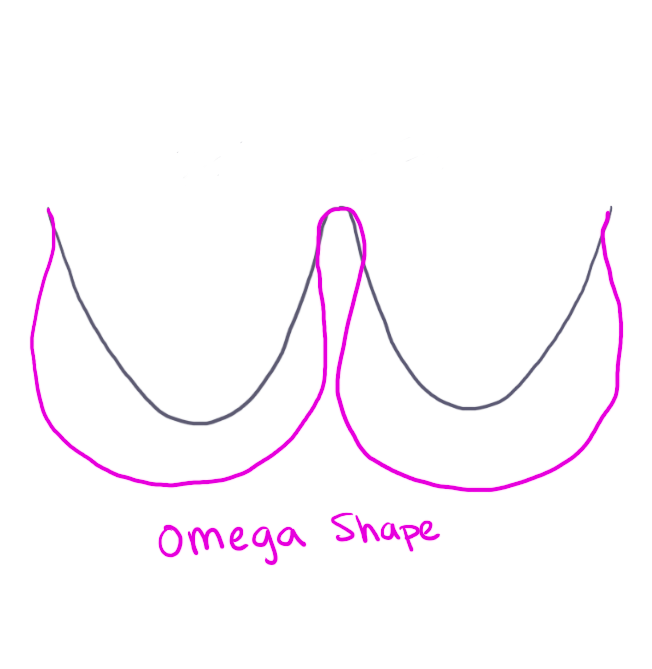
Common Fit Issue: Omega Shape
Ah, the infamous omega shape. I went on a side tangent about this issue in my first post, but basically the omega shaped breast looks like the Greek letter omega (Ω): narrow at the root and more bulbous as it extends away from the body. It is not supposed to be a common shape, but it has been hypothesized that a disproportionately large percentage of people who sew their own bras have this shape because they are fed up with how ready to wear bras (don’t) fit. The challenge of fitting this shape is that you will need a much smaller wire line on the frame when compared to the volume of the cups, resulting in a bit of guesswork and a lot of testing. To fit the omega shape it is very important to go through the process of fitting the band first, then testing out the fit of the cups. This shape of breast usually requires more fit samples and adjustments to get a working pattern. The “omega adjustment” is essentially making the cup’s seam line “darts” much larger to shrink the cup down to fit the wire line while preserving the overall cup volume. I have to do this alteration on all of my patterns, so I will go over this more in the next post.
Common Fit Issue: Sunken or Protruding Chest, Flared Ribs, or Protruding Stomach
These fit issues come from the body’s bone structure and may impact fit, or at least design considerations that can impact fit. A few things to be aware of for these situaitons:
- Sunken Chest. Typically this does not impact the fit of the bra because it is above the top line of the bra.
- Protruding or Pigeon Chest. This is when the breast bone protrudes outward. This may require a lower center bridge, as a high bridge could result in wires poking into the breast bone, causing discomfort.
- Flared Ribs. This is when the ribs flare outward under the breast line. Because the bone is not compressible, it can make some bra bands feel too tight, or cause discomfort when wearing longline bras. Using a gothic arch or partial band style can help alleviate the pressure caused by the band pressing on the flared ribs.
- Protruding stomach. If the stomach is fuller in shape it can have the same effect on fit as the flared rib, where design changes to reduce pressure points can also help with the fit.
Challenges of Diagnosing Fit Issues
Although I have categorized fit issue and discussed them in isolation, the unfortunate truth is that with bra fitting, everything impacts everything. The support of a bra results by balancing the tension forces to keep the breast in place, and the proper balance occurs when everything is working together. Although there is an order of fitting that can get you closer to success faster (fit the band first, then fit the cups), changing any part of the bra (the pattern, the fabrics, the elastics, etc.) can result in changes to the fit. And even bras that feel like they “fit” when first putting them on may reveal unexpected fit issues after moving around in them and living in them all day. Most of the Bra Bee fit clinics included some word of caution that “close enough may be close enough,” especially when working on fitting your first bra. I will say this has been my own experience – after working through my fit after the 2023 Bra Bee, I ended up with 2 patterns that were “pretty close” and then tried self-drafting a bra band that got me “really close”. Although I want to do some further explorations and play around with wire spring and some of the more advanced fit topics this year, getting to a place where I could make several decently well fitting bras has been great. Now I have things to wear while I do further pattern testing, and they are all much better and more comfortable than any of my store bought bras.
Another common theme in all of the Bra Bee resources is that “fit is a journey”. I definitely agree with this, but I think it’s important to note that being on a journey doesn’t mean you can’t stop at various points along the way. My first “stopping point” was getting a pattern to fit using the process outlined during the 2023 Fit Clinics. My next “stopping point” was drafting a bra band that fit with an un-sprung wire, resulting in an even more comfortable bra. Then I found a “stopping point” after fitting several cup patterns into my band, giving me the ability to make some fun design variations. I think the next leg of my journey will be testing out some new patterns and playing around with wire spring and some different wire sizes in the cradle, because I feel that it might resolve some of the minor fit issues I am still experiencing. I feel my fit journey has really allowed me to think about and understand pattern drafting in much more depth than I ever had previously, but it’s also the gateway to even more questions to answer and ideas to test. Fitting a bra pattern is definitely a journey, but it’s very rewarding and one well worth taking.
Where to Get More Information
Although I have utilized a number of different resources in trying to understand fit over the past year, my first real understanding of fit came from many of the classes held at the 2023 International Bra Sewing Bee. Happily, I have been able to partner with them in creating this post, and was provided access to some additional class materials from previous Bees as part of the research for this “Figuring Out Fit” blog series. I found last year’s Bra Bee to be an invaluable and inspirational experience, and I highly recommend attending this year’s International Bra Bee to anyone who has an interest in sewing lingerie and has the opportunity to participate.
For those interested in attending the International Bra Bee, here is some additional information:
The International Bra Bee’s annual 2024 conference is going to help you take your bra and lingerie sewing journey to the next level and make lifelong friends along the way. The 2024 Conference runs April 13th – May 18th with a live classes day on April 27th 2024. There is also a Beginner Bee starting on March 30, focusing on sewing the Sahaara pattern as a first bra. The Conference is going to be focused on getting your perfect fit, starting with your fitting band. Getting the perfect fitting band without cups gives you a foundation for the best fit that can be incorporated into any bra. In 2024, the Bra Bee team is also launching more informal “community” events to gather, sew, and perfect our fit together in a new platform called The Hive. Registration is now open at brasewingbee.com and you will get access to The Hive as soon as you join!
Even though the beginner experience doesn’t start for a few weeks, there is already a lot going on in The Hive, including member introductions, discussions about various bra sewing topics, reviews of past projects, meet-ups, and special access to some videos from previous Bees! I’m really looking forward to the structure of this year’s Bee, which feels more focused on sewing and learning together as a community. I’m also excited for the next post in this “Figuring Out Fit” series, so come back to the blog in a few weeks for Part 3, where we are going to look at common pattern alterations to fix the fit issues we identified today!

Thanks for all the informative posts on this topic! I re-read many recently, and finally got my supplies and patterns out the day of your previous post. The post reminded me of the Beverly Johnson videos on Craftsy which I am working my way through now–another great resource! I’m looking forward to hearing what you learn at the Bee.
LikeLiked by 1 person
Figuring out bra fit can be such a challenge, but it is so satisfying when everything finally comes together. Love seeing the breakdown of common fit issues and how to fix them!
LikeLike