It wasn’t intentional, but I’ve pretty much been blogging exclusively about sewing bras since I made my first one at the end of 2022. At the beginning it was all about skills acquisition for me – learning to sew with special materials, using tiny pattern pieces, and how to get get the overwhelming jumble of materials that comes in a kit to end up looking like an actual bra. At the start of this journey, the appearance of the end product was enough to keep me going, but after sewing about three bras, I realized I was missing another very important component of a good bra: the fit.
Because I’m me, I tend to dive far too deep into the topics I’m obsessing over, so last summer I dove into the topic of how to fit a bra. Although I referenced Craftsy classes and a few books, my primary resource became the fit classes presented at the 2023 Bra Sewing Bee, which really inspired me to deep dive into the process of figuring out fit and documenting my efforts in my Adventures in Bra Sewing series. In reviewing the Bra Bee class materials, one thing was very clear about fit – there is definitely an order that most of the presenters agreed upon in terms of how to best achieve good results. The fitting order is: (1) measure/analyze the body, (2) determine the correct wire size, (3) select the pattern/cradle that fits the wire, (4) select or alter the band size to fit the body, and (5) adjust the cups.
Because a bra is such a close fitting garment, the fit is not nearly as forgiving as it can be when sewing other types of clothes, and there are a lot of things to consider, which can be very overwhelming. Although I won’t claim that this post is going to demystify everything, I hope that it at least synthesizes the information that I have gathered from reading about this topic and attending the Bee, and that it creates a good reference for anyone who needs help just getting started with sewing a bra. For this series of posts I’m working with the assumption that the goal is to fit a wired bra, though as we go through this fit series some concepts can be more generally applied to any style of bra, but a lot of this post will be specific to fitting a wired bra.
Where to Start with Measurements
One of the major topics that was covered in the Bra Bee fit clinics was the idea of measuring your individual body, and understanding both the qualitative aspects and quantitative measurements that will impact fit.
For most patterns, there are three basic measurements: chest or high bust, full bust, and ribcage or under bust.
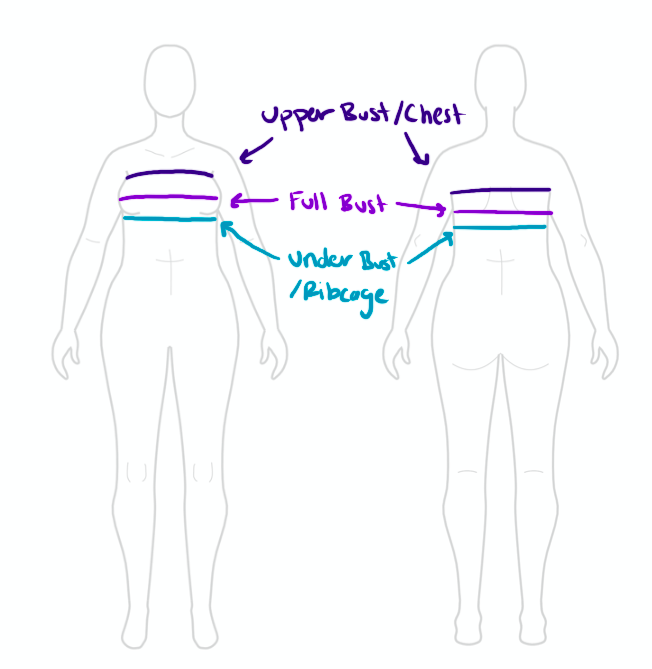
When we consider ready to wear (RTW) bras, generally speaking, it is the relative relationships of these measurements that are commonly given as the bra size. For most countries the bra size consists of a number and a letter. The number is the length of the band. This number typically corresponds to the under bust measurement in inches (e.g., a 36″ ribcage = a size 36 band), but because of historical reasons, this is not always the case. Sometimes the band measurement will be the ribcage measurement +4″ (e.g., the 36″ ribcage = a size 40 band). I have also seen some brands that use centimeters instead of inches (e.g., the band will have numbers like 85 or 90), and I’ve also seen a few suggestions to use the average of the upper bust and under bust measurements to select the band size. There will also be personal preference in selecting a band size. Although correct fit is generally considered to be when the band is fairly snug around the body (as the band provides most of the support of the bra), depending on the comfort of the wearer and their individual body composition, they may choose a slightly longer or slightly shorter band length.
The second part of a typical bra sizing is the letter (for example, we are used to seeing 36B, 36C, 36D, etc.) The letter is typically derived by taking the difference between the under bust and the full bust, with 1″ of difference being an A cup, 2″ being a B cup, 3″ being a C cup, etc. Putting that together with a band length, you end up with a size typical to what we see in stores. Of course, this part of the measurement can’t be entirely that simple either. This is the area where we find that different countries tend to have different lettering systems, especially in the D/E/F or D/DD/DDD ranges. I won’t go into too much depth on that here, but suffice it to say, once you get beyond 3-4″ of difference between your ribs and your full bust, the naming conventions for commercially available ready to wear options start to get very inconsistent depending on brand and sales region. Of course, this is probably part of the reason we want to sew our own bras rather than buy them, and why I will now say that having your body’s actual measurements and not a “what you’ve always bought in the store” bra size will be the most important thing moving forward.
So, now that you’ve got a high bust, full bust, and under bust measurement, we are ready to pick patterns out, right? Not exactly. Although these are the basic measurements to get for most patterns, it is also helpful to do a more detailed body analysis, which can include things like measuring the bust’s horizontal hemisphere (HH), vertical hemisphere, vertical and horizontal quadrants, bottom cup depth (BCD), bridge width, and front ribcage and back ribcage. While the three standard measurements are often instructed to be taken while wearing your “best fitting non-foam bra”, these more detailed measurements are typically instructed to be taken bending over without wearing a bra, though perhaps using a thin t-shirt or make-shift fabric sling to help contain the tissue being measured.
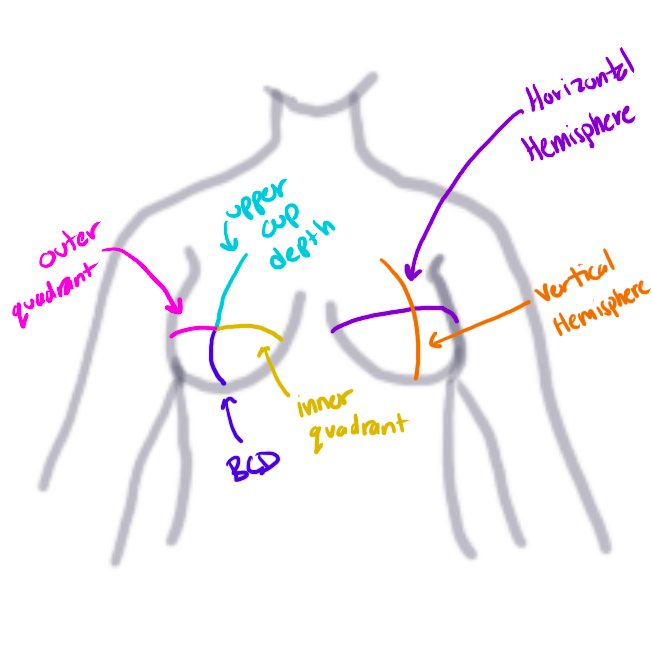
Looking at these more detailed measurements can give you an idea about your unique body and how it may differ from a standard pattern or RTW bra. Compare the vertical and horizontal hemispheres – is the horizontal larger than the vertical (indicating an oval breast shape), or are they roughly the same (a circular breast shape)? Look at the quadrants – is there inner or outer fullness to the tissue, and is it more full on the top or the bottom? Do you have a larger bust relative to your ribcage measurements? These are all things that can be different person to person that impact the final fit of a pattern. Getting a good qualitative understanding of the body’s proportions will be very helpful moving on to the next steps.
Where to Start with Wire Sizing
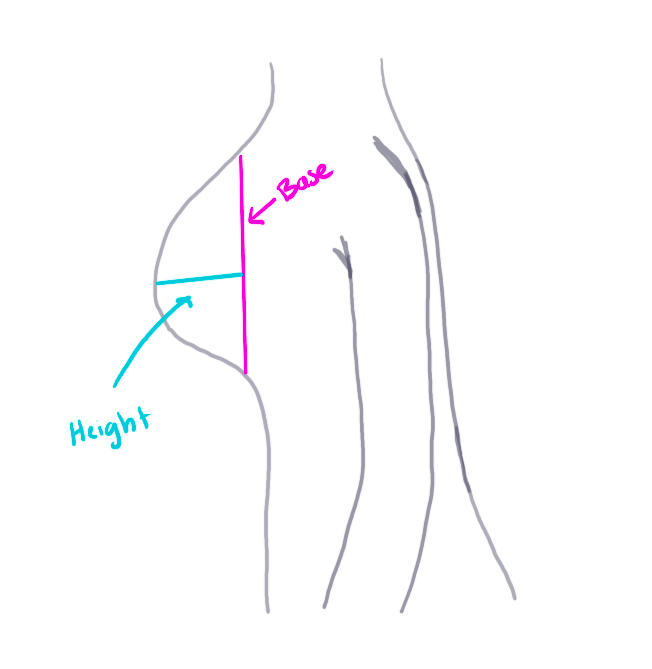
I think most of the experts in this field would agree that finding the correct wire size is a critical first step to getting a good fit, because the entire pattern and structuring of a wired bra depends on the wire size and shape. To determine how to start with selecting a wire size, you need to take a breast root trace.
The breast root trace (BRT) is taken by leaning over with a bra off and using some sort of wire to map out the inframammary fold (IMF), which is the line where the breast tissue attaches to the body. Typically, it is easier to locate the fold near the inside and under portion of the breast tissue, but it can be difficult to locate closer to the underarm in some cases. Although I have seen a few different options for tools to do this (floral wire, bendy rulers, …my sister even used some pipe cleaners), the current tool du jour is a gear tie. I ordered my gear ties from Amazon, but I believe that Bra Builders is also now included one with their Bra Bee 24 fitting band kits. The goal is to take the wire and bend it so that it maps out the shape of the IMF, which should help in narrowing down the wire selection.

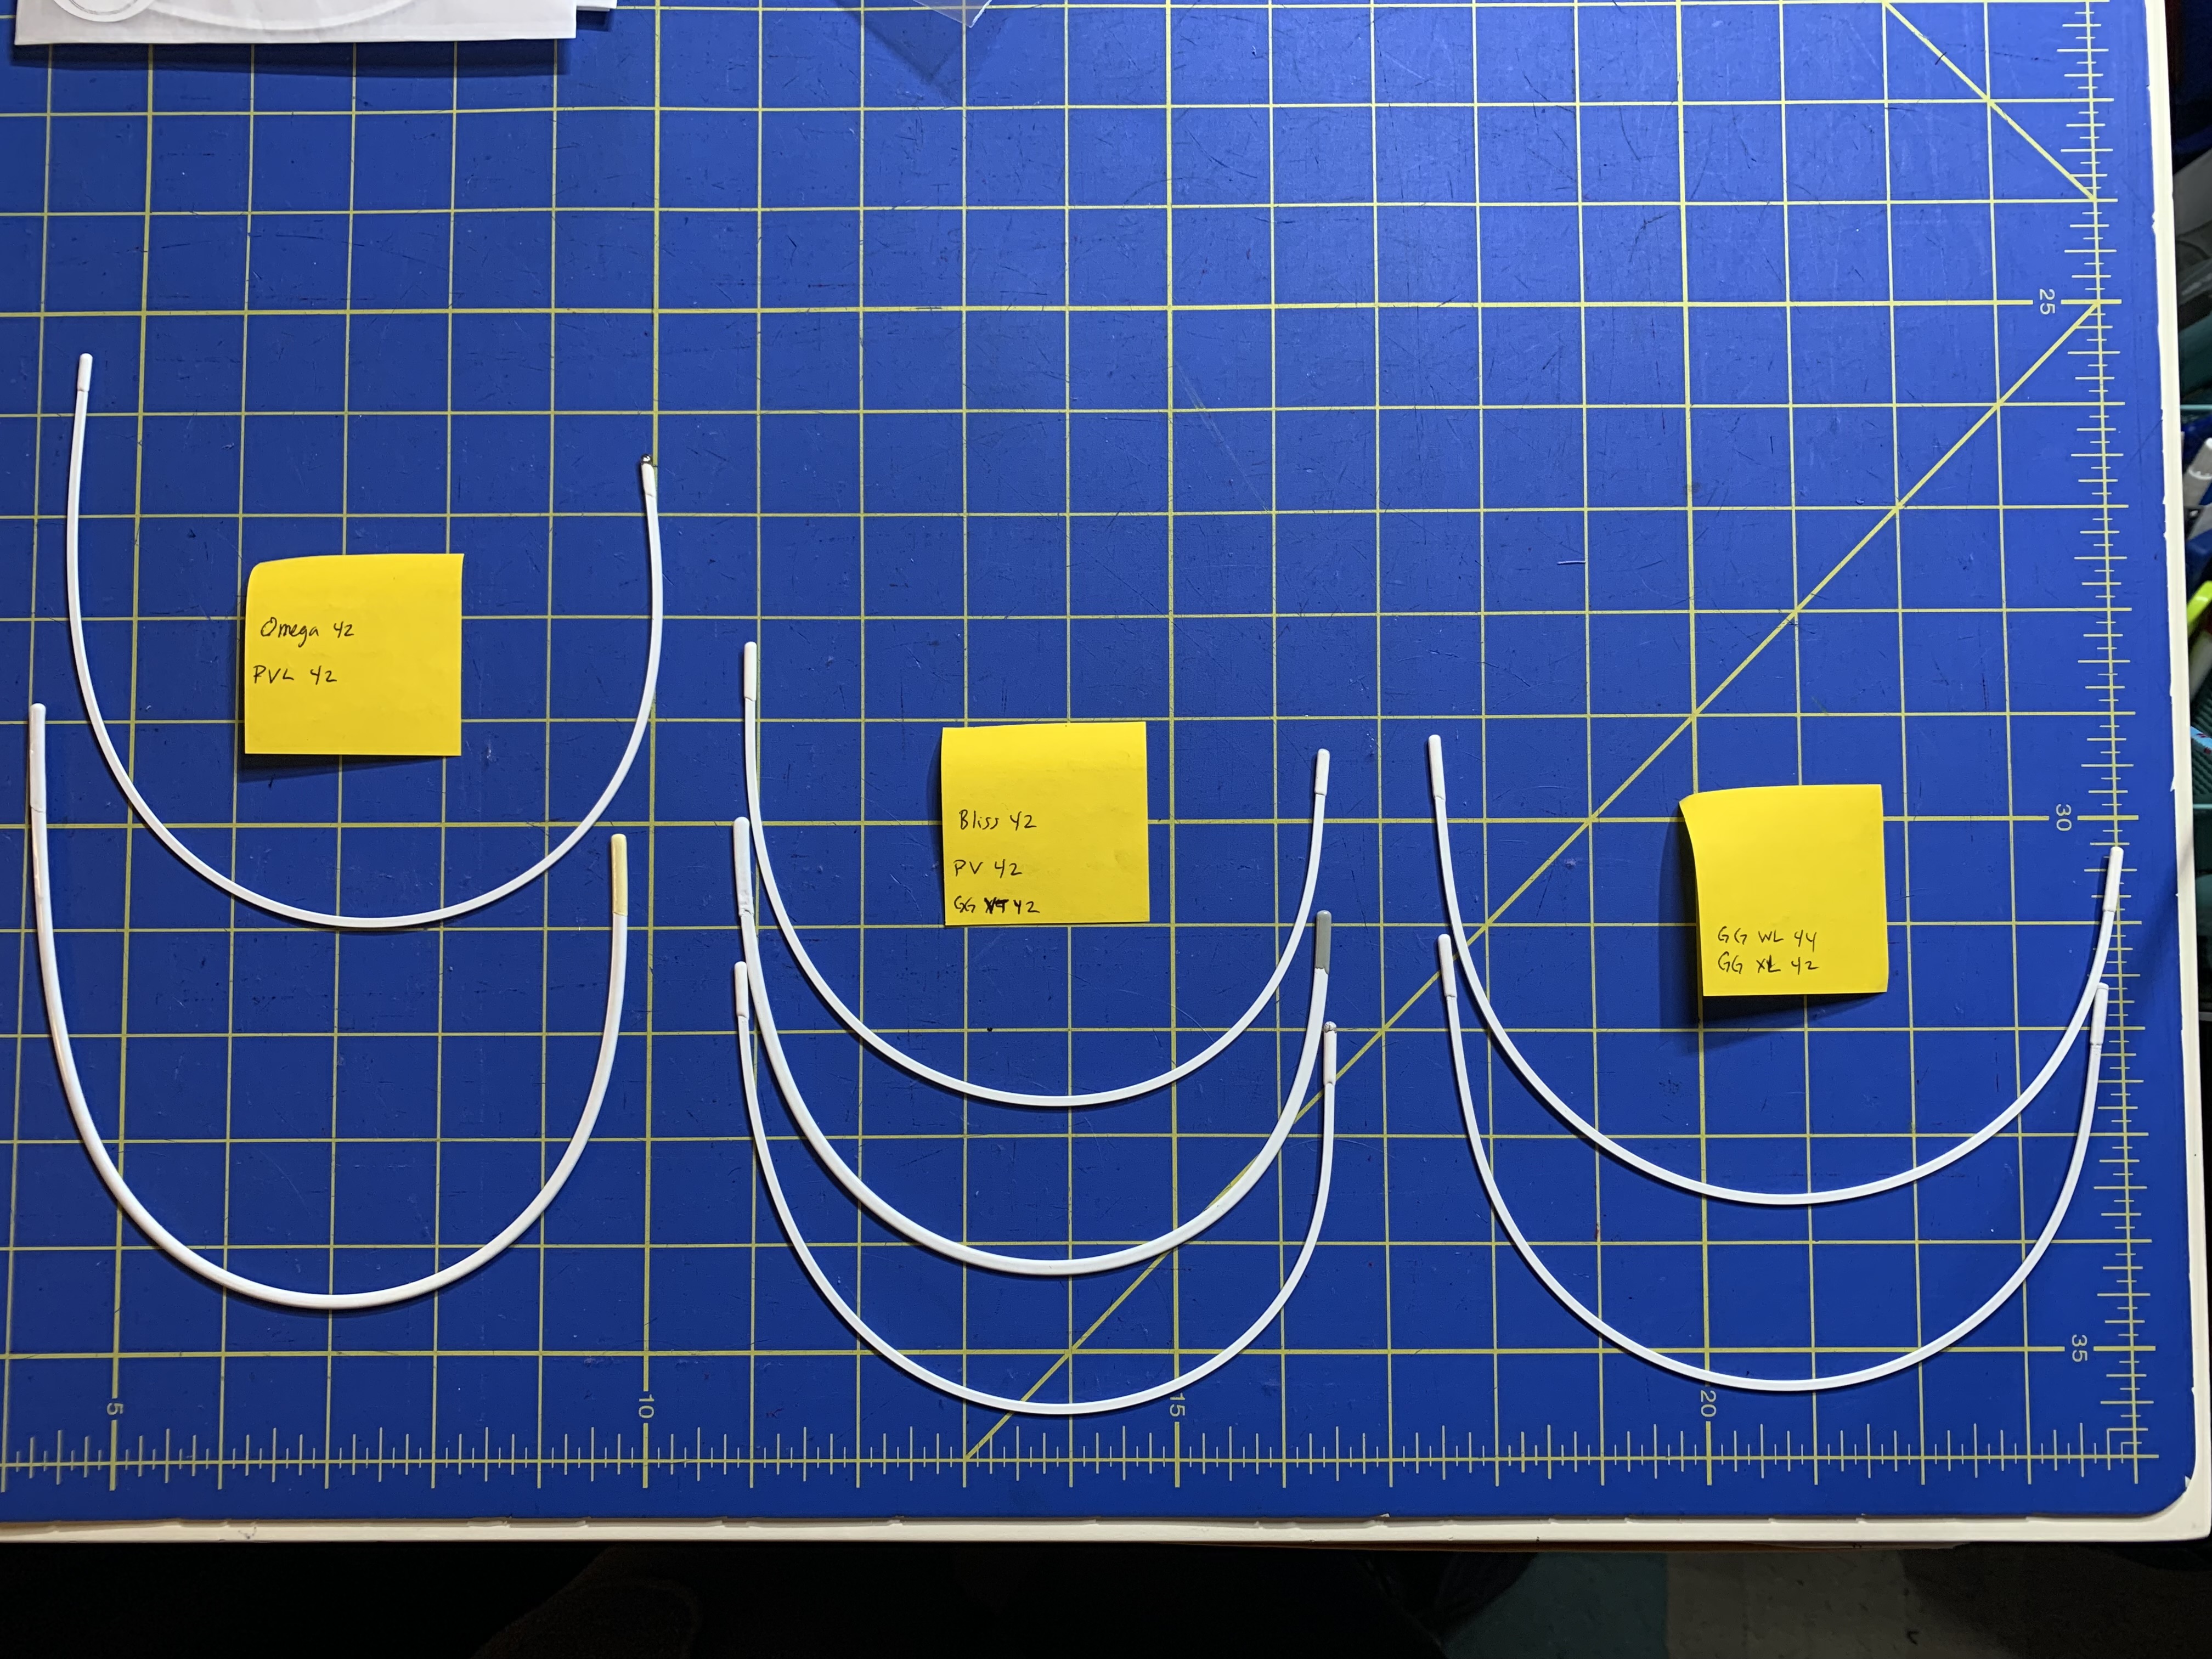
With the BRT in hand, it’s time to look for wires. This is where it can be helpful to start identifying different vendors and downloading wire charts. Some of the vendors I have used in the past are Emerald Erin, Gigi’s Bra Supply, Bra Builders, Bra Makers Supply, Porcelynne, and B,Wear. Make sure to print out the wire charts at 100% scale so that you can compare your sculpted wire BRT to the charts. All vendors will offer wires in different sizes, and most also offer wires in different styles. Depending on the styles of wire and where they are sourced and manufactured, they can have large or small differences between brands. Some of the more common wire styles are Regular, Long, Extra Long, Vertical, and Demi. I have also seen some specialty wires such as Vertical Extra Long, Wide/Flat Bottomed, and Omega, which have some unique shaping to the wires. Some wires have very specific uses (for example, demi style wires would be used for a demi style bra and would not typically be used with a full coverage bra), but some styles can be utilized in different ways, depending on the person. For example, I tend to prefer a vertical wire in my everyday bras, but for others this style is often recommended for strapless bra styles because it offers extra height on the side of the wire compared to a typical regular or “day” style of wire. In addition to the wire shape and size, the wire’s material can also impact fit. Most wires are rigid wires with a fairly standard wire gauge, but Porcelynne offers a heavier gauge of wire and Bra Builders offers a flexible wire option. During fitting, it is advised to use a rigid wire so the fitting band will maintain its shape, so I will continue this article with the assumption that a rigid wire is being utilized, but I will say that many people prefer to use a flexible wire for daily wear after fitting because it can bend into a more comfortable body-hugging formation.
After you’ve compared your BRT to the various wire charts from your preferred vendors, I recommend ordering a selection of a few sizes of wires or a fitting kit. Although the BRT will get you close, I will say that the practical experience of actually fitting and wearing a bra for a few days will give you a much better idea of if you have the right wire or if you want to keep looking. I think most people who go down the path of sewing bras end up with quite a collection of different wire sizes and shapes as they look for “the one”, so planning to order a few options while you are trying to figure out what you like will save you the frustration of waiting for multiple mail parcels to arrive so you can test out different wire sizes. Having the ability to iterate and test our multiple wire sizes is also helpful to arrive at the right wire size for you. And once you figure out your wire size – congrats! This is a major step in fitting and will really help with the next steps of the process.
A Brief Side Tangent into Wire Spring
Before we move on to the next step in fitting, I want to write a brief note on the wire spring. Wire spring is the idea that as the bra is put under tension as it wraps around the body, the wire will be pulled apart or “spring” open. I have watched a lot of fit videos and read a lot of articles on this and it seems to be one of the few contentious topics in bra fitting and pattern drafting. Although everyone agrees as to how the wires should fit (sitting along the IMF on the frontal plane of the body, with the wire sitting in front of and not under or poking into the arm), there are some different schools of thought in terms of when, where, and how much wire spring should or shouldn’t be applied during fitting. One school of thought is that wire spring isn’t really necessary and that leads to fit issues and discomfort by putting too much tension on the wire. It results in weird pressure points because the wire spring added into the pattern is trying to wrap a rigid wire around the torso in a direction it doesn’t want to go and ends up with wires poking into the underarm. Conversely, the opposite school of thought is that the wire spring helps to set the wire into the position it needs to be in so that when the bra is put on the body, the tension will already be accounted for and the wire will sit correctly, thus giving the band the correct amount of tension to sit smoothly on the body.
I will say that I think both things can be true, to some extent, and it really goes back to the body shape analysis from step 1. In a very unscientific analysis of the Fit Clinics presented at the Bra Sewing Bees, the example fit models can be classified into a few different general categories. The first category is a larger narrower cup with a smaller band. I would categorize myself as being a part of this group, so I have a bit more experience with these types of fitting issues. Generally speaking, the overall size and volume of the breast tissue is relatively large when compared against the dimensions of the torso. This means that there really isn’t a lot of body space to spring the wire open on, and often the fit solutions for this category is to remove or reduce wire spring, or to go with a smaller size of wire. The second category tends to be a wider, shallower cup, which may need a wider wire or may need more wire spring to help everything sit correctly on the body. When I drafted a band pattern for my sister, I included a lot more wire spring than I did for myself because she is more towards the second category of general fitting needs, and it seemed to work really well for her.
I bring all of this up in the wire section because, from personal experience, I think that the amount of wire spring in a pattern can drastically impact which wires feel comfortable when fitting a bra. I have made the Cashmerette Willowdale pattern several times, with two different bands: one with wire spring, one without. In the band pattern with a fairly sizable amount of wire spring, I was able to go down to a size 38 Omega wire (from Emerald Erin), but in the band without wire spring I’ve been using a size 44 Vertical wire from Porcelynne because all of the smaller wires felt like they were pinching. This is a pretty big difference in wire sizes! To continue my very unscientific analysis, it seems that the majority of commercially available patterns and RTW bras seem to be drafted with wire spring, though to very different degrees, whereas the pattern drafting manuals I have reviewed have wildly different recommendations for how much wire spring to use, further adding to the… discussion… over this topic.

At this point I am nowhere close to being a “wire spring” expert, nor am I really a proponent of using or not using wire spring. I have been using my self drafted band pattern (with very minimal/no wire spring) for a while, and though it has been giving me a very good fit, I am wondering if the combination of more wire spring with a smaller wire might not help resolve some of the (relatively minor) remaining fit issues I seem to have. This, of course, deserves further exploration in another post, but, all that being said, this is yet another reason why I recommend ordering several sizes of wire for fitting because the pattern itself can also impact the way that wires feel when fitting a bra.
Where to Start with Patterns
Ok, back to the main topic at hand! And we are finally at the fun part – looking for patterns! As much as I think most sewists will agree that, given enough time and effort, any pattern can be altered to fit any body, with bra sewing even very minor changes can have a huge impact on the fit, so sometimes it is best to try and start with a pattern that will set you up more easily for success from the beginning. However, this can require a bit of research, both in terms of the sizing available in a pattern as well as in terms of the body type the pattern designer drafts for, which is not always easy to know. Going back to the resources from the Bra Bee, there were definitely a few recommendations that kept coming up as being a good starting place for different body types. For the small back/large bust/more projected shapes, the Josey Bra, LilyPADesigns patterns, and the Bravo Bra #2 continually come up as solid starting points. For the shallower/wider shapes, the Orange Lingerie line and the Black Beauty Bra by Emerald Erin seemed very popular. The Cashmerette Willowdale and Pin-up Girls patterns seemed to live in a middle space, garnering different recommendations from different presenters with preferences for different body shapes. In the case of Pin-up Girls, these recommendations also seemed to vary quite a bit pattern to pattern. From personal experience, I will add that I would categorize AFI Atelier patterns in the wider/shallower category, whereas the B,Wear patterns seem to be in the rounder/more projected category.
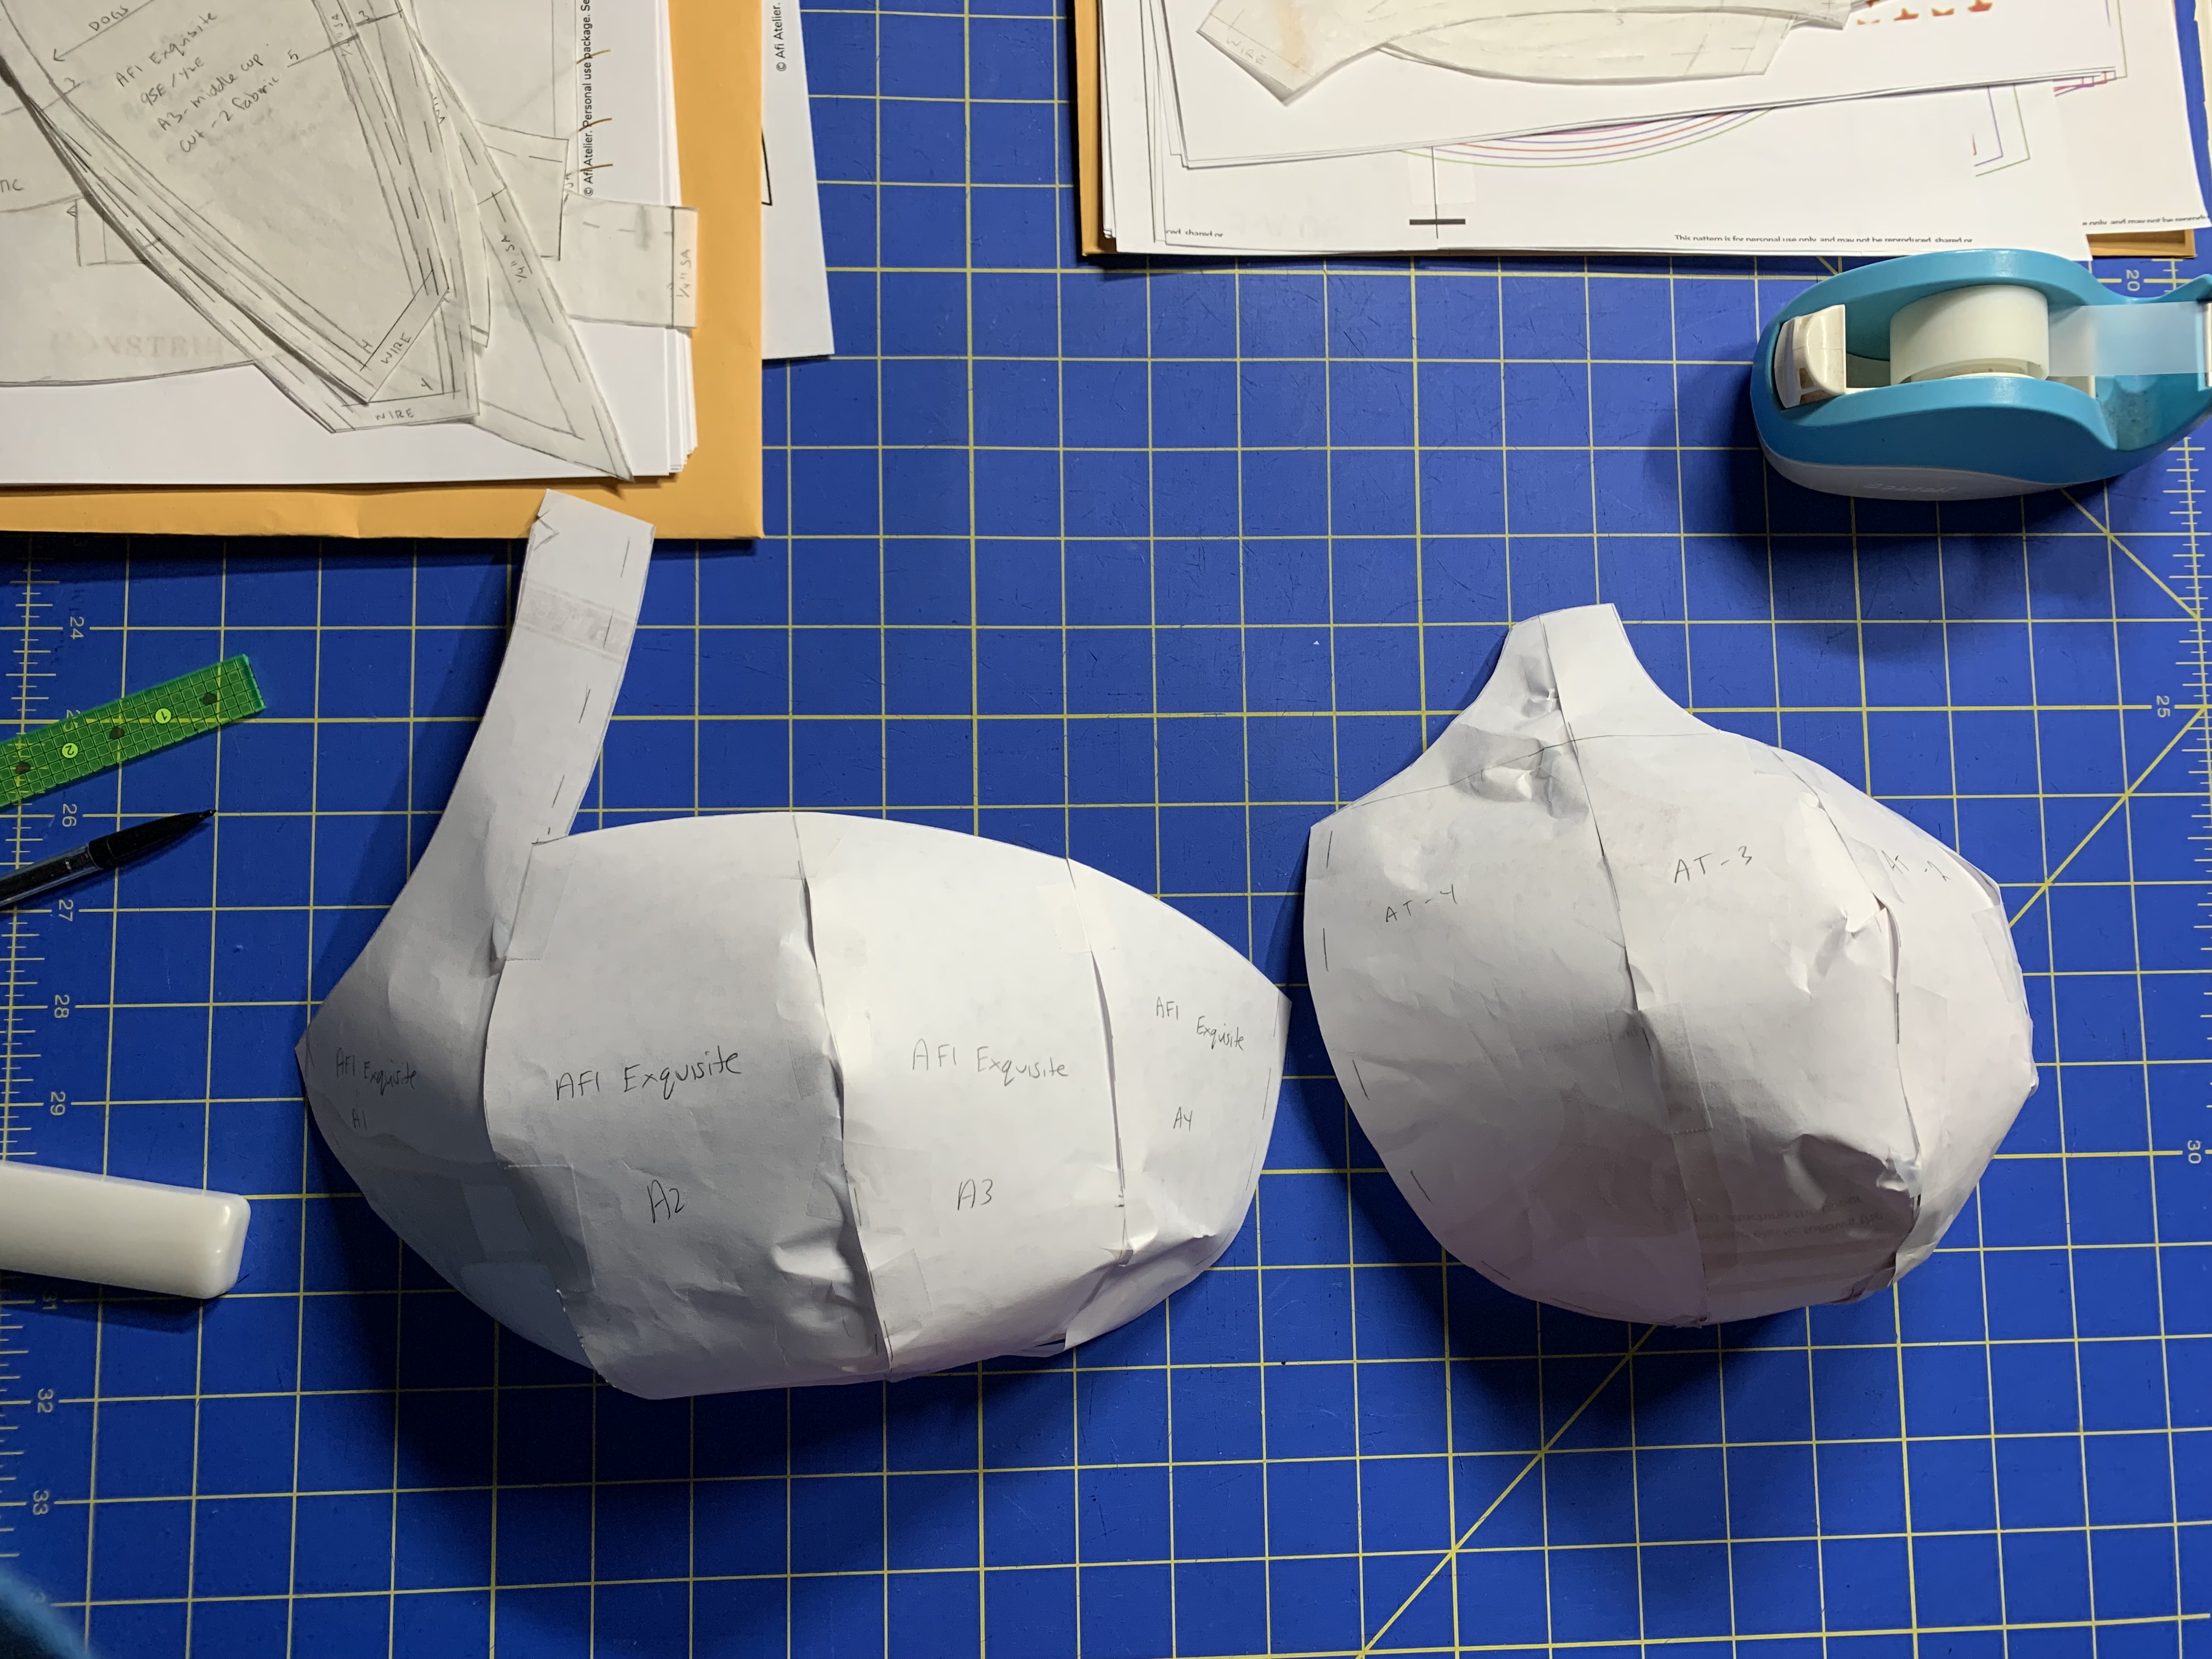
Once you have narrowed down a brand and style to use, the next thing will be to select your size from the pattern. This again goes back to the measurements taken during the first step, but will also depend on the measuring system of the pattern brand. Some brands only use the ratio between the full and under bust measurements, but others also list sizes based on the BCD or HH measurements. The size you select based on measurements can be a good place to start BUT this is also a critical juncture where it is important to compare the wire you selected in the previous step to the pattern itself to see if you might need to select a different starting size and alter the pattern more from there. I plan to do a post on common pattern alterations in the future, so I won’t detail that here, but for this step, the important thing is to make sure that the wire line from the pattern is going to accommodate the wire that was selected to match the BRT in the previous step.
A Brief Side Tangent into the Omega Shape
If you get into bra sewing I think you will find a lot of people in this sewing-sub-genre talking about being omega shaped. It comes from the Greek letter omega, which is narrow at the bottom and bulbous on top. For the breast shape, it also tends to have a very small and narrow root and have a larger circumference as it protrudes away from the chest wall. It is supposed to be a somewhat uncommon breast shape, but it is also harder to fit, so my hypothesis is that there is a higher than normal percentage of people with this breast shape who turn to sewing or buying custom bras. It took me a long time to determine that I have this shape because my breast tissue is very soft, but if you bend over and use your hands to encircle the base of the breast and they have to get farther apart as you slide them away from the body, your shape is probably to some extent omega. This shape can be particularly hard to fit because the wire line tends to be much smaller than the total necessary cup volume, meaning that there needs to be some gathering or clever use of darts and curved seams to get everything to fit properly. Although this is a complex topic that also deserves a separate detailed post, I’m bringing it up at this point because fitting this shape of breast can be extra confusing when picking out a pattern, especially if the wire size is much much smaller than the expected cup volume. I don’t want to get into fit alterations in this post, but I will say that LilyPADesigns has some very helpful blog posts about altering patterns for this type of fit issue if you want to learn more right now.
Where to Start with Sister Sizing
The final topic I want to touch on in this basics of fitting post is the concept of sister sizing and how it relates to choosing the starting point for using cup pattern pieces. Once again, this topic could be it’s own dedicated post, but a basic understanding of the concept can help with selecting starting pattern pieces before diving into more in-depth pattern alterations.
For the purposes of this conversation, we can assume that the breast is roughly cone shaped, just to establish some basic geometry principles. (As a side note, I’ve had my fair share of considering what happens to a spherical chickens in a vacuum, so this approximation really isn’t too bad.) For the shape of a cone, the total volume is proportional to the area of the base of the cone multiplied by the height of the cone. This means that we can arrive at the same mathematical volume of the cone (or breast) by increasing the base and decreasing the height, or by decreasing the base and increasing the height. This concept maps to the idea of the two main categories of breast shapes as discussed earlier – either being shallower and wider (decreased height and increased base) or more projected and narrower (increased height and deceased base).

This idea also ties back into the general bra sizing categories as were discussed in the first part of this post, as the “sister size” is a bra with different dimensions but same total volume. The typical sister sizing conversion is decreasing a cup size for each increase in a band size. For example, the sister sizes for a 36B bra would be 38A = 36B = 34C = 32D = 30E. Clearly, the cup letter (aka projection, or height) increases as the band size (aka base) decreases. Practically speaking, when shopping for RTW, this can yield mixed (or subpar) results, but when selecting a pattern, understanding the concept of fitting a cup to the overall volume, a base level understanding of this concept can be helpful.
When picking a pattern, by this point we have found our wire and selected a cradle based on the wire line and, to some extent, the band length (the band length is one of the easiest adjustments, so it’s not as critical as selecting a band based on the wire line). However, if the necessary cup volume doesn’t match with the cradle size, or if your cups fall just outside of the size range for your particular cradle, using sister sizing can help select an appropriate pattern. If you do have to use sister sizing to select a cup pattern, generally speaking, there are two ways to go about it. The first is to select a pattern that fits into the wire line but may be too small overall, so pattern alterations will need to be made to add volume. The other option is to select a cup pattern with the correct overall volume, but may need alterations to reduce the length of the cup to fit it into the wire line. As with several of the other points made in this post, I plan to take a closer look at common alterations in a different upcoming post, but with this final step, we should at least now have a good starting point to work on fitting a bra!
Where to Get More Information
Although I have utilized a number of different resources in trying to understand fit over the past year, my first real understanding of fit came from many of the classes held at the 2023 International Bra Sewing Bee. Happily, I have been able to partner with them in creating this post, and was provided access to some additional class materials from previous Bees as part of the research for this “Figuring Out Fit” blog series. I found last year’s Bra Bee to be an invaluable and inspirational experience, and I highly recommend it to anyone who has an interest in sewing lingerie and has the opportunity to participate.
For those unfamiliar with the Bra Bee, here is some background information:
In 2019, Sue, the owner of Bra Builders, was traveling from a sewing conference across the country to her home in Wisconsin. Though she had an amazing time connecting with people who shared her passion, it was hard to justify the time away from home and the expense for her business. She thought “there has to be a better way,” and with that thought, the idea of the Bra Bee was born. Early in 2020, she decided to put some feelers out into the bra making community, and by spring she had teamed up with her daughter, Emma, to take that little idea to a big reality!
Three years later, and the initial thought has grown into the International Bra Sewing Bee, with thousands of attendees and dozens of instructors from all over the world annually! This entirely virtual conference offers everything from live classes, panel discussions, sew-alongs, a meet n’ greet space, a mentorship program, and access to an inspiring online community of fellow makers. For the 2024 event, the Bee is excited to have many returning teachers and professionals on the team who are eager to share their sewing smarts. The Bee team is also launching a new community platform called The Hive.
The Hive is a members only platform for all the bra sewists around the world. If you’ve ever wanted a group of friends who are into bra sewing they are waiting for you right here! The community is both organized and private so all photos, discussions and questions stay safe. It’s a dedicated space to get help, chat about your fabric stash, show off your makes, find new friends with similar lingerie aesthetics and have dedicated spaces to talk about all the projects and patterns the community has made together.
The 2024 Conference runs April 13th – May 18th with a live classes day on April 27th 2024. The Conference is going to be focused on getting your perfect fit, starting with your fitting band. There is also a Beginner Bee starting on March 30, focusing on sewing the Sahaara pattern as a first bra. You can learn more and sign up at brasewingbee.com.
I have already signed up for the 2024 conference and have been active in The Hive – and it is awesome! I feel like I have already found some great tips, tricks, and resources from other members, and I’m so excited for the conference to start. I’m also excited for the next post in this “Figuring Out Fit” series, so come back to the blog in a few weeks for Part 2, where we are going to look at how to diagnose common fit issues!

… sorry?
LikeLike
It’s a physics joke. A lot of times objects are approximated as spheres with the assumption that you can ignore air resistance to make the math easier.
LikeLike
I am really, really considering joining you at the Bee! I see the schedule mostly has classes on Saturdays. I am working full time and am worried about falling behind. What was your experience? Thank you! L
LikeLiked by 1 person
This year it is set up a bit different than last year. Last year I signed up pretty late and I didn’t even sew during the Bee (it was a 4 day conference so I just watched videos the whole time). This year it feels like things will be more spread out, with the sew-alongs happening over a longer period of time, and just one day of all the in person content. Last year I did buy the year long access (this year is set up a bit different in that regard as well), and I will say I have gone back and re-watched a lot of videos over the past few months, so I feel like it was a great value. I made I think 3-4 things that were part of last year’s sew alongs, but all after the fact. Since this year is more condensed in terms of topics, I’m hoping to actually be able to sew along a bit. I will say, though, that I also have to work full time and I have several trips planned in April, so I totally get it. However, I also think that sewing lingerie is actually pretty fast (aside from fitting – that takes a while and several tries) but it’s the kind of project that is easy to break up in chunks and work on a little bit at a time. I also think the Bee is worth trying at least once – the first year was overwhelming but in a good way, so I knew I wanted to go back this year because it was such a fun experience. Already this year I am enjoying the interactions on The Hive, and I’m looking forward to some of the bonus content that is starting to get released soon.
LikeLike
Thank you so much for a thoughtful reply. This is incredibly helpful and I will think on it some more. I took Beverly Johnson’s bra-making course in Hamilton, ON a few years ago. I completed a bra, started another, and haven’t returned to it since. My weight has changed, so the original bra draft doesn’t fit as nicely (too tight). I’m interested in how to re-fit myself and make more bras. Thank you again! L (You sew, girl!)
LikeLiked by 1 person
For the B Wear patterns, do you think they are designed with wire spring? They don’t give a cradle diagram like LilyPADesigns patterns, so I’m a bit stumped on which frame I should pick. I have a wire size I like (either 36 or 38 from BraMakery), but I feel like I could put either of those wires in SO many different frame sizes and produce many different results! I noticed you were fitting a 44 vertical from Porcelynne into a 90A frame for B Wear patterns from another post. That would make it seem like 0 wire spring, right? I’m just trying to limit how many times I have to try different frame sizes for Angie’s Twin LOLOL. Any help or thoughts are appreciated! I really only have experience with Lusamine & Labellum from LilyPADesigns, this will be my first new brand (outside of the Orange Lingerie Marlborough which I’ve given up on).
LikeLike
I think they might have minimal spring (like 1cm) but they definitely don’t have as much spring as LilyPADesigns or PUG patterns. I’ve mostly fit their cups in self drafted band patterns – I was doing without spring but now I want to go back and fit them in my frame with spring.
LikeLike