September came and went with grand plans of entering the Pattern Review Mini Wardrobe contest fizzling out after many hours of pattern fitting muslins and resulting in only one knit shirt. October started with slightly less grandiose plans of completing just one pair of trousers in time for the Pattern Review Skills contest. I thought I had started on the right track, but again, most of the month was spent fussing with trouser toiles. The eve of October 31 came, and my pants were nearly but not quite done. Certainly there was no chance of taking quality photos, I didn’t have the start of a review, and I also had pre-existing commitments that I would have to cancel to finish on time. Plus, the idea of rushing the last two steps (hems and the waistband finishing) really didn’t appeal after taking such care with all of the steps (and stripe matching!) up to that point. So, I decided to let my hopes of entering the contest go.
I will admit that I definitely had a solid 30 minutes feeling overwhelming shame and guilt when I realized I wasn’t going to make it. Shame because I couldn’t finish the project “on time,” even though the only real deadlines were my own (I hadn’t even properly registered for the contest, so there really was no obligation at all) and guilt because I felt that I had “wasted” my weekend trying to finish the pants for the contest when I “should” have been working on things for my other life and work obligations. Of course, after calming down a bit, I have to admit this all is nonsense. I had planned enough time for my other obligations to get things done on time if I worked on them the next few weeks, and the reality is that attending to those things first had pushed back the construction of the trousers to begin with, which is part of why I didn’t finish “on time.” And really, the goal of all of this was just to have a suitable pair of trousers to wear, which of course I would end up with because I was so close to being done that I would finish them anyway!
So, I’ve started thinking about these as the “better late than never” trousers. Partly because having them done not in time for the contest is very much a “better late than never” situation, but also because this fabric is from super deep stash – it’s a PLR (poly-rayon-lycra) from Jo-Ann circa 2011 (back even before I started blogging). At the time I had envisioned using a similar wide-legged Vogue pattern (this was before I was fully into Burda and long before I started hunting down back issues on EBay). So, really, it’s been a decade-long process to get these pants into production, but in this case I think it is definitely better late than never.
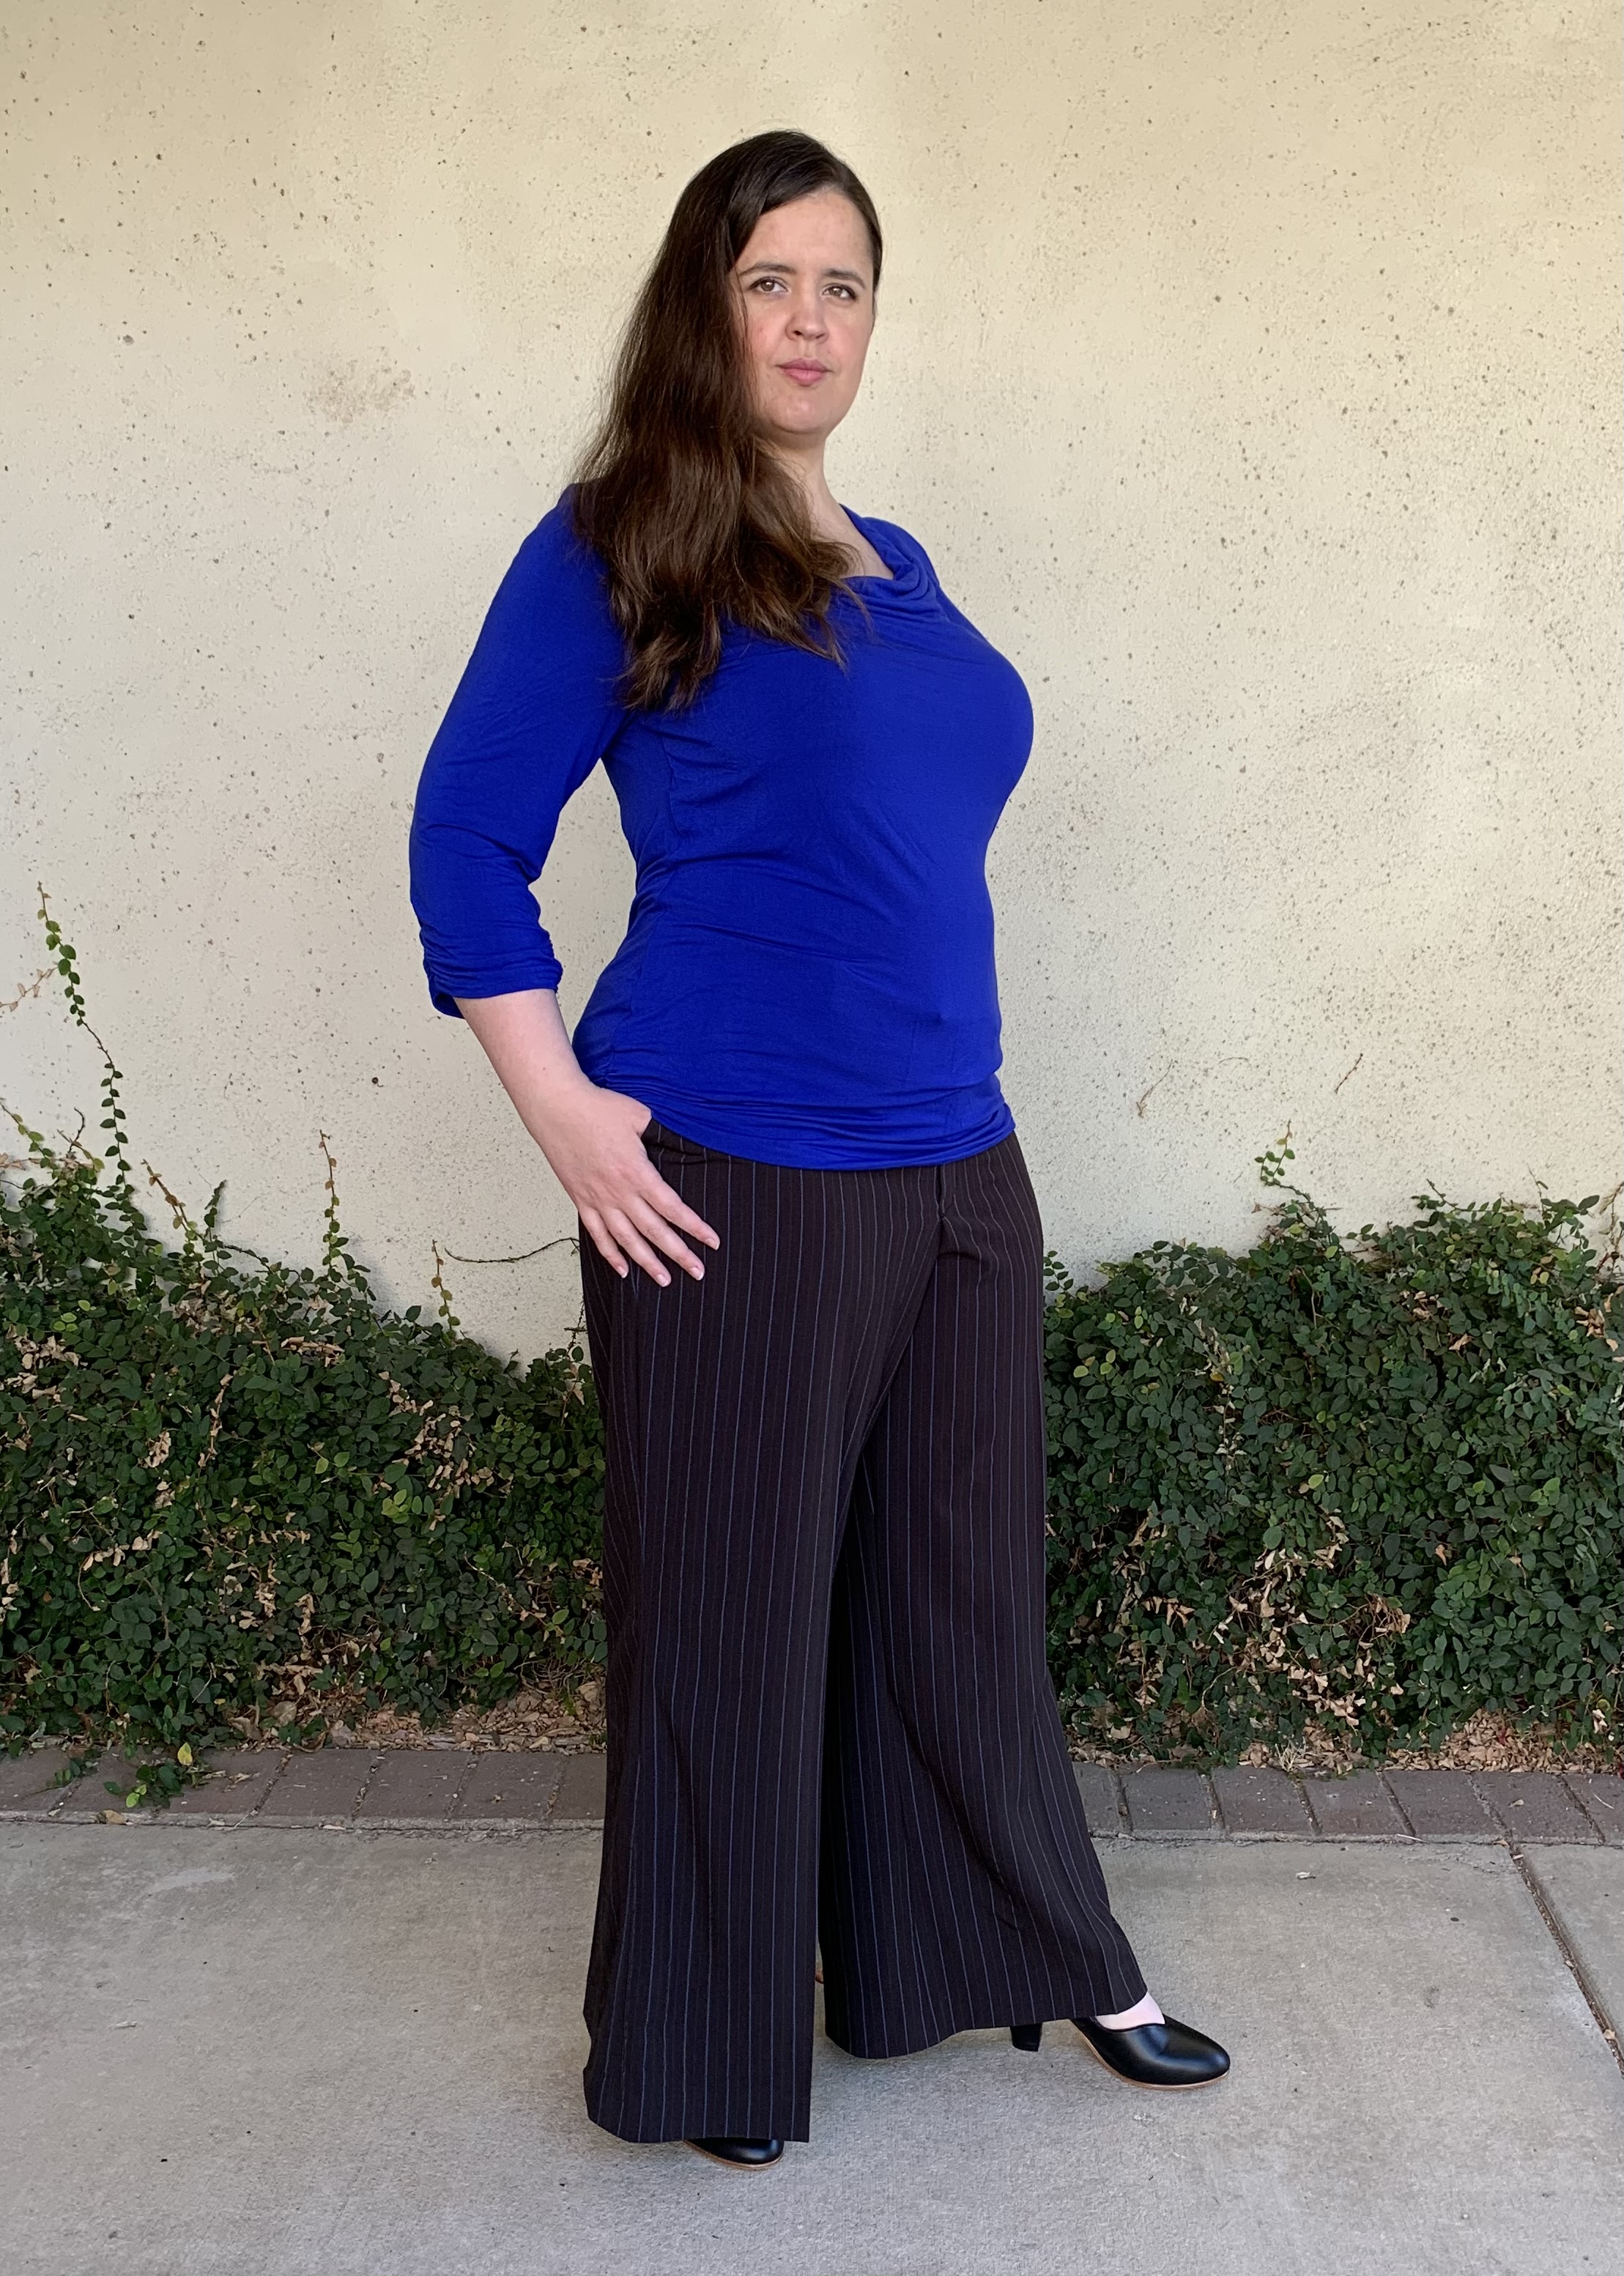
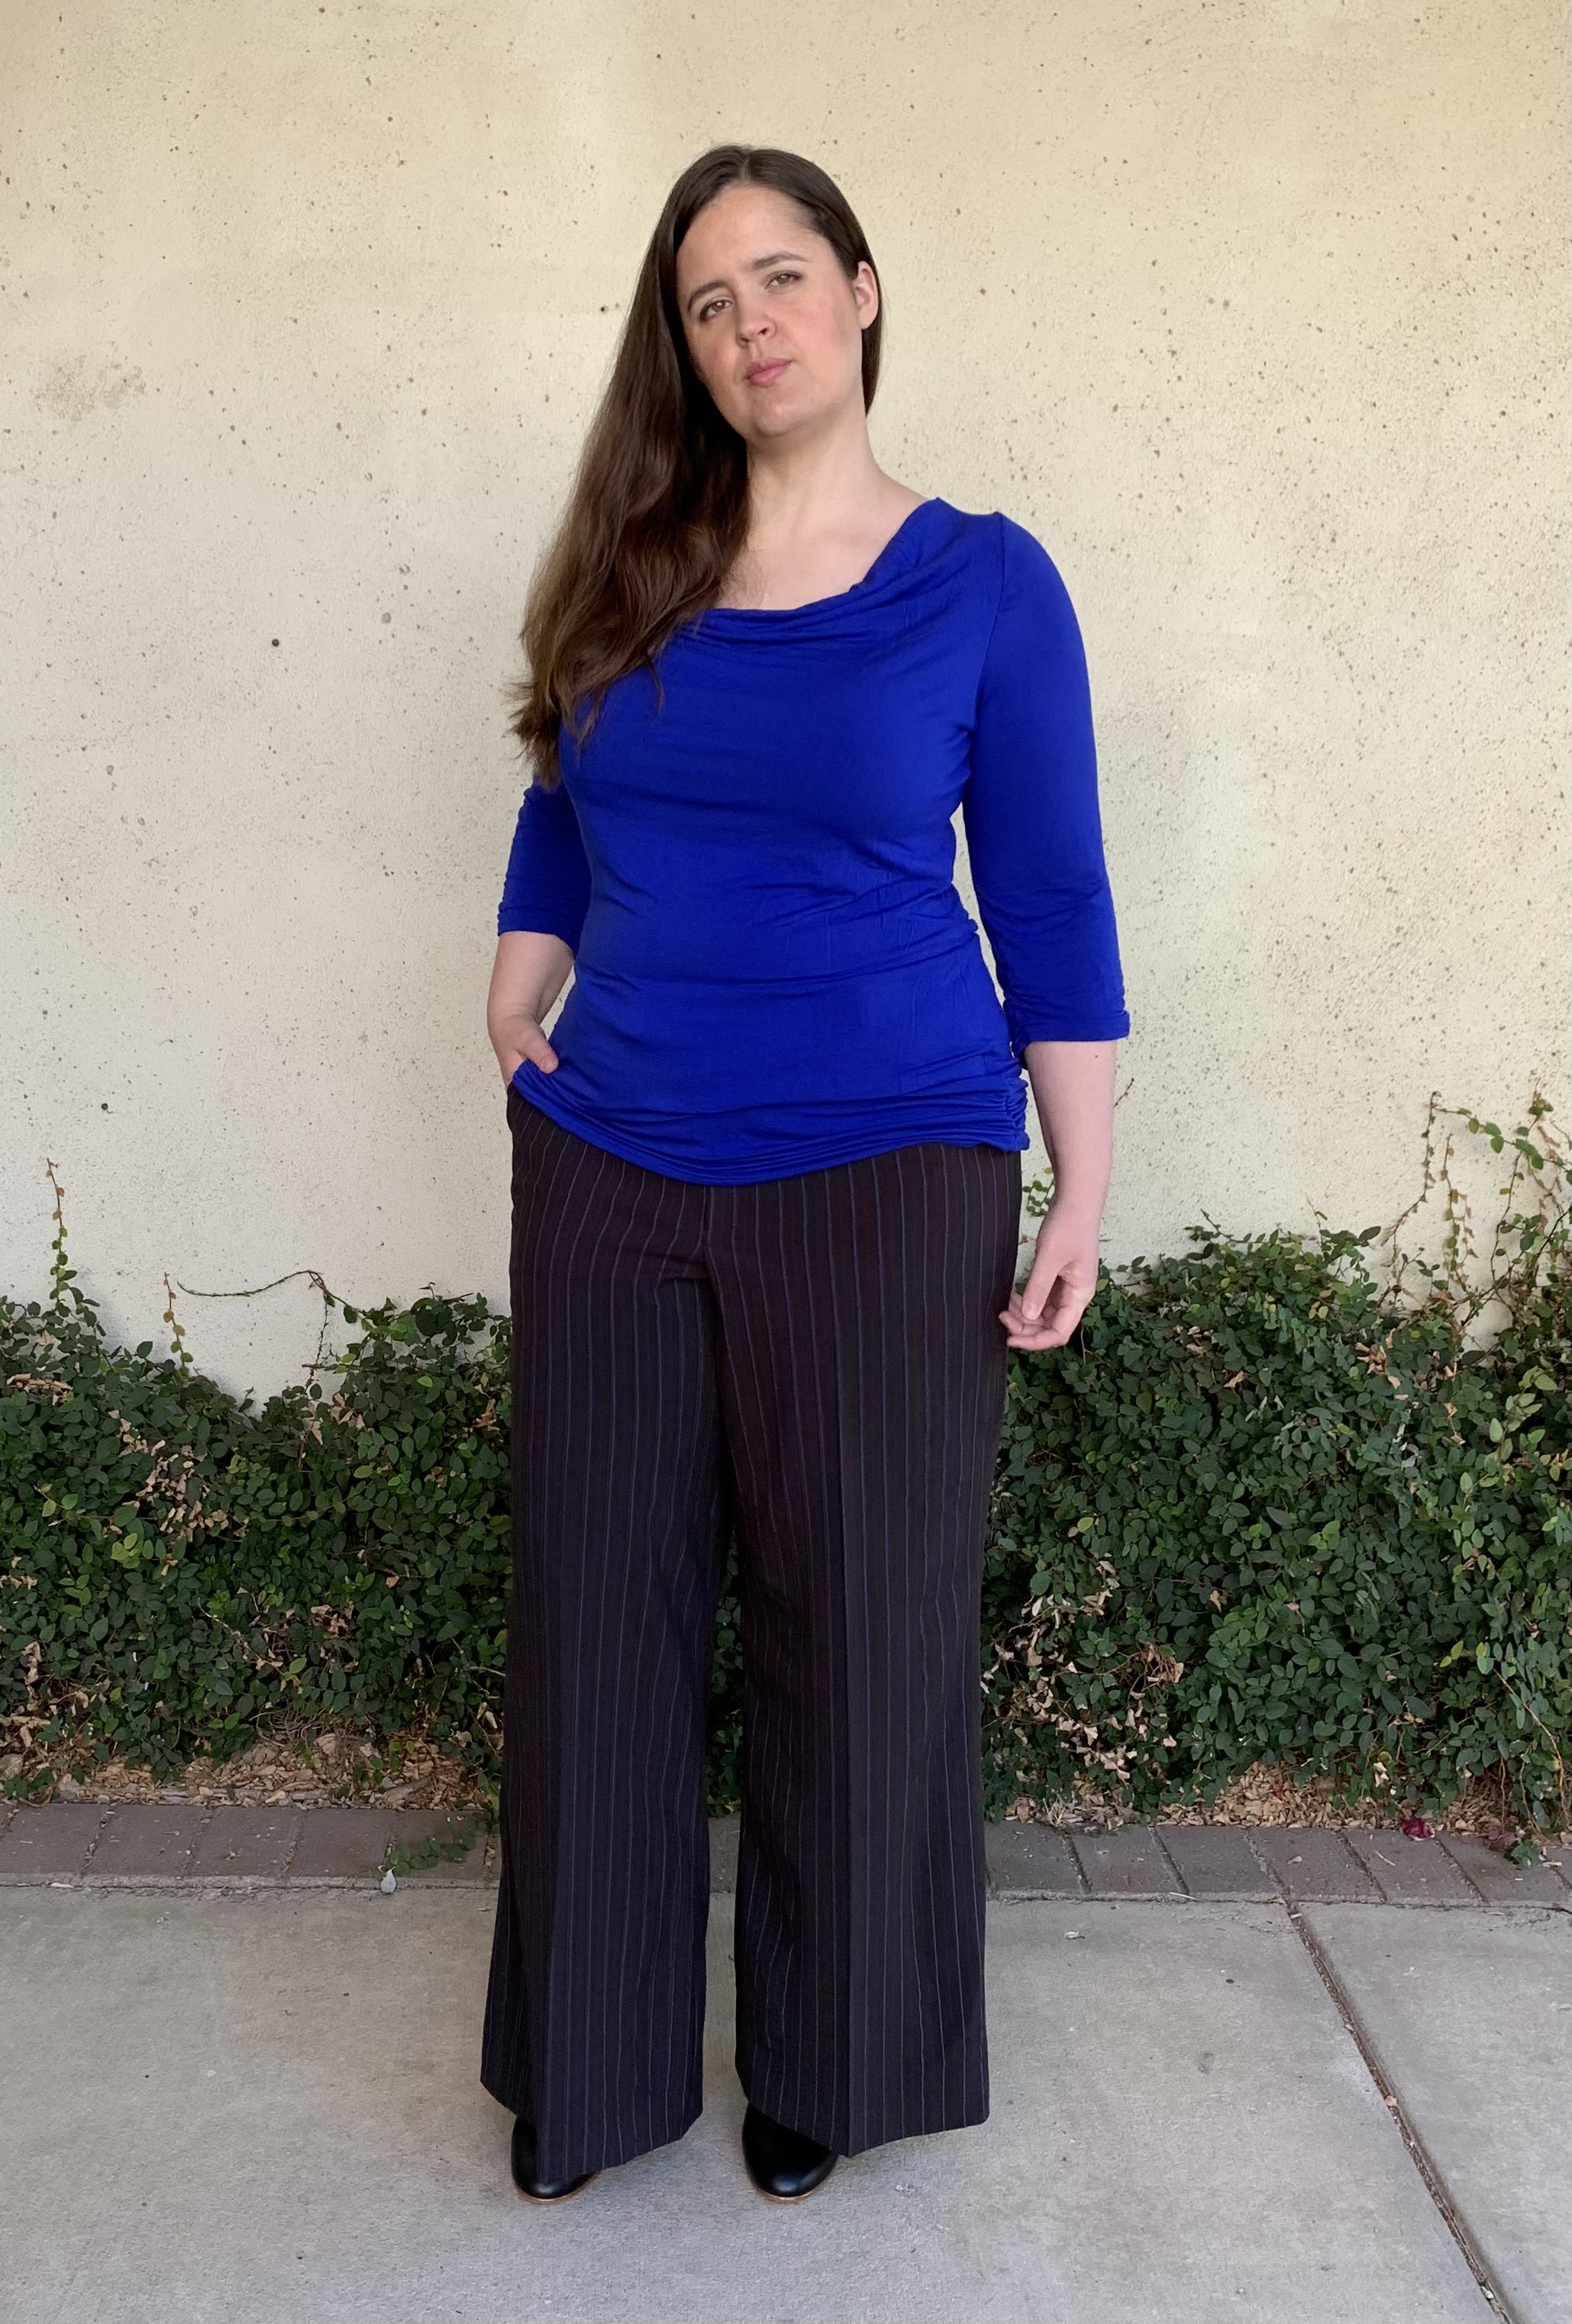
Here is a look at my pants:
This would have been one of my mini-wardrobe outfits from my September plans. I’m not sure if I’ll finish the others any time soon (I want to go back to my original mini-wardrobe plan), but I really like the way this outfit turned out at least.


Here’s a look at the waistband. I’ll probably not be tucking in my tops, but I think it’s helpful to see proportions.


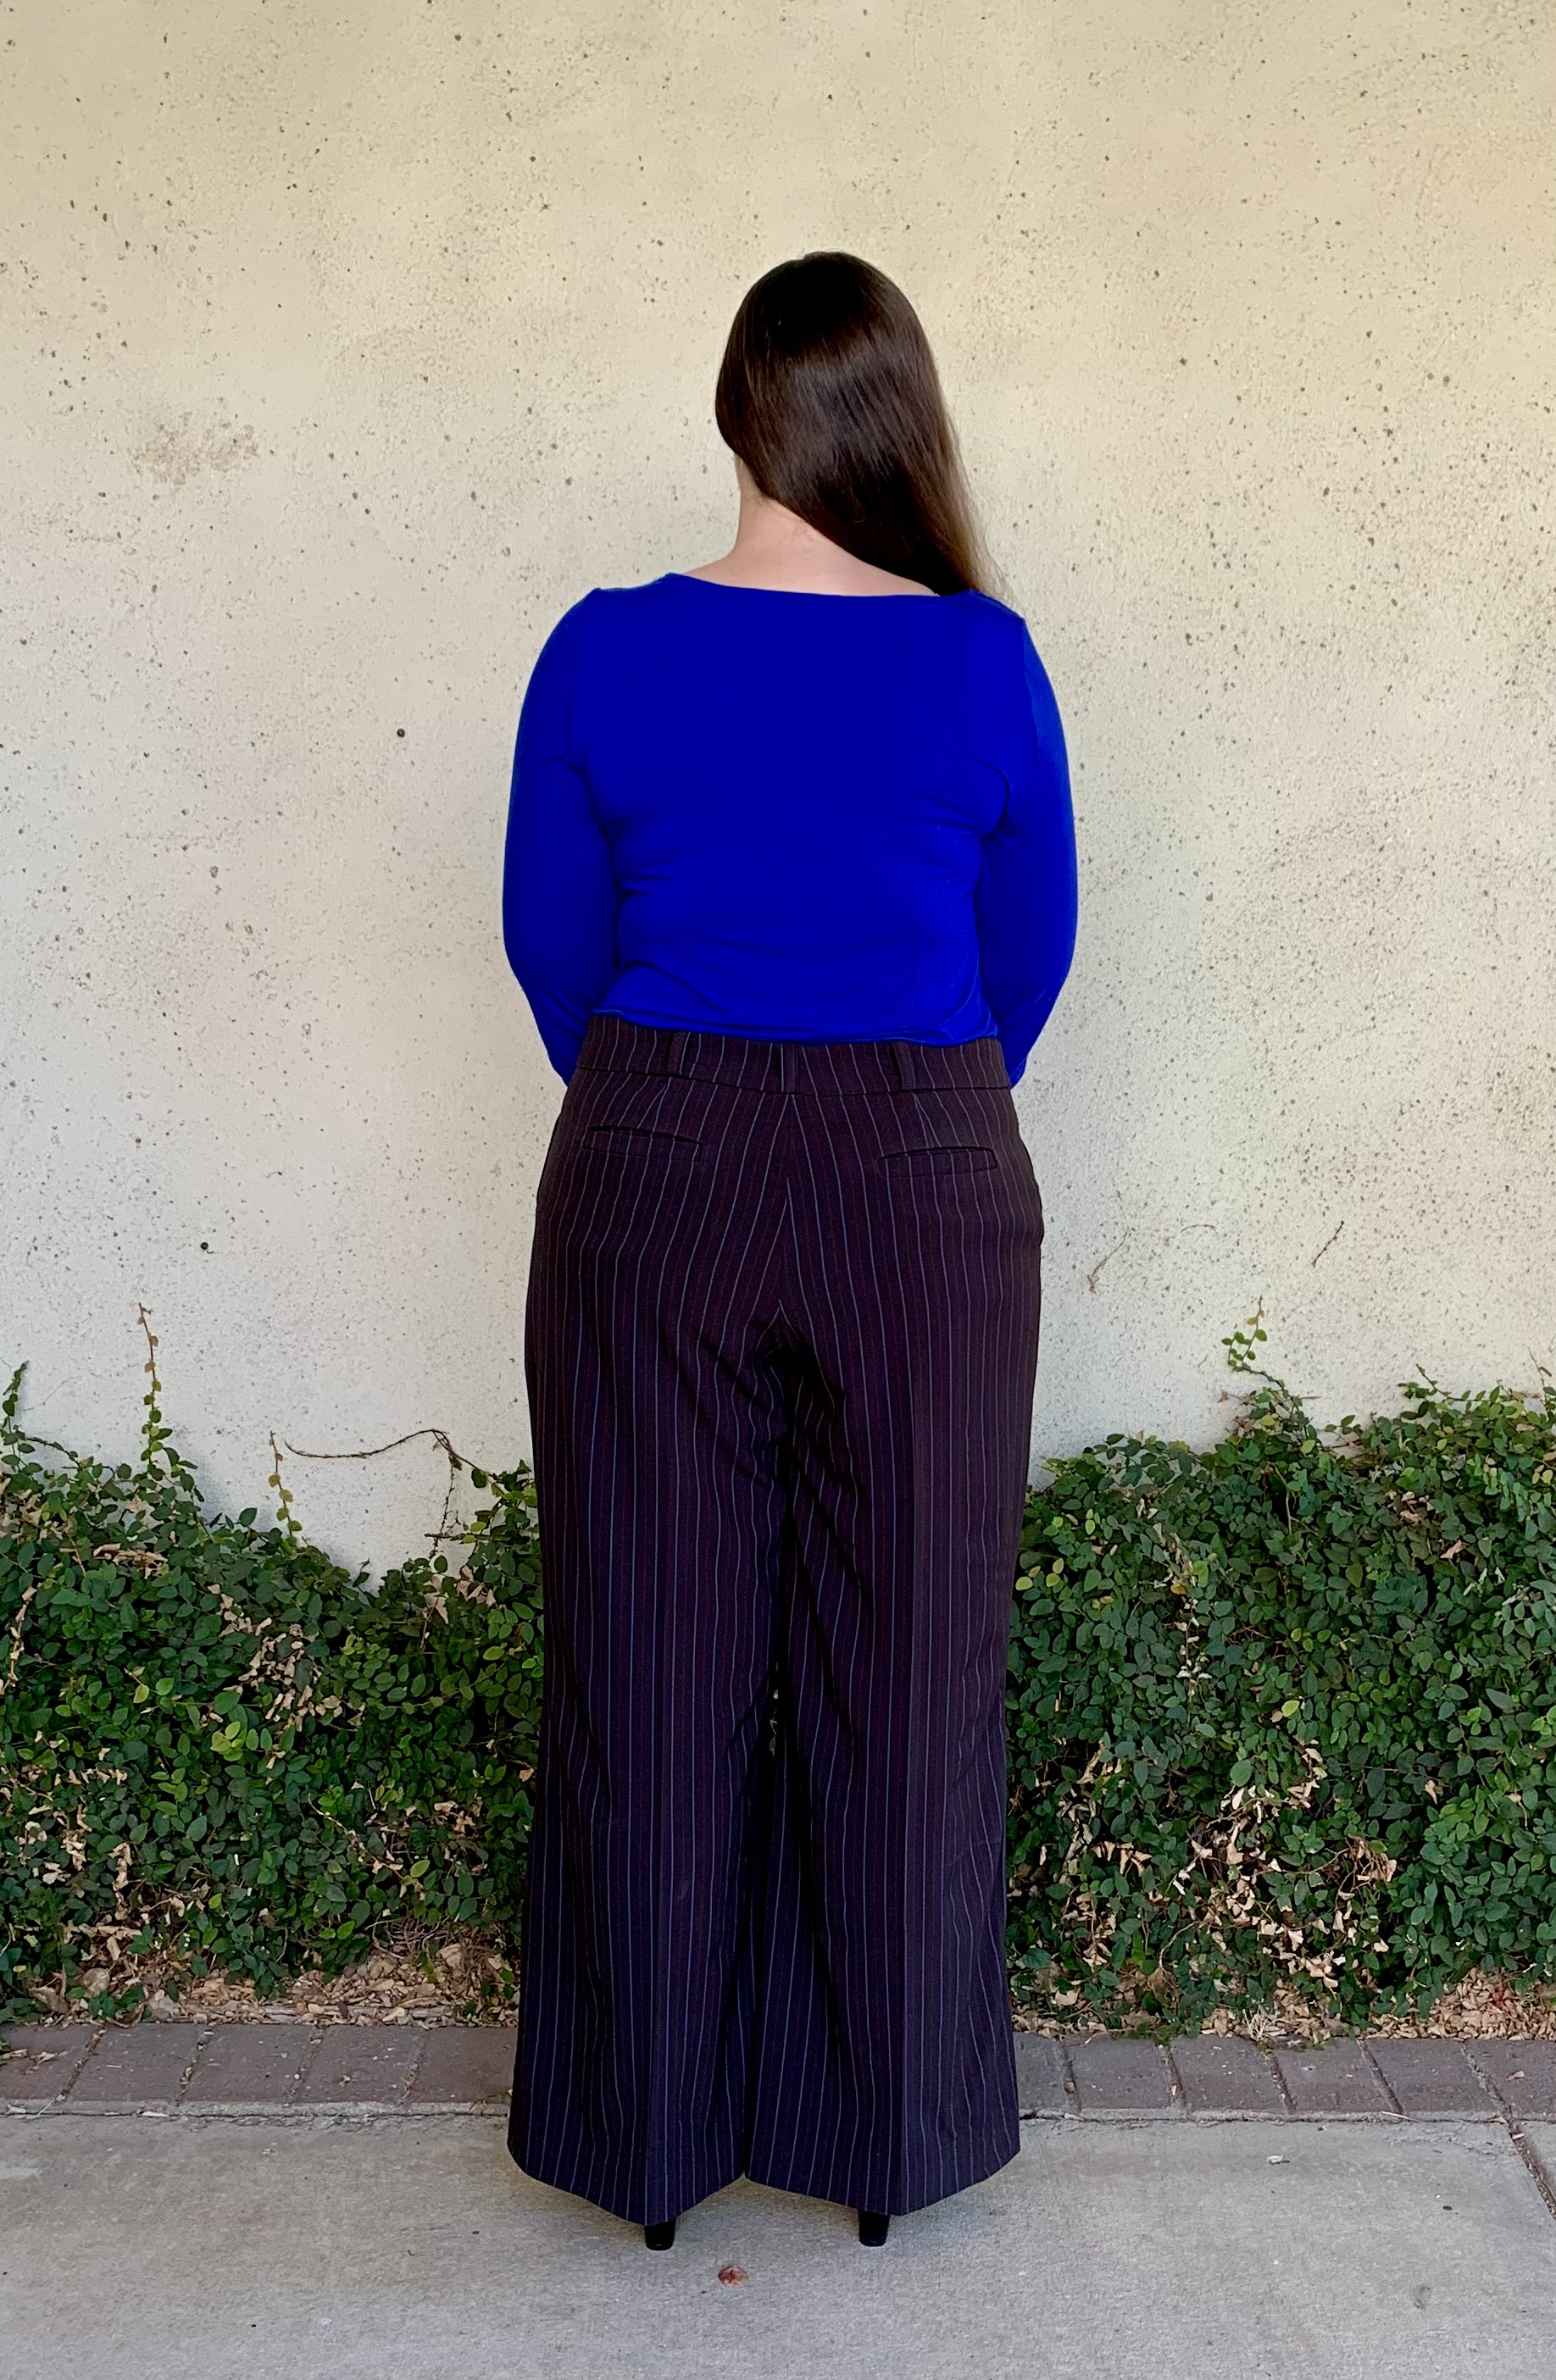
I’m really happy with how the back welt pockets turned out, as well as with the stripe matching on a lot of the major seams.
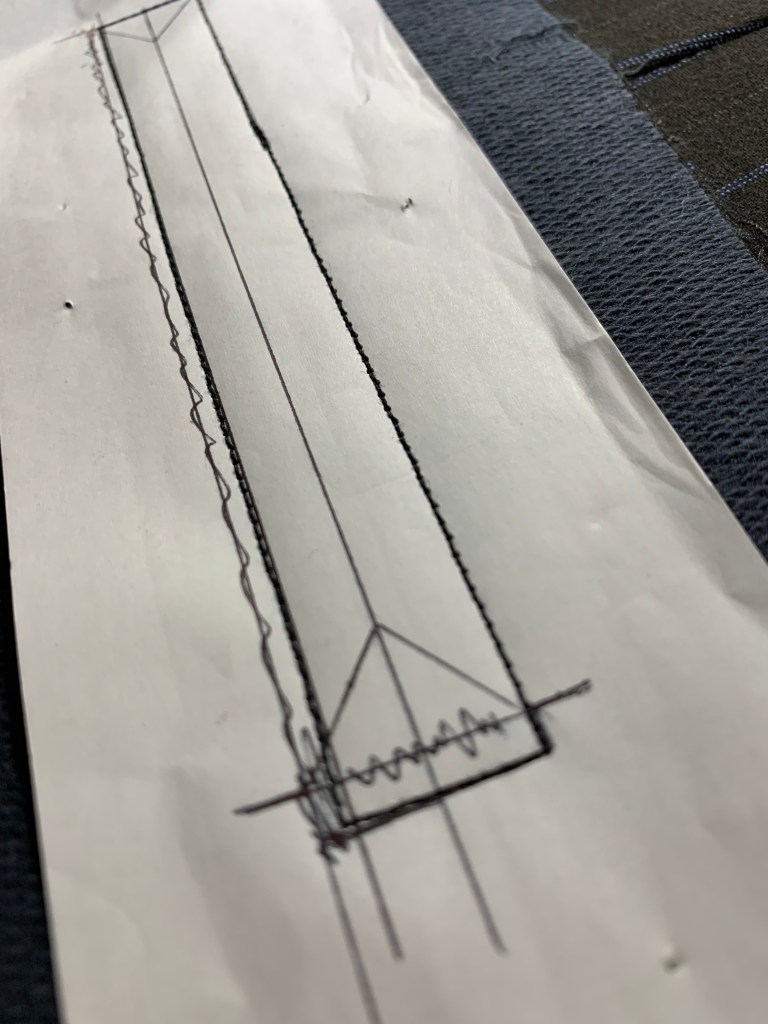
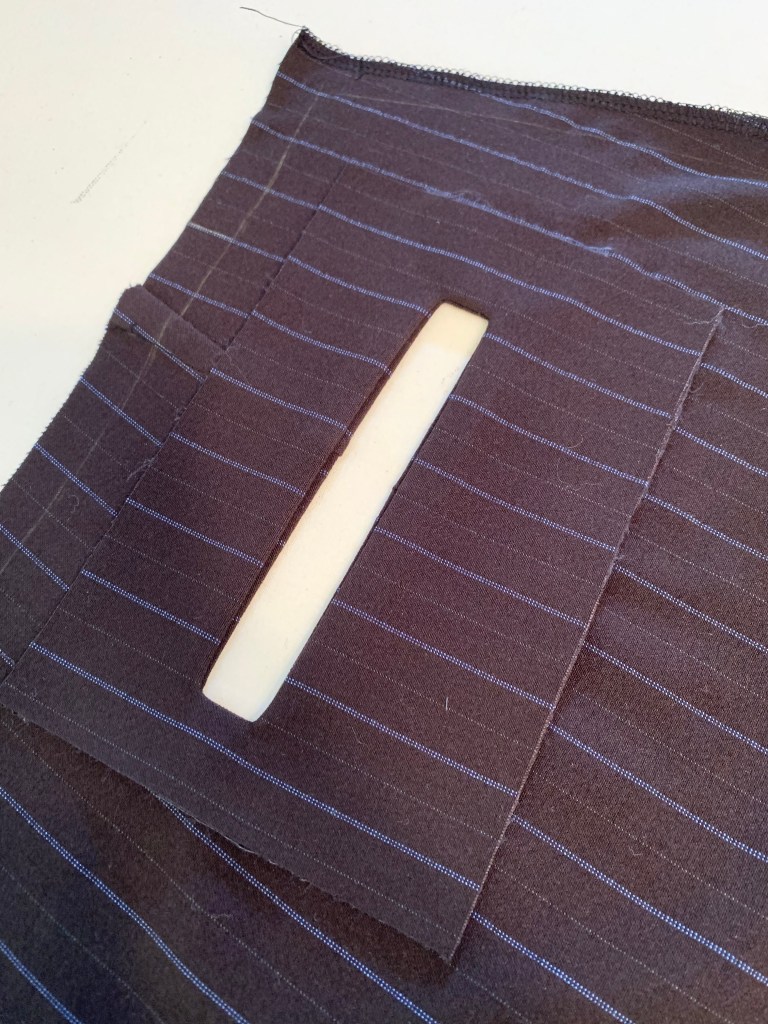

I followed the Welt Pocket instructions in Barbra Emodi’s new book – I’m really pleased with the results! Her tip about making a stitching template was genius, and I combined it with a Kenneth King tip about using “ticker tape” – it really is the best tear away solution aside from perhaps using actual tear-away stabilizer, and the welt opening was so precise.
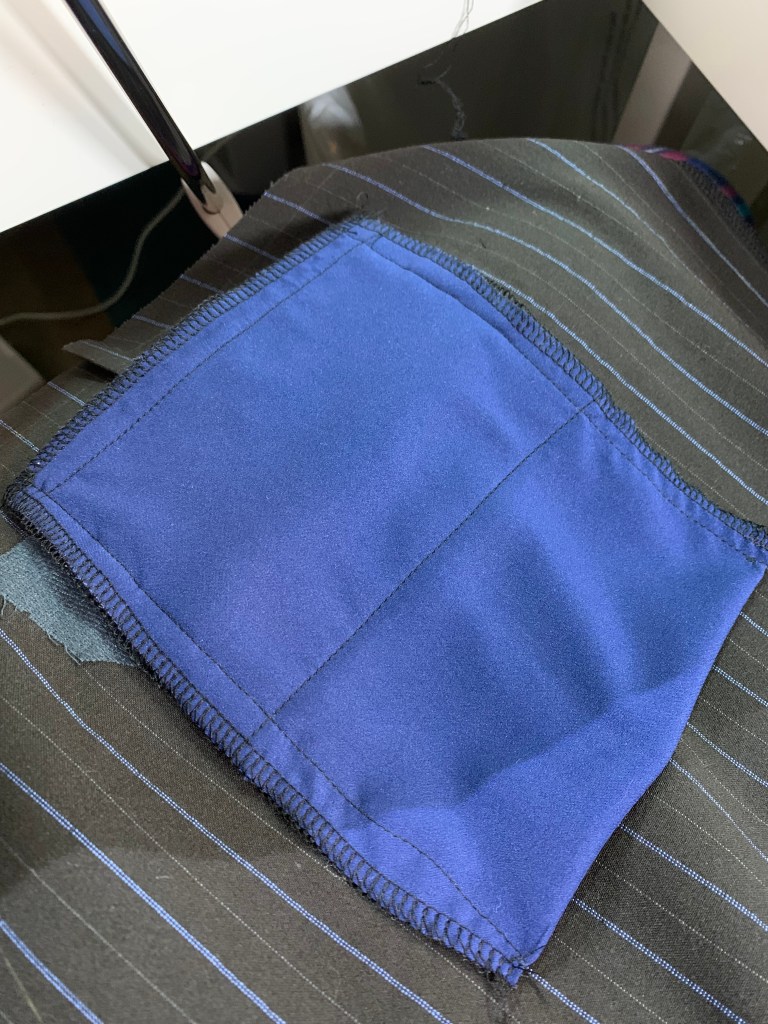


I took a lot of care with the pockets. I even basted! That’s how you know things got serious in the sewing space. Because this fabric is super stretchy, I also have loads of interfacing everywhere, but especially on the pockets and fly openings.


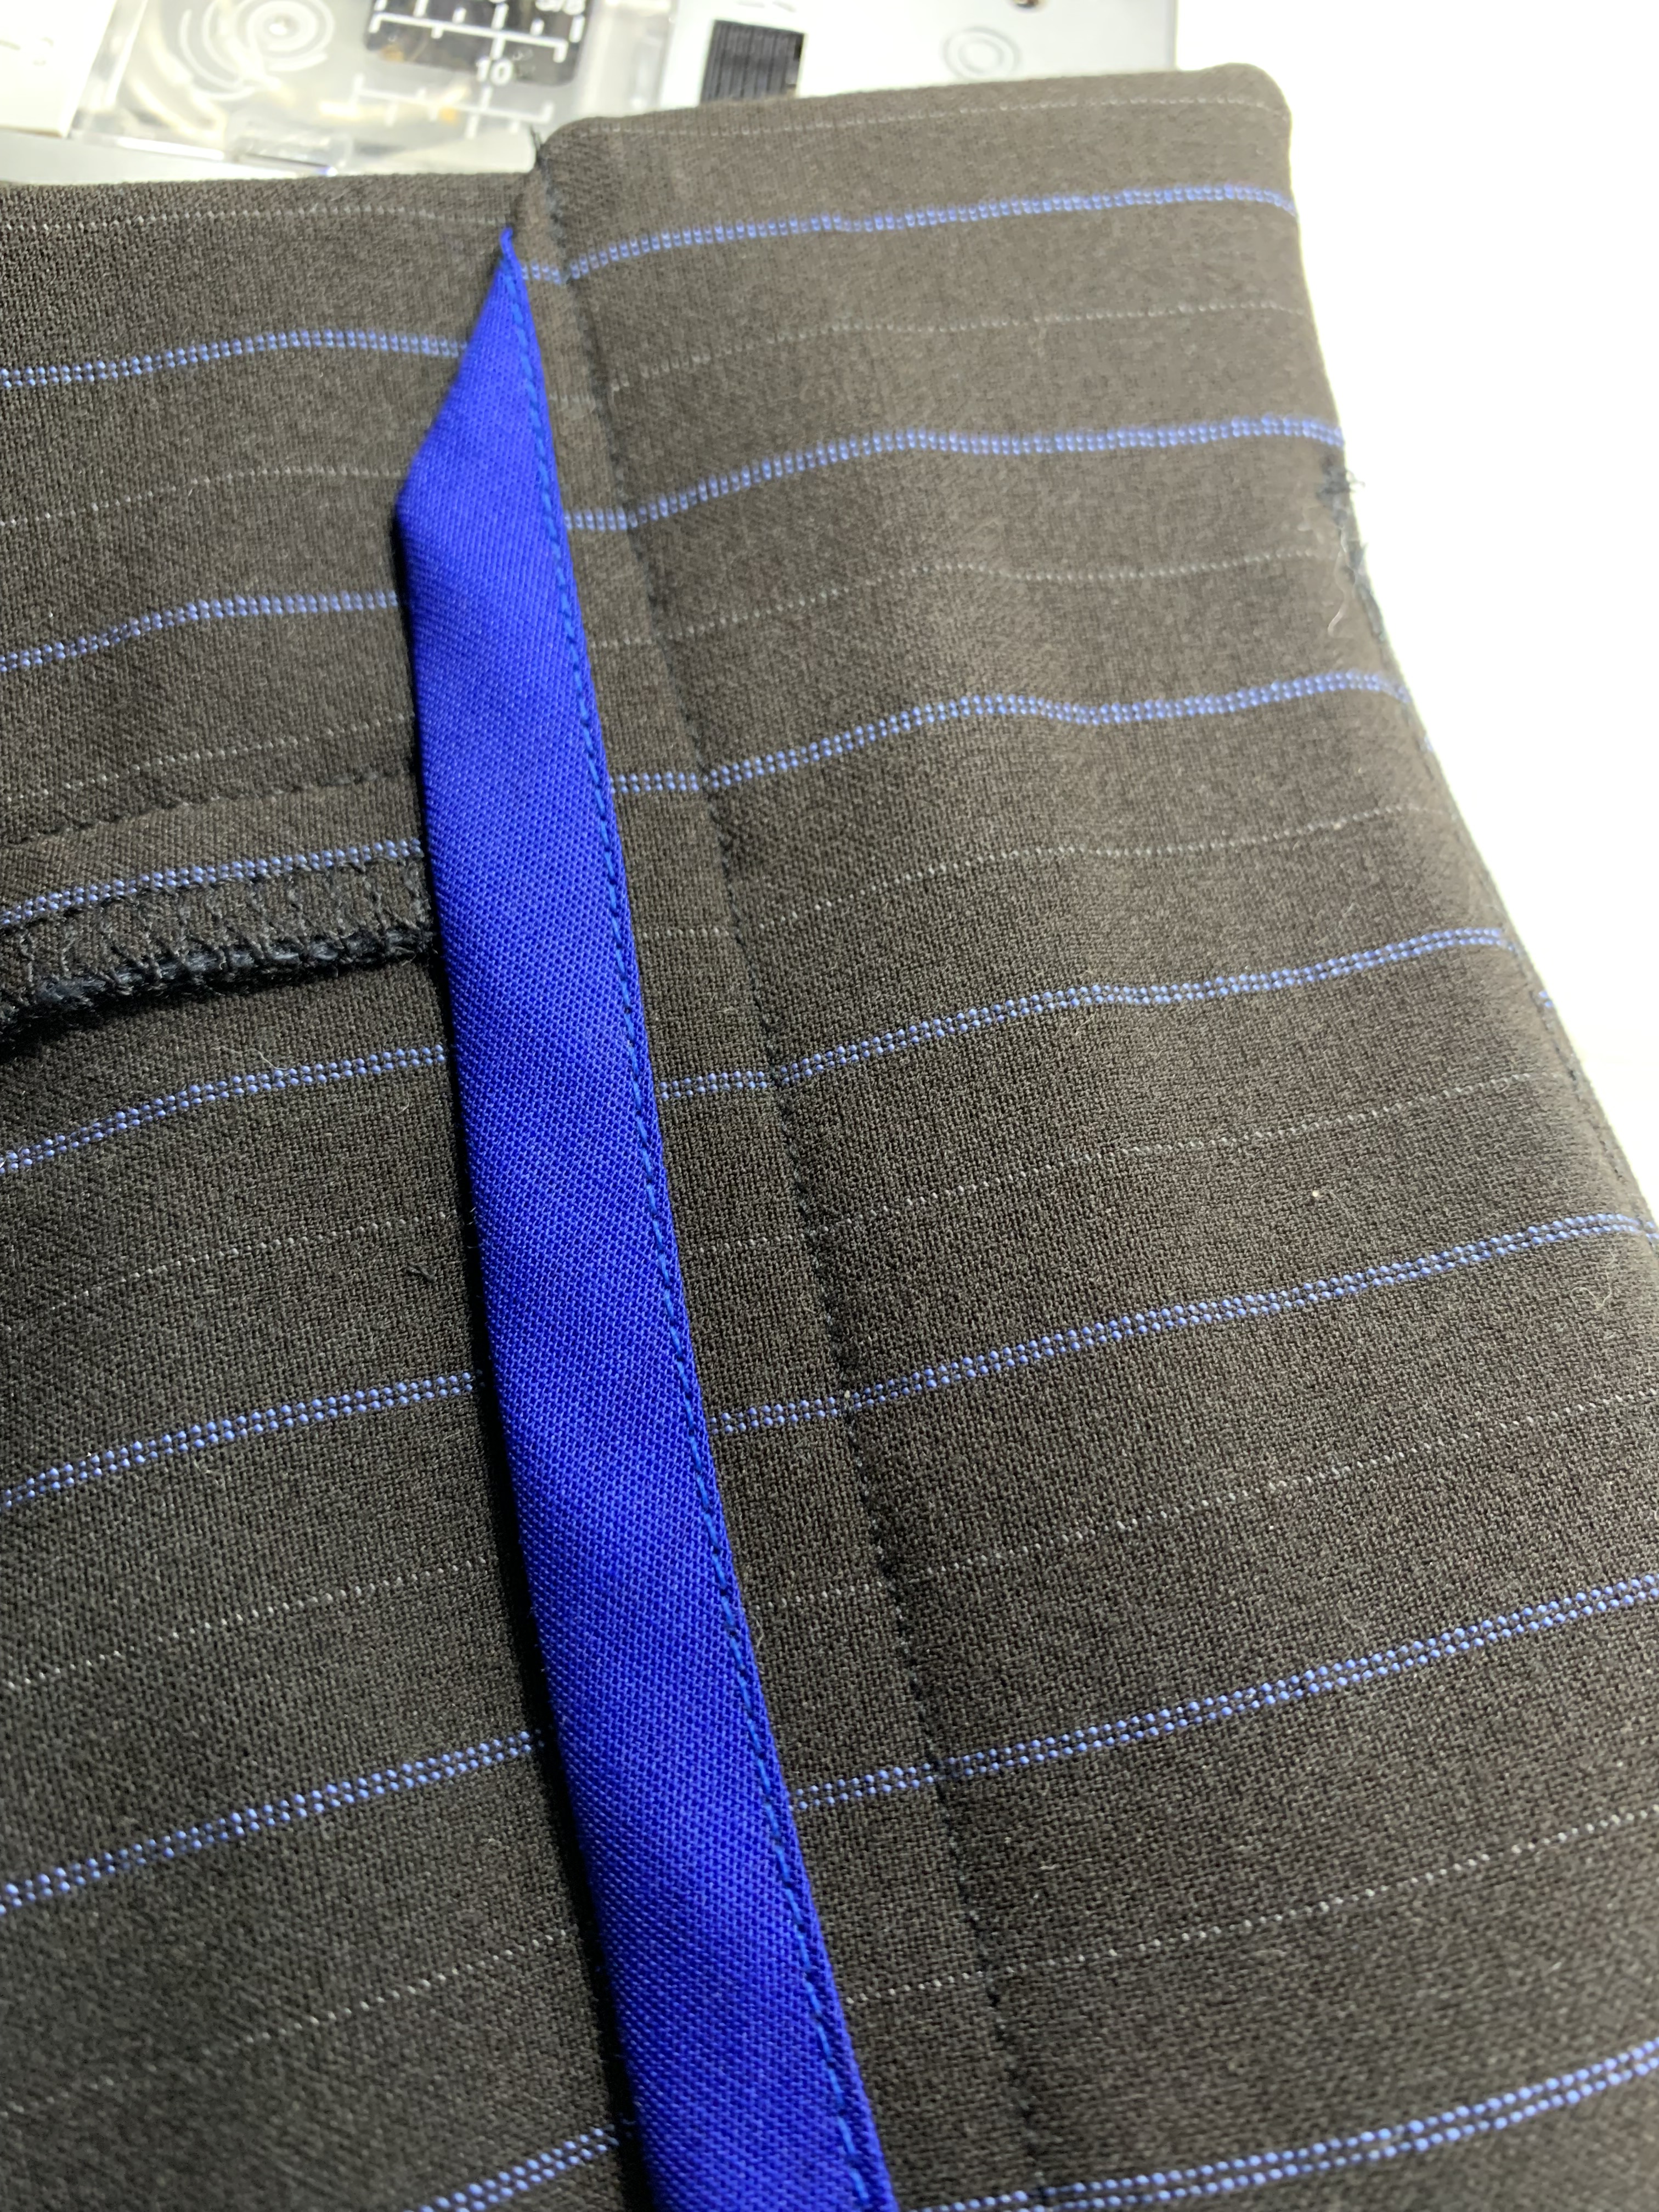
I also did a new waistband treatment that I’ve never tried before. Rather than folding up the inside and hoping to catch it when ditch-stitching from the front side, I bound the bottom edge in bias tape and let the seam allowance extend past the stitch line. I’ve seen this in some of my RTW trousers, and I have to say I am much happier with the finish this time than I have been in the past.
My cutting process was very slow – rather than cut everything at once like I normally do, I finished each section then cut out the next pieces to ensure stripe matching. I probably had enough leftover to allow for a few mistakes on waistbands and pockets, but I really had just enough of this fabric to make pants, and since it’s a decade old there definitely wasn’t the option to run to the store for more. But, even though it’s not possible for stripe matching to be absolutely perfect everywhere (darts and waistband shaping make this impossible), overall I’m pretty happy with the matching on the pockets and front waistband.

Poor attempt at posing like the magazine model.

The aftermath. Definitely need to clean and organize a bit before starting on the next project.
Pattern Review
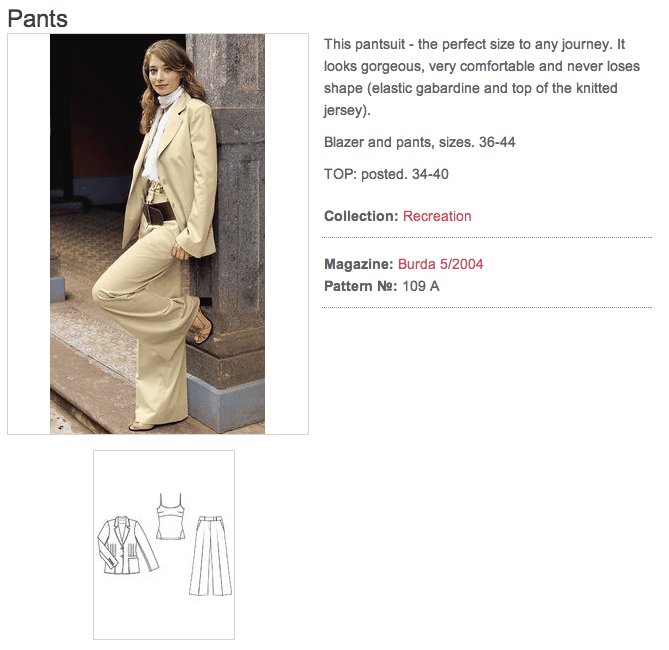
Pattern Description: Wide legged trousers with slant front pockets, back welt pockets, curved waistband, and belt loops.
Pattern Sizing: Burda sizes 36-44. I traced off a 44, but after one much too small first mock-up, I got a bit discouraged and pulled out a bunch of fitting books then sort of got distracted by the idea of following the instructions for a self-drafted pants sloper from the book Threads: Fitting for Every Figure. I ended up with a pretty good base pattern, so I decided to try combining the details from the Burda pattern with the waist, hip, and crotch curve of my self-draft. I think what I ended up with is probably a bit closer to a size 50 in Burda, based on my current measurements. I used the self-drafted pattern to fit the waist and hips, then used the proportions from the Burda pattern to re-draft the fit of the lower legs. For the waistband and pocket pieces I simply extended the sizing from the original Burda draft (either extending the center front extension of the inside pocket pieces or the side waistband length for the waistband pieces).
Were the instructions easy to follow? I did follow the construction order of the Burda pattern, but I ignored (after skimming) most of the detailed instructions. I instead used Barbara Emodi’s book Stress-Free Sewing Solutions to get instructions to construct the welt pockets and the fly front zip. I was really happy with how they turned out using those instructions compared to how Burda writes the instructions for those particular steps. The rest of the pattern is pretty basic if you’ve made pants before, so I didn’t really need detailed instructions for those steps. I think the Burda instructions are ok for this pattern, just not my preferred method of doing things.
Did it look like the photo/drawing when you were done with it? Yes, I think so! Obviously I am not the same proportions as the model, but I think that the main silhouette of the trousers and design details look very similar.
What did you particularly like/dislike about the pattern? I love how deep the front pockets are (perfect for holding a cell phone!). The front pocket piece also extends all the way to the center front fly, which adds both stability for the pocket and a bit of added structure to the front of the pant. I also love the welt pocket detail on the back. As nerve wracking as it is to sew them, I think it gives a very classic look to the trousers and was totally worth the effort. The wide legged shape is perfect, and I always prefer a fly front opening. I also like the curved waistband and the belt loops. No dislikes so far. I think this might become a go-to classic trouser pattern for me!
Fabric used: I used a PLR (poly-rayon-lycra) blend from deep stash. I bought it from Jo-Ann circa 2011, and I’ve been planning to make it into wide legged trousers for that long. It’s fairly stretchy, but really didn’t play nicely with my iron, even under a press cloth. It has a really bad tendency to get a shine anywhere that it gets a lot of heat or friction, but it is super comfortable to wear, so I suppose there are always trade-offs.
Pattern alterations or design changes you made: The major changes were for fit – I used my self-drafted trouser pattern to re-draft the hip and crotch area, but I used the Burda design features for the other aspects of the pattern. I also added welt pockets to both sides in the back (in the line drawing there is only a welt pocket on one side). I also flipped the side that the fly zip opened. Mostly because I was following instructions that had the opening on the left and not the right, but in the future I could do it the other direction.
Would you sew this again? Would you recommend it to others? Yes, absolutely! I love a good wide-legged pant, and I really love that these are a custom fit since I used my self-drafted block as a starting point. I think that saved me hours of fitting aggravation (even though I did spend many hours fitting these pants anyway). I know this pattern is a bit old and might be hard to find, but I would definitely recommend it. I think it is a super classic wide-legged trouser style with a lot of great details.
Conclusion: I had intended to finish these trousers for the October Pattern Reviews Skills contest, but I missed out by a few days. At a certain point I decided I could try to rush it and end up with something for the contest that I’d be unhappy with, or I could just take my time and do better finishing though not on time for the contest. I decided that this fabric has been waiting a decade to get sewn, so a few extra days couldn’t hurt. I was disappointed, but I know I’ll be happier with these pants in the long run.
Is this garment a “Triumph of Individual Style”? Yes, I think so! I love the design because it allows the pants to softly drape, and the colors are perfect for me. I think the custom fit is also awesome because it avoids any weird twisting or bunching of the fabric. I also think this is the sort of piece that allows other garments to shine, and so it will be a great “team player” in the wardrobe.
As I was sorting through pictures I was having difficulty finding ones that I liked because in a certain way these pants just seem totally unremarkable. But then, I also think that this is probably a great thing, because they will be the perfect item to include in a wardrobe. I think I tend to be drawn to and inspired by very “loud” garments, either in terms of color or decoration or style, so it’s a bit odd to feel like I’ve made something very quiet. But it’s also sort of exciting too because I think it might become one of my most-worn pieces!

Very professional looking. Nice job!
LikeLiked by 1 person
Thanks!
LikeLike
Totally brilliant but you put too much pressure on yourself. Remember that you sew because you love it not because it is a chore. You have to fit sewing around everything else in your life and should never feel guilty or – did you say ashamed!!!
I didn’t know the new book was out yet. I have it on pre-order from Amazon.
You are fab Darling. Sewing is my guilty pleasure meaning that it makes me sublimely happy. It is my happy place. Please keep it yours too.
You are an inspiration and I have picked up lots of tips from you.
A xx
LikeLiked by 1 person
Loving your color combo, fabric selection, your garment and your stellar award pose … FIESTA!!!!
LikeLike
Wow, so many great details on these pants; the fabric is lovely, welts turned out wonderfully precise, and love how the stripes match on the pockets and the welts. Beautiful attention to the details, including fit!! Thanks for sharing.
LikeLiked by 1 person
Great fit! Re: welt pockets on stripes… I get covered in cold sweat every time I think of the last project that had that feature. There was a dart on one side of the pocket slit, too, so it would have been impossible to match stripes on one side. In the end, I cut new welt strips on the cross-grain instead, and was much happier for it. I see them done that way in RTW garments, too.
LikeLiked by 1 person
Oooh – that would have been smart! Mine goes through a dart too and that would have avoided the matching issues. Next time I will try it that way!
LikeLike
Beautiful pants!! They look fabulous on you, and very stylish! Great wardrobe staple, it looks like ❤️ Love the fabric… Super interesting to read how you combined instructions from various places. Personally, I’d be really curious to read more of your thoughts on what you mentioned here:
Quote: “I also did a new waistband treatment that I’ve never tried before. Rather than folding up the inside and hoping to catch it when ditch-stitching from the front side, I bound the bottom edge in bias tape and let the seam allowance extend past the stitch line. I’ve seen this in some of my RTW trousers, and I have to say I am much happier with the finish this time than I have been in the past.”
LikeLiked by 1 person
Ah! So basically on the inner waistband rather than pressing the lower seam allowance into place then ditch stitching from the right side hoping to catch it in place, I bound the lower edge with bias tape. Since it had an extra 5/8” there was no way the stitching wouldn’t catch from the outside, the finish looks nice, and since it doesn’t have the double fold at the seam, the waistband is very flat.
LikeLiked by 1 person
I’ve not yet had the courage to sew pants (though I WILL try, dang it), I’ll try this idea! Bet it would work with jackets too….?
LikeLiked by 1 person
Yes, probably! I think this is similar to a Hong Kong style of seam finish with the bound edge, so I’m sure you could do similar techniques in a jacket.
LikeLiked by 1 person
These look just great on you! You are inspiring me to try drafting my own pants block.
LikeLiked by 1 person
It’s not as hard as it seems! There are lots of steps but if you find and follow decent instructions the results will probably be much better than making massive alterations on a pattern that is starting off with a lot of fit issues.
LikeLike
Great fit on the pants. I’ve finished pants waistbands many times like this, minus the bias tape – I just zig zag the raw edge. It’s much easier and less bulky.
LikeLiked by 1 person
“Better Late Than Never” could be the title of my yet unpenned memoir (haha) but not these exemplar trousers! Good job you!
As a person who signed up for Barbra Emodi’s blog approximately 5 days before she pronounced that she was giving up blogging (hence the title of my memoir) I am hitting “buy now” on her book, ’cause… call me crazy but those are some awesomely perfect welt pockets! (And a heck of a run-on sentence.)
GOOD JOB YOU!
LikeLiked by 1 person
Thanks! I think you will enjoy the book – it’s full of really fantastic instructions!
LikeLike
Those welt pockets are a thing of beauty. And I love the inner waistband finish you’ve used – stitching in the ditch always ends up looking very message when I try it, so this is my favourite method now too. Enjoy wearing them!
LikeLiked by 1 person
I am in awe of your pattern matching – across the hip pockets too! And so happy for you that your pants Odyssey had a happy ending! I hope you can use this base pattern many times.
LikeLiked by 1 person
Thanks! I’m wearing them today for work and I love them! They are soooo comfortable, so I definitely see some more versions in my future!
LikeLike
Those look really good. Your welts are beautiful! And hooray for stash busting.
LikeLiked by 1 person
Thanks!
LikeLiked by 1 person
Very swish looking pants – I am in awe! I really like the finish you did on the waistband – one to try I reckon because it does look so tidy and flat.
LikeLiked by 1 person
Beautiful trousers! So many of those contests on PR are just not enough time, IMO. Then there are other contests where I have actually started the perfect project, but maybe a week too early and my honesty gene just won’t let me enter. It’s frustrating. Again, you are looking gorgeous in this fabulous fit.
LikeLiked by 1 person