I was super excited to have made it through to the third round of the Bee. Last year was my first time participating and I made it to Round 2, but was out at that point. It worked out for the best, perhaps, because last year the contestants in Round 3 had quite a challenging time with the designated pattern. This year we were all anticipating being given a specific pattern to work from, so we were all a bit surprised to find that we would be making a reversible garment!
I wanted to do something fitted, but to be honest my skin is so terribly dry heading into fall and winter, I couldn’t think of a top/pants/skirt/dress that I could easily reverse that I wouldn’t have to wash between wearings. So I decided to do a jacket. I’ve also been really eyeing the bomber jacket trend, as something I’d want to sew for myself, and I even had some fabric in the stash for a bomber jacket project. So that’s what I ran with for this challenge.

PR Sewing Bee Round 3 Official Review:
Inspiration: I’ve been dying to make a bomber jacket since the trend really took off last year, and I’ve been especially wanting to make an embroidered jacket because there have been quite a few beautiful examples that I’ve been drooling over. Partly it is because I think the mix of the feminine embroidery and more masculine jacket style is an interesting juxtaposition, but mostly because I bought an embroidery machine last year and I really want to start using it on garments. At the same time, I’ve also had a really pretty, bold print in my stash that I’ve been wanting to turn into a different bomber jacket. This challenge gave me an excuse to mix the best of both worlds and make two things that I really wanted to wear at the same time.

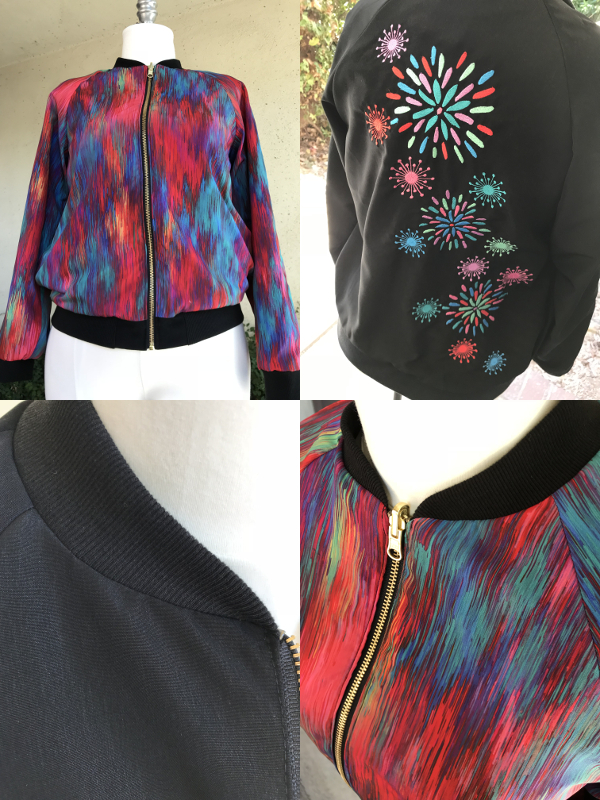
Special Techniques: I am really excited to say that I used my Janome 500e Embroidery machine to position and stitch out the design on the black side of the jacket. I bought the digital embroidery files on Etsy, as I don’t have digitizing software yet, but I did use my machine’s features to create and position the overall design. The thread colors were chosen specifically to coordinate with the colors in the print that is on the reverse side. Although I’ve had the Janome 500e for nearly a year, I have had some trouble getting the stitch quality that I wanted. The dealer suggested that I was using the wrong type of bobbin thread, but even that did not resolve this issue. The stitches on my sample were not up to my liking, but I was resolved to have embroidery on my jacket design, so I spent a bit of time trying to figure out how to adjust my machine. Turns out the screw on the bobbin holder was really, really loose. A bit of tightening and everything turned out much better! I must say I’m really happy the Bee pushed me to make this project, otherwise it would have taken me much longer to find the motivation to find a solution and fix my machine!
Reversibility: When I decided to make a bomber jacket, I started planning all the ways I’d need to adjust the pattern to make it reversible, but I completely lucked out with my final choice of pattern. Simplicity 8418 uses the same pattern pieces for the outside and the lining, and the construction order is already perfect to make a reversible garment. Although it wasn’t my intent when I picked this pattern (I really just wanted a relatively close-fitting raglan sleeve bomber jacket), it ended up working out perfectly for this contest. I was able to construct the jacket as though it were a jacket with a lining, then sew up the turning hole by hand after the rest of the garment was constructed. If I had been sewing a normal jacket with a lining, I would have done a small row of machine stitches on the lining, but, since this was to be a reversible garment, I hand-sewed the last seam so that it would be invisible from the “outside” of the garment.

Pattern Description: Simplicity 8418 is a raglan sleeve bomber jacket with side pockets, front zip, lining, and knit cuffs, collar, and waistband.
Pattern Sizing: Sizes 4-12 and 14-22. I traced a size 12 and adjusted with an FBA.
Were the instructions easy to follow? I had to admit I was really impressed with these instructions. They start off by telling you how to adjust a metal zipper – definitely a technique I feel would have been avoided even a few years ago in favor of catering to newer sewers. The instructions are very clear, and the construction order is very logical. I especially appreciate the extra steps that secure the waistband, and the fact that the instructions are written to maximize the machine sewing and minimize hand finishing. The pictures are also very helpful in clarifying where exactly the stitches should go. These are possibly some of the best instructions I’ve used, and they lent themselves especially well to the Sewing Bee reversible challenge.
Did it look like the photo/drawing on the envelope once you were done with it? Definitely. I LOVE the way this turned out! I even included embroidery in my design, which really helped it look like the cover image.
What did you particularly like or dislike about this pattern? Likes: The style, the fit, and the instructions were all great. The pattern pieces fit together like a dream; it’s a very well drafted pattern. Dislikes: Side pockets are always just a little awkward for me, since I love to shove my hands in pockets. However, I decided that it would be better to keep this feature because of the bulk of having 2 pockets in a reversible design. In the future I may change the pocket placement in order to make it more functional for myself.
Fabric used: The rainbow print is a thin polyester from Jo-Ann Fabrics that I’ve had in my stash for the better part of the year. The black is a polyester peach skin from Jo-Ann that I bought for this project, and the trim is a bamboo rib knit from Michael Levine’s online store. I had to serge the edges of the polyester fabrics because they frayed so much. I also used Metro embroidery thread, embroidery stabilizer, and a metal reversible zipper from Wawak as notions for this project. The embroidery designs were purchased from DigitalSketches on Etsy. While I would love to have digitized my own designs, I have not yet invested in that software. It is definitely something I’m looking forward to playing with in the future though. In the meantime, I’m using my machine’s built in features to edit and alter designs that I can purchase from various internet sources.
Pattern alterations or any design changes you made: The most important alteration for me was a full bust adjustment (FBA). I chose a size 12 based on my upper bust measurement, but since Simplicity drafts for a size B cup, I thought it was likely I’d need to made this adjustment, despite the pattern having a reported 6 inches of ease at the bust. I made a muslin, and it was pretty apparent that I would definitely need to make this adjustment if I wanted to be able to move in the finished jacket. However, the arm also fit exceptionally well (very unusual – the one adjustment I *always* have to make is a full upper arm adjustment), so I wanted to make sure to adjust the armscye as little as possible to keep the excellent fit of the sleeve. I made a 1/2” FBA on the front pattern pice by cutting up to the bust point and diagonally towards the sleeve seam and rotating the piece outwards by a half inch. I then cut perpendicular to the grain to rotate the bust piece down so that it would be a consistent half-inch width down the length of the front. Finally, I smoothed out the side seams. Because of this FBA, the side seam was slightly longer on the front piece, so an additional 1/4 inch was added to length of the back piece. The only other design changes were to have pockets on both the “inside” and “outside” and to use a reversible zipper to make this project reversible for the Sewing Bee. My only other change was to have the opening for turning the garment right side out in the under-arm seam and not the side seam (as directed in the instructions) since I needed to install the pockets, and there wouldn’t have been a large enough opening.

Would you sew it again? Would you recommend it to others? I definitely want to sew this again! I love the result, and now I want to make all the bomber jackets. I’ve got several more plans for using embroidery on future jackets, not to mention some fun color blocking and print blocking designs that could be great with this pattern. It it very likely to become a TNT. I highly recommend this pattern!
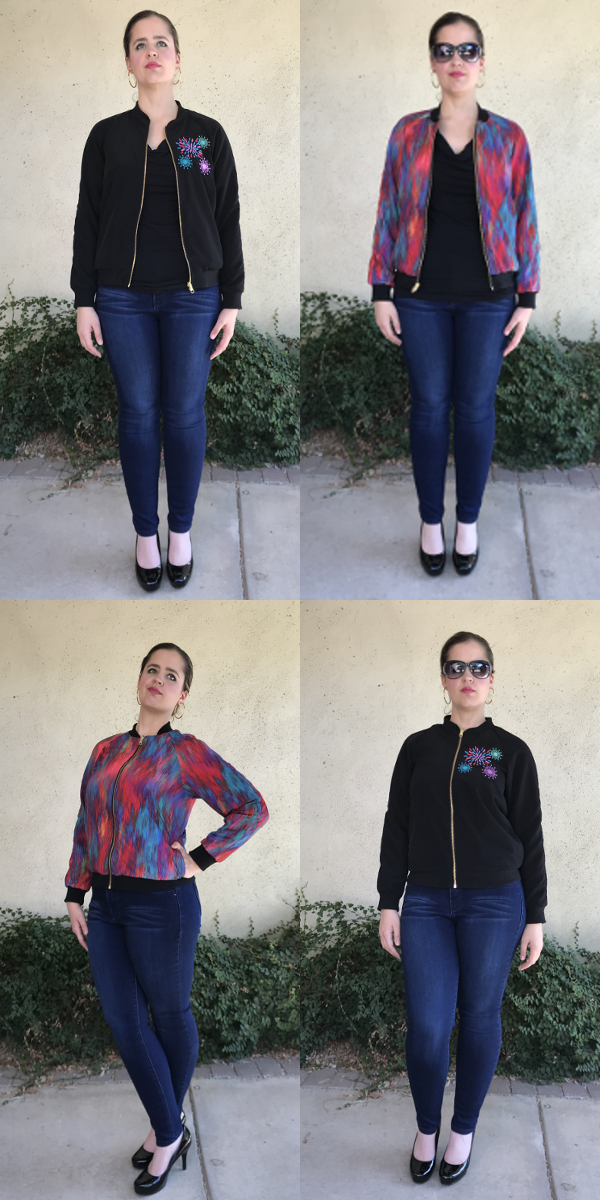
Conclusion: I love this! I’ve been wanting to add a bomber jacket to my wardrobe for quite some time, and now I’ve essentially got two! I’m super excited by both of the looks I’ll get from my jacket – one side being a bright, bold print, and the other being a jacket that is part of the embroidered bomber trend. I also love how easy it is to reverse the garment – when I take it off it almost naturally flips to the other side, ready for the next day. I know I’ll get a lot of wear out of both sides of this jacket this fall!
*************************************************************************************
As far as the contest goes, I’m not sure if this will be “enough” to get me into the final round. It seems like a lot of people went the same route I did with bomber jackets or other lighter weight outer wear. With the level of competition as high as it is, I’m not sure this project will be fantastic enough to get me to the final round. Technically speaking, it wasn’t as much of a challenge as I’d anticipated (the pattern basically did all the work for me), and other than the time spent doing the embroidery, there isn’t a lot of “extra” on this piece. Work did ramp up quite a bit, so I scrambled to get all the sewing done over the weekend, along with the pictures and review, so I’m not sure I could have even finished anything more complex in the time frame, even if I’d wanted to. Still, out of everything I’ve made for this year’s Bee, this is definitely the thing I’ll wear the most. To be honest, out of everything I’ve made for myself this year period, it’s probably the thing I’ll wear the most. I really do love this jacket, and I’m really happy with the quality of my construction on this and all the pieces I’ve made for the Bee. Regardless of the decision of the judges in this round I’m so satisfied with this garment I’m not even stressed about the results. I am, however, very much looking forward to seeing what the rest of the participants made for their reversible pieces, and I am also really looking forward to finding out what final round of the Bee will be! In the meantime, I’ve got 3 commissions to work on, blog stuff to catch up on, loads of extra “regular” work, and a wool coat to start for my dad. (Tangentially, since I won the last round of the Bee I don’t think I can participate in the wool coat contest now? But I’m still making him a wool coat regardless.) So, plenty of things coming down the pipeline; hopefully October will be as successful a sewing month as September proved to be!

Bravo, Dr. T! This jacket is spectacular. I love it!
LikeLiked by 2 people
I went to Michael Levine’s site and could not find rib knit for cuffs, collar, and waist!
Did a search and still did not find it!
Could you please send the link so I can purchase? This is very hard to find item!
Thank you and btw I love your blog!!! So inspiring and informative!
Thanks again!
Judith Watson
LikeLiked by 1 person
It’s a fabric, so I had to cut out all the ribbing pieces from the pattern:
http://www.lowpricefabric.com/p-19182-bamboo-rib-ml289385-black.aspx
LikeLiked by 1 person
Oh my Gosh! That’s sewing love for sure!!! I know that took a bit of time, care and precision! Kudos for braving the task – I am going to continue my search for tubing which=less work, and less chance for error! Lol!
Thanks again, the jacket is beautiful, can’t wait to see what you do next! (I also loved the red dress with the lace-overlay statement sleeves! Gorgeous! 🙂
LikeLike
this is great – fun colours and embroidery ;o)
LikeLiked by 1 person
Spectacular indeed!!! what a beautiful jacket and reversible too! good luck with the third round.
LikeLiked by 1 person
All of your entries for this contest have been simply amazing! I’ve been following all your work for it and I’m blown away by your skills.
I love your bomber jacket! I have one cut out with the reverse and I’m terrified to start! I don’t know how to make it reversible. If you ever did a tutorial on this I would be forever grateful!
LikeLiked by 1 person
Making it reversible was actually very easy. If you use a pattern with a lining, you can follow the normal instructions and it should turn out just fine. You will want to use the same pattern pieces for the “inside” and the “outside,” and I would recommend getting a reversible zipper so that it is easy to open and close from both sides. If I make another of these I’ll do a more detailed post/tutorial so that you can see the process.
LikeLiked by 1 person
That would be wonderful. Thank you.
LikeLike
That is so impressive! I also really like how you styled it in the photos. That silhouette suits you very well.
LikeLiked by 1 person
Brilliant! I love how you’ve done this and think both sides are gorgeous!
LikeLiked by 1 person
Beautiful bomber! Great to have a piece you can easily wear anytime, anywhere, and it looks outstanding. Love the embroidery!
LikeLiked by 1 person
It’s so awesome!!!
LikeLike
I’m surprised how many bomber jackets there were because I wouldn’t have thought of that. I like yours best so I think you’ll move on!
LikeLike
Aw, thanks! I’d love to make it to the final round, but at this point it’s up to the judges.
LikeLike
Sorry I am so slow in commenting that we all already know you are on to the next round, but I still want to say that this is absolutely fabulous. Either jacket on it’s own would be great so the fact you have 2 in one that are quite different to each other is brilliant.
LikeLiked by 1 person