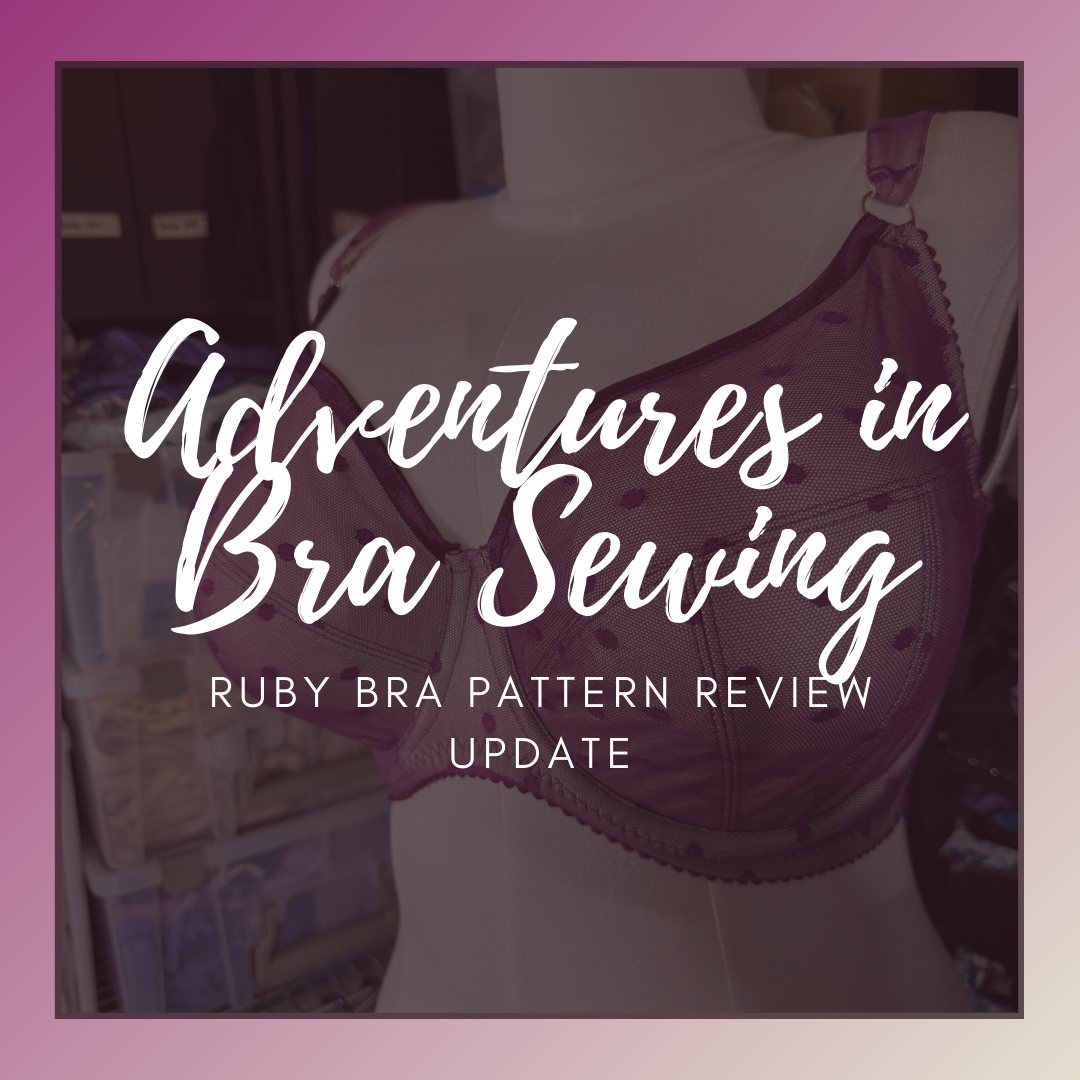
I participated in the Bee on a Wire class in The Hive at the start of the year. It was a month long class to help participants identify a good starting pattern and having expert bra fitters walk us through making alterations to get to a perfectly fitting bra. Although I’ve been applying a lot of techniques I’ve learned from previous Bra Bees to work on fit the past few years, I was excited to join this class and learn more about fitting with more of a personal guided approach. I will say that it was an amazing experience and that I learned so much. It has completely changed my perspective and process for how to fit a new bra pattern, and I ended up with four new well fitting bras, so I am very happy about that. Most of the bras that were part of the class were patterns I’ve tried perviously, so although I was initially just going to try one or two patterns, I ended up trying all of the patterns that were in my size since I already had access to the them from previous purchases. I’m going to do a mini series of re-reviewing the patterns I’ve tried before, or posting a new pattern review if I hadn’t previously made the pattern. The first pattern that I’m going to re-review is the first bra pattern I ever made: the Pin-up Girls Ruby.
Before we get too far into the review I did want to post a quick reminder that I’m going to be teaching a class on “Pattern Analysis – Projection” at the 2025 Bra Sewing Bee Main Conference, which is happening April 3-6, 2025. If you were interested in attending and haven’t signed up yet, I am happy to offer an affiliate discount code to interested blog readers. You can use the code 2025DOCTORT for $10 off of the main conference fee at signup.
Back to the review. So, back when I first started sewing bras I was definitely trapped in the cycle of my bra doesn’t fit well, so the measurements are bad, so I’m just making more bras that don’t fit well because they are based on the bad measurements. I think bra sewing is an iterative process at the best of times, and when my starting point was “I think it fits a bit better than RTW” I had a pretty long way to go. I also made a lot of foam cups in my early bra making endeavors, and that covered up a lot of really bad fit issues that only became apparent once I started making fabric bras. So I sort of went on the carrousel ride of trying different patterns and techniques and getting closer and closer, but I never really went back to the original Pin-up Girls patterns I had tried until now. I’m really glad I was inspired to do so because I think these might become some of my favorite patterns!
For the Ruby I had originally started with a 5.25 BCD back when I made my first bra, but after going through all of the sizing and measurement exercises in Bee on a Wire, I realized that the 5.75 BCD would be a better starting point. I did a lot of testing (I made an army of paper cups!) to figure out my starting size for all of the patterns. It was a lot of work, but I think it saved me a lot of time in the long run because all of my starting sizes were deemed “correct” and I was able to spend most of the class working on more individualized adjustments.

Another fit revelation I had in the Bee on a Wire class was that I’ve been using the wrong wire size for a while. I’ve been having issues where the bra feels too wide in the bowl or like it’s sliding down my chest, so I’ve been chasing a smaller and smaller wire size to try and fix the problem. Well, it turns out that the too-small wire might have been causing it! I’ve been using a 44 Vertical the past several years, but after doing the fitting for Bee on a Wire, it was clear I should really be using a size 46 wire. I will say that most of the typical wire styles in a 46 felt too wide inside of a bra, but the 46 vertical is actually a really good match. And now that the center front isn’t getting pushed down because of being too small I’m really excited to see how this will improve my bra fit going forward. I’ve got more to say on wires but I’ll leave that for some of the other upcoming pattern reviews because it’s more relevant there. For the Ruby I ended up using a 46 Super Long wire, which is the longest size I could find before getting into the Vertical Extra Long and Omega shaped wire from Emerald Erin.
Of all of the patterns, the Ruby was actually the one I did the least adjustment to (see details in the pattern review below). In hindsight I wish I had tweaked the pattern a bit more because of the four bras I made it’s the one that has the most to-do’s to fix any remaining fit issues, but overall this pattern really did need the least amount of adjustment right out of the package.
For this project I used materials from my BRAdvent box from last year, so I ended up with a lovely polka dot bra in a vibrant fuchsia color.

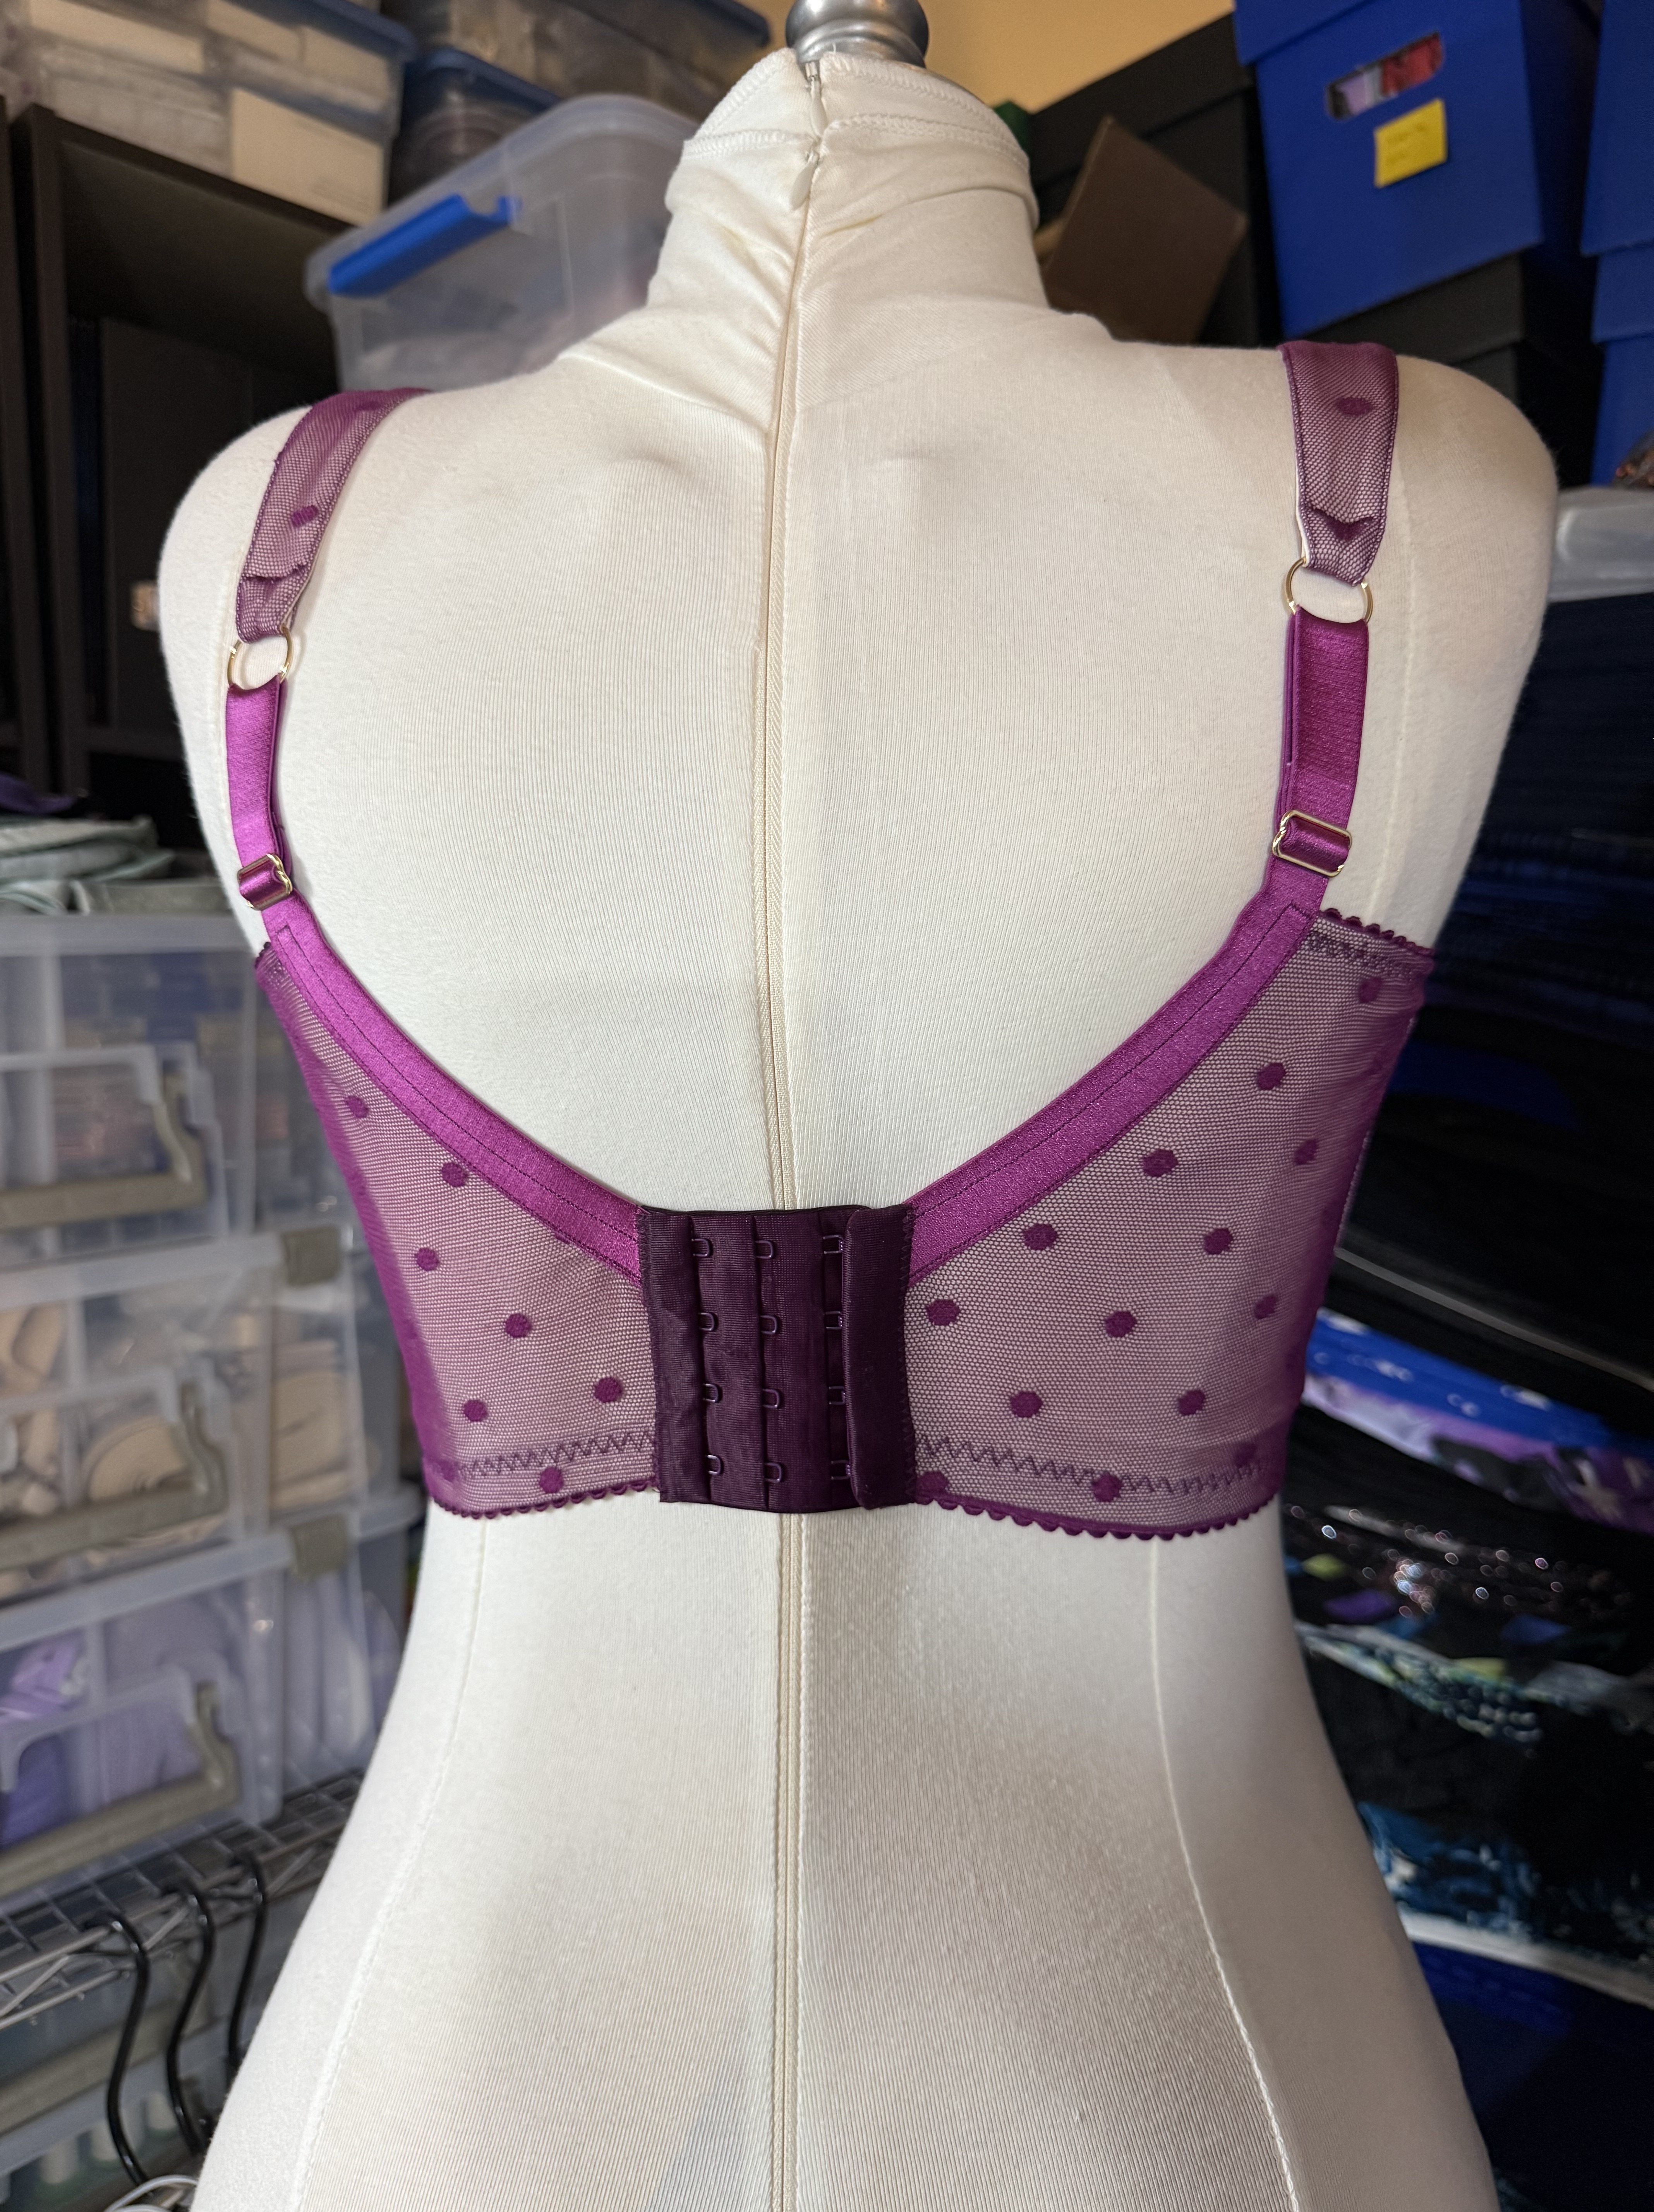


I think I still need to take in the neckline a bit more, but overall the fit is pretty good!
Pattern Review
Pattern Description: The Ruby Bra Pattern is a full banded bra with an offset vertically seamed three piece lower cup with option for foam lining.
Pattern Sizing: Band sizes 26-40 and bottom cup depth (BCD) 3.0 – 6.0. This was the first bra pattern I ever made and while I was happy with the fit when I first made it, I eventually realized the bra didn’t fit that well. I went on to other patterns, but decided to revisit this pattern as part of the Bee on a Wire online class. Several years ago I had started with a 38 band and 5.25 cup depth, but after taking better measurements in the class I started with a 5.75 BCD and a 36 band. The fit was much better than in my previous attempts, and I only had to make a few simple alterations to get a really good fit. I will note that I had to use a slightly longer wire (the Super Long style) than I have typically used in some of my other patterns.
Were the instructions easy to follow? At this point I largely don’t look at instructions when sewing bras, but I think my previous analysis of the pattern still stands: “The instructions were very easy, though they feel somewhat like they get less detailed as you go along. There isn’t a lot of detail about attaching the rings and front straps to the bra, but it isn’t too hard to figure out. Most of the instructions are very detailed (including stitch types with width and length information), but a few steps are missing this level of detail so I had to rely a bit on my previous experience, intuition, and generally “what looks good” to make stitch setting decisions.”
Did it look like the photo/drawing when you were done with it? Yes! It looks very much like the line drawing.
What did you particularly like/dislike about the pattern? I still really like the style lines of this bra, that is has the option to use foam, and the instructions are generally very good. I also have found that I much prefer the BCD/band measurement system for patterns, so I really appreciate the pattern sizing because it is much easier to figure out where to start if you have good measurements. I think that this pattern gives a more natural shape to the bust so this may or may not be a positive feature depending on the preference of wearer.
Fabric used: For my most recent version I used microdupolex with a dot mesh overlay, powernet for the back band, and the usual elastics and findings. The materials were from Bra Builders, except for the wires which I purchased from Gigi’s Bra Supply. I used a 46 Super Long wire, which was the correct length for the wire line but felt a bit wide on me. Next time I will probably try a 46 Long Vertical from Porcelynne and cut down the wires to match the pattern.
Pattern alterations or design changes you made: I took a 1/4” dart out of the upper cup neckline, shortened the back band by 1/4”, raised the center front gore height by 1/4” (for the 5.75 BCD there seems to be a misprint on the pattern so it doesn’t match up to the cup length), and I took a 1/8” dart out of the upper edge of the band. For the next versionI want to take another 1/4-3/8” dart out of the neckline, narrow the band under the cups, try cutting down a 46 long vertical wire to fit the pattern, and possibly move the back strap attachment point inwards a tiny bit.
Would you sew this again? Would you recommend it to others? Yes, I’m definitely sewing this pattern again! This was my first bra pattern, so it’s a bit sentimental in a way, and I’m really happy to be having a version that fits so well now. I think my next version will be even better and I’m so excited to have this pattern as an option I can keep going back to to make more well fitting bras. I started with the PUG patterns but was off of them for a bit as I found other brands that seemed to be working better for me, however, I am back to really liking the fit and styles of the PUG patterns. I would definitely recommend this pattern to others, especially those new to bra sewing because the sizing is more intuitive since it is based on measurements and the instructions are generally very good if you are new to sewing a bra.
Conclusion: I’m really happy I was inspired to come back to this pattern during the Bee on a Wire class. It helped me understand the importance of fit and working from a correct starting size, because it ends up with much better results with much less effort than some of the other techniques I’ve been using. I’ve ended up with some really great bra patterns, and I’m happy to have the various style options, including the Ruby. I plan to make a few additional fit changes and make a new version, so I know this is a pattern I will come back to in the future!
More pattern reviews coming soon!

I just want to take a moment and say how much I am enjoying your detailed posts. I feel like the content really helps expand my knowledge, the information is relevant, and the writting has a sense of purpose that always leaves me inspired to try new things. I’m really loving the email option so that I can stay up to date on your projects as I have started to swing to the “less social media – more sewing” end of things.
The sun is shining here so I’m sending a bit of it your way! Miranda
LikeLiked by 1 person
Awww, thanks!
LikeLike
It sounds like an intense process but fun!
LikeLiked by 1 person
It was! It was a month of fitting and changing patterns and re-fitting and ripping things apart and putting them back together. Definitely intense but very worth it!
LikeLiked by 1 person