Ok, so October has really not been going how I planned. In my September wrap-up post I was unexpectedly working on the cherry lingerie wardrobe (which I finished) and I had proclaimed I would be working on a few other things to wear to an event on Halloween. However, October has been a month of a lot of ups and downs, and my sewing time has been totally derailed. Health wise, this month has been kicking my rear (I’ve basically been sick or injured with completely different maladies every weekend), but I’ve had positive news on other fronts, so I’m going to consider it a karmic balance of sorts. Despite the chaos, I was able to finish the first part of my October sewing plans, which was the LilyPADesigns Marei Strapless Bra!

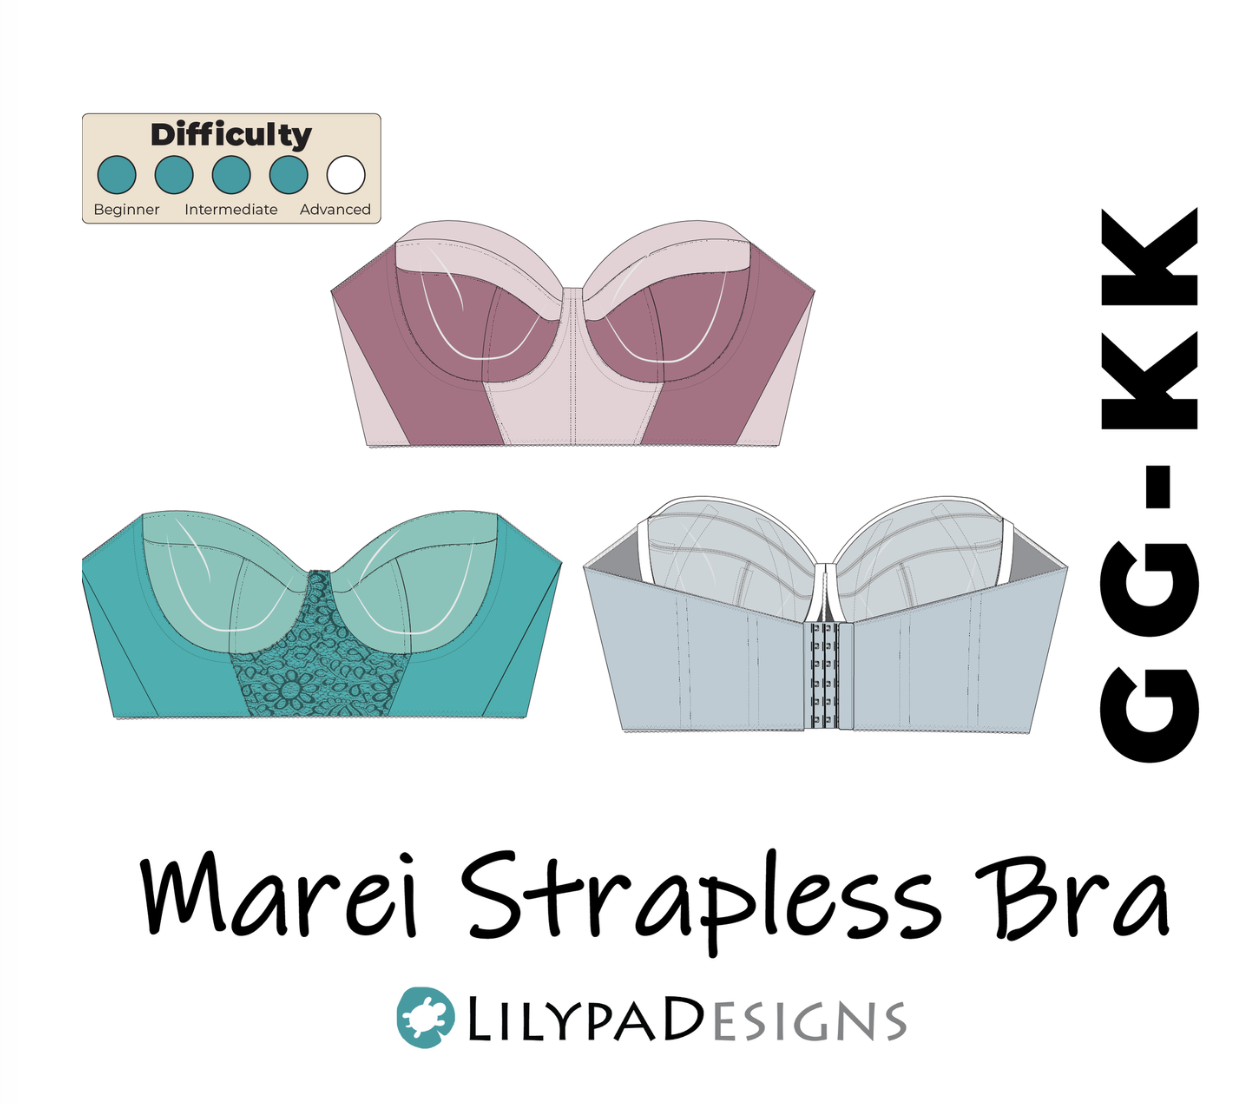
I haven’t seen a lot of strapless bra patterns for the home sewing community, and even fewer that are designed for larger breast sizes. The Marei comes in three size ranges from LilyPAD: A-DD, DD-GG, and GG-KK. Before I had any well-fitting bras I was pretty sure I was in the largest size pack, but after making a few of the LilyPADesigns patterns (and after making a few well fitting bras where I could accurately measure my BCD and HH), I found I’m squarely in the middle of the DD-GG size range, so that’s the size pack I bought to start.
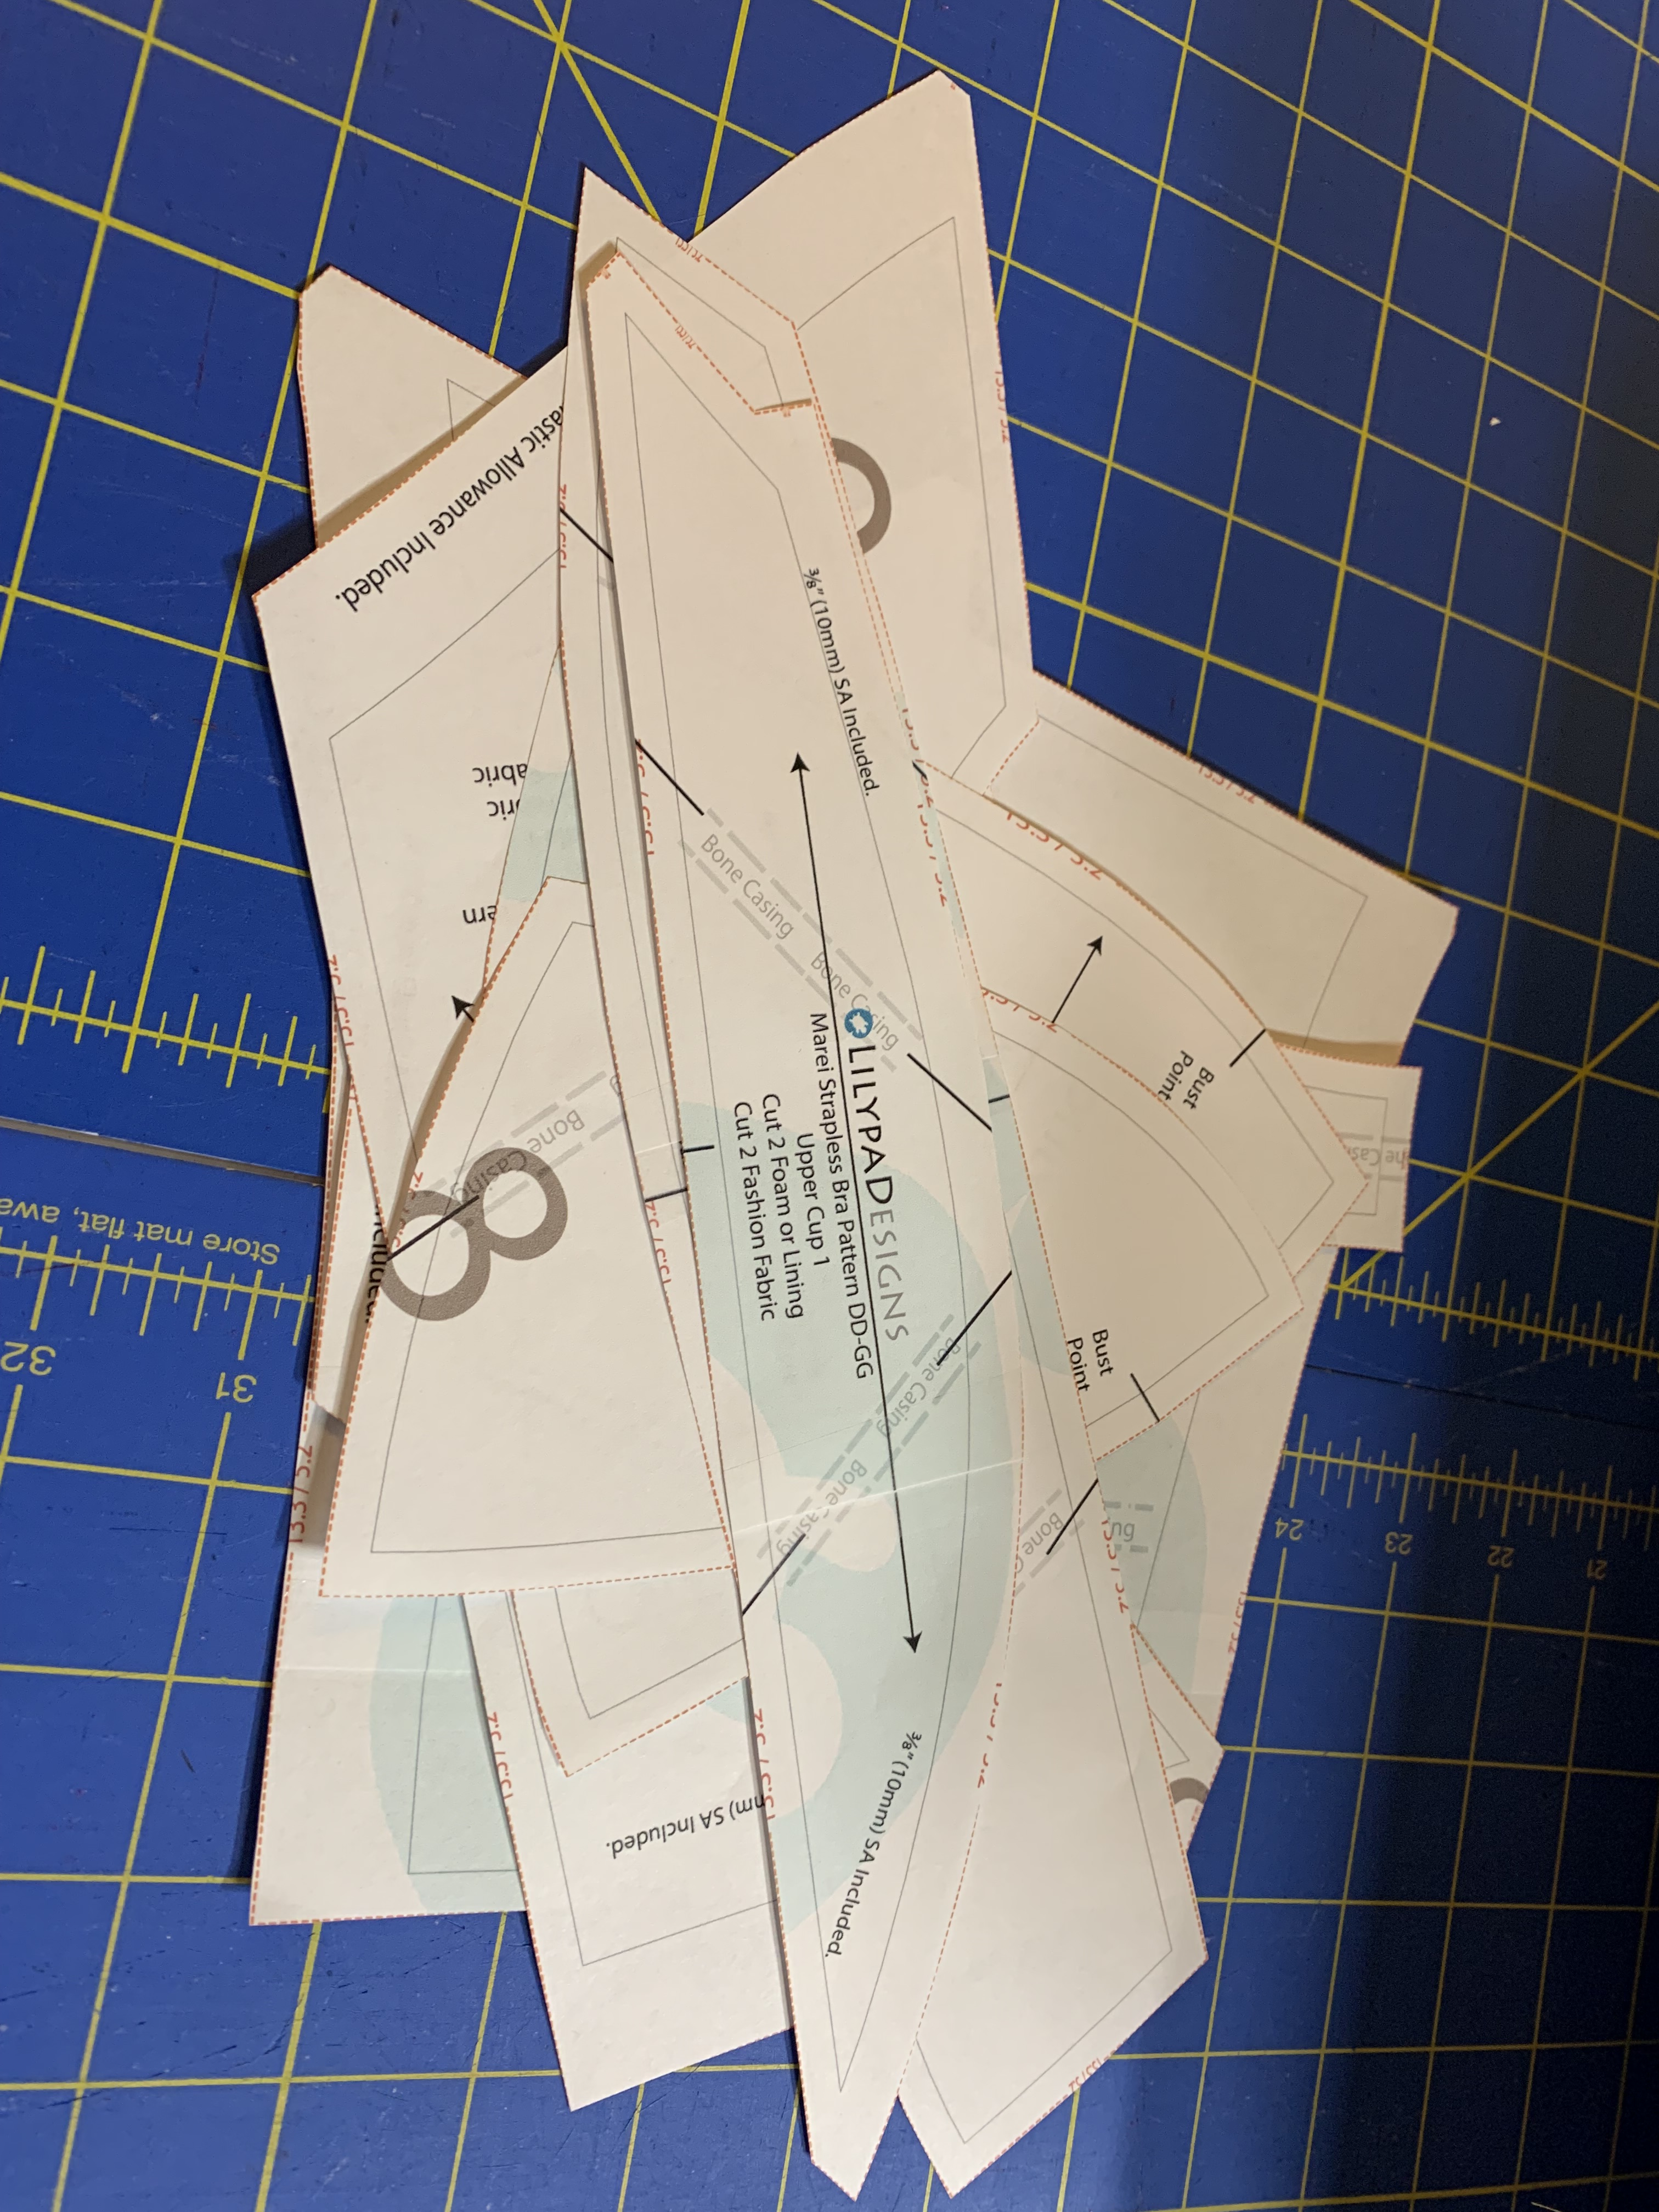
I was feeling a bit rushed for this pattern, so instead of tracing everything I just cut the pattern pieces out of the paper print outs. I will admit I started to trace, but I had printed out all of the sizes and there were way too many overlapping lines will all of the stitch lines, cut lines, boning placement lines, etc. to get a good trace. And this is from someone who boarder-line enjoys tracing the crazy Burda sheets, so that’s saying something. Anyway, I admitted defeat and went back and hid all the layers except the 5.2 BCD and re-printed and cut the pattern out directly. This was much better. I made a quick mock-up out of muslin and some cheap power mesh I had lying about just to get a sense of the fit. The cups seemed too small (but the neckline too big), and I thought it would be prudent to narrow the back band by 1/2″, because it seemed a tad big and I always have to narrow the back band, even on my self-drafted patterns. Anyway, I went back and printed out the 5.6 cup pieces and did a tiny omega adjustment to get them to fit the 5.2 wire line. It’s the smallest omega adjustment I’ve ever made (the pattern is already pre-omega-ified according to information I’ve seen from Lily), so this is officially the least pattern adjustment I’ve had to make to a bra pattern, ever. The upper cup piece was already big, so I used the 5.2 and I took about 1.5″ worth of darts out of the neckline. The pattern looked a bit distorted, but in a logical-ish-way, so I ran with it. In the picture on the right (below), you can see my upper cup piece looks completely inverted from the way the pattern piece is printed for the pattern.

Again, being short on time, I kind of thought it looked good enough and just went for it. I could have (but really didn’t want to) do a mock up with boning, etc. to actually get a good idea of fit and tweak things a bit more, but I was feeling the time crunch so I just cut things out and started sewing.
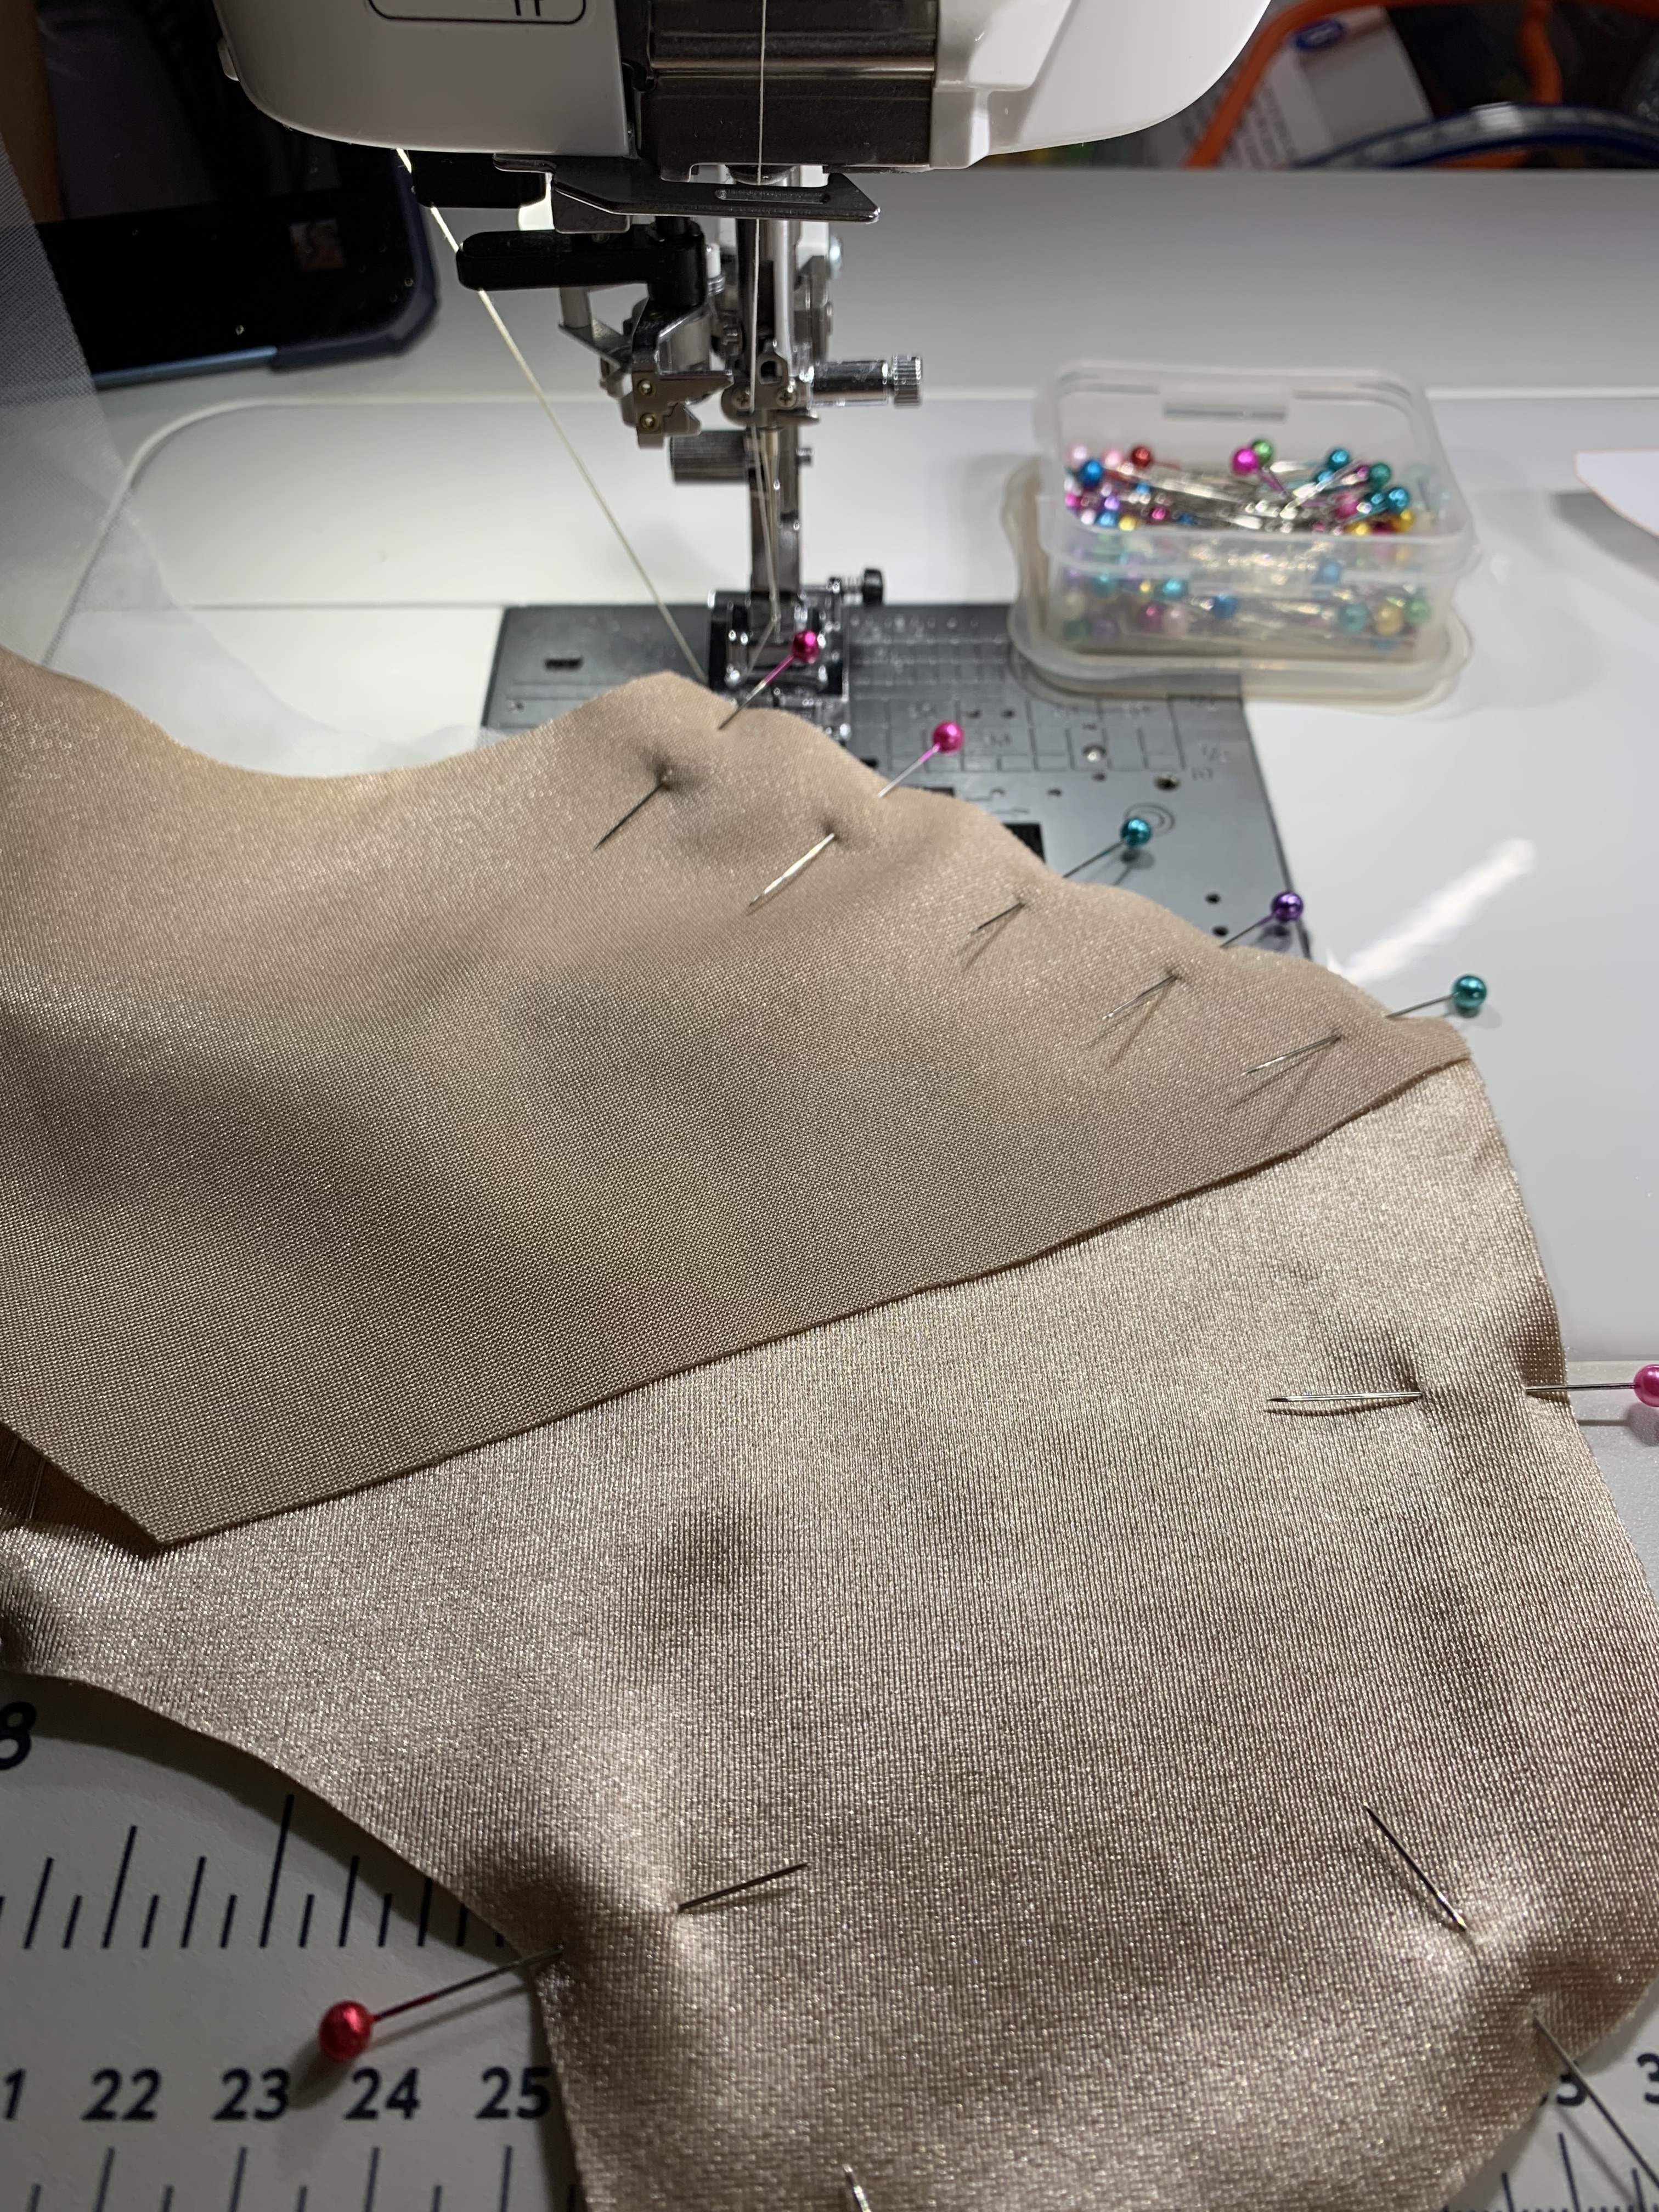

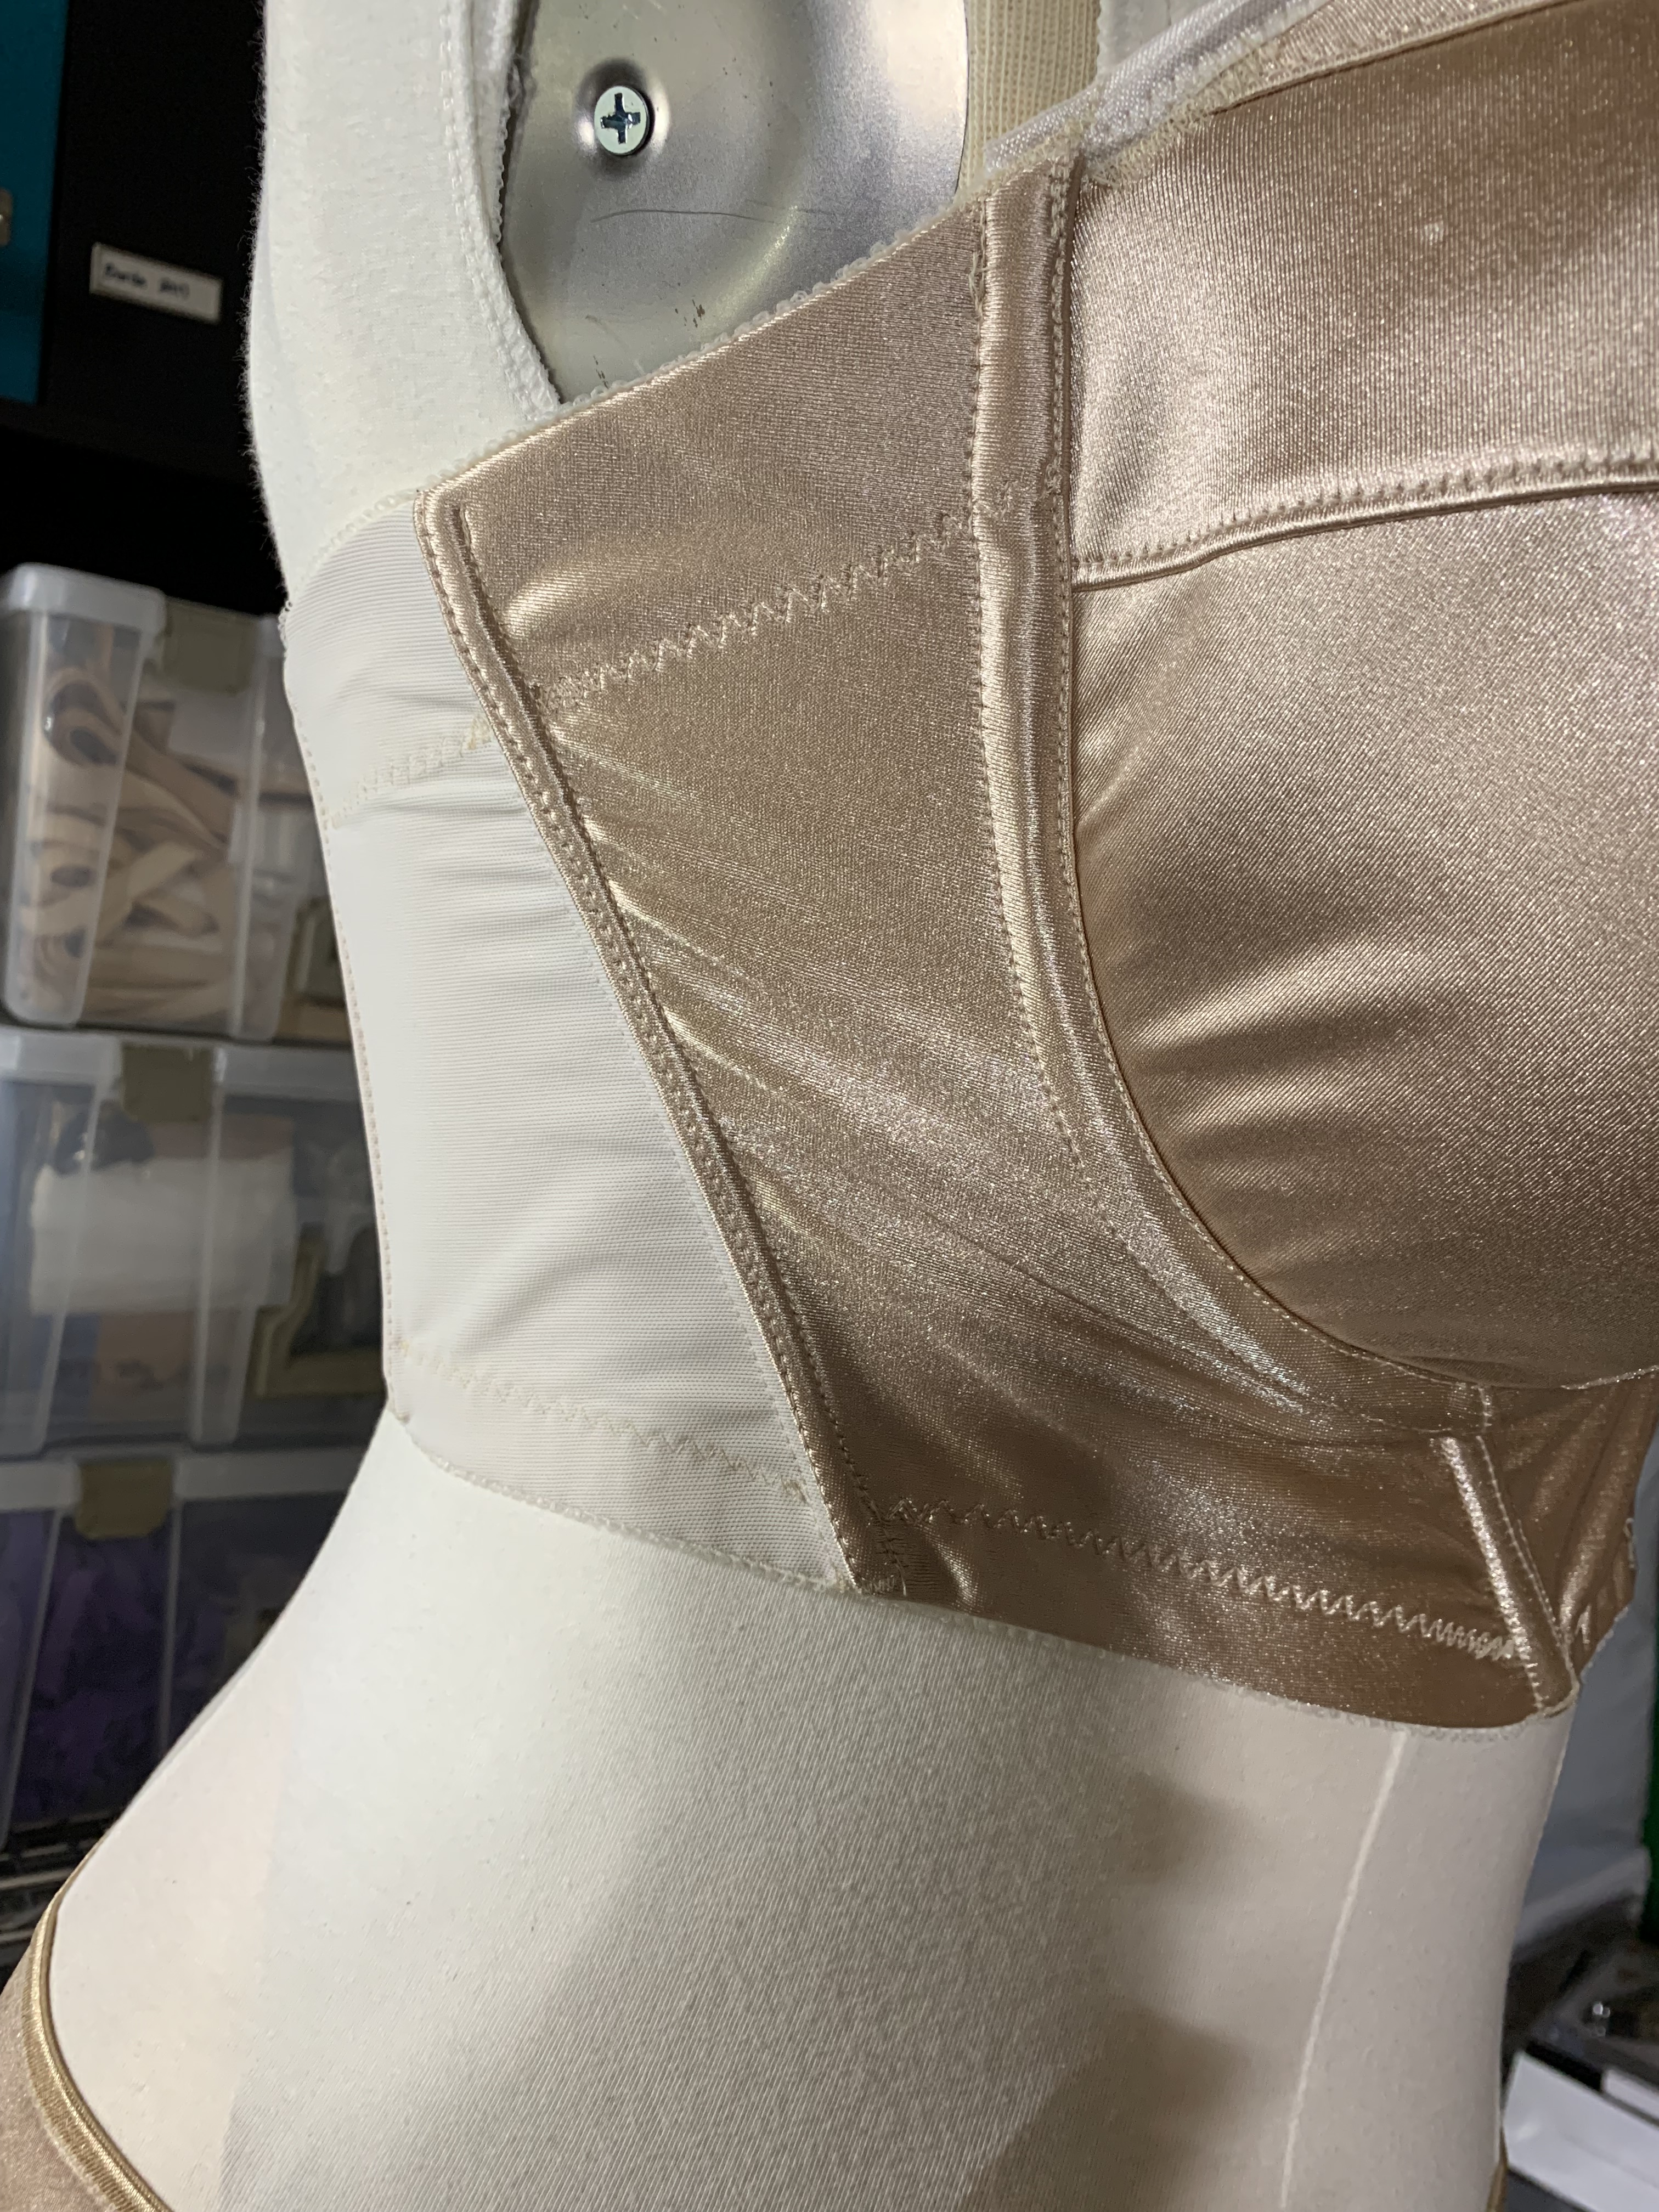
Making the cups was wild. This pattern is honestly genius in terms of how it creates support. It adds boning to the cups, and has an option to wedge it between two laters of foam. I wanted a smooth silhouette on the outside, so I actually used 2 different types of foam for the cups – a slightly thicker beige for the inner cups to support the bones, and a thinner foam for the outer layer to sit under the fashion fabric. I also don’t usually add tape to cover my foam seams, but I did here and it added even more support.

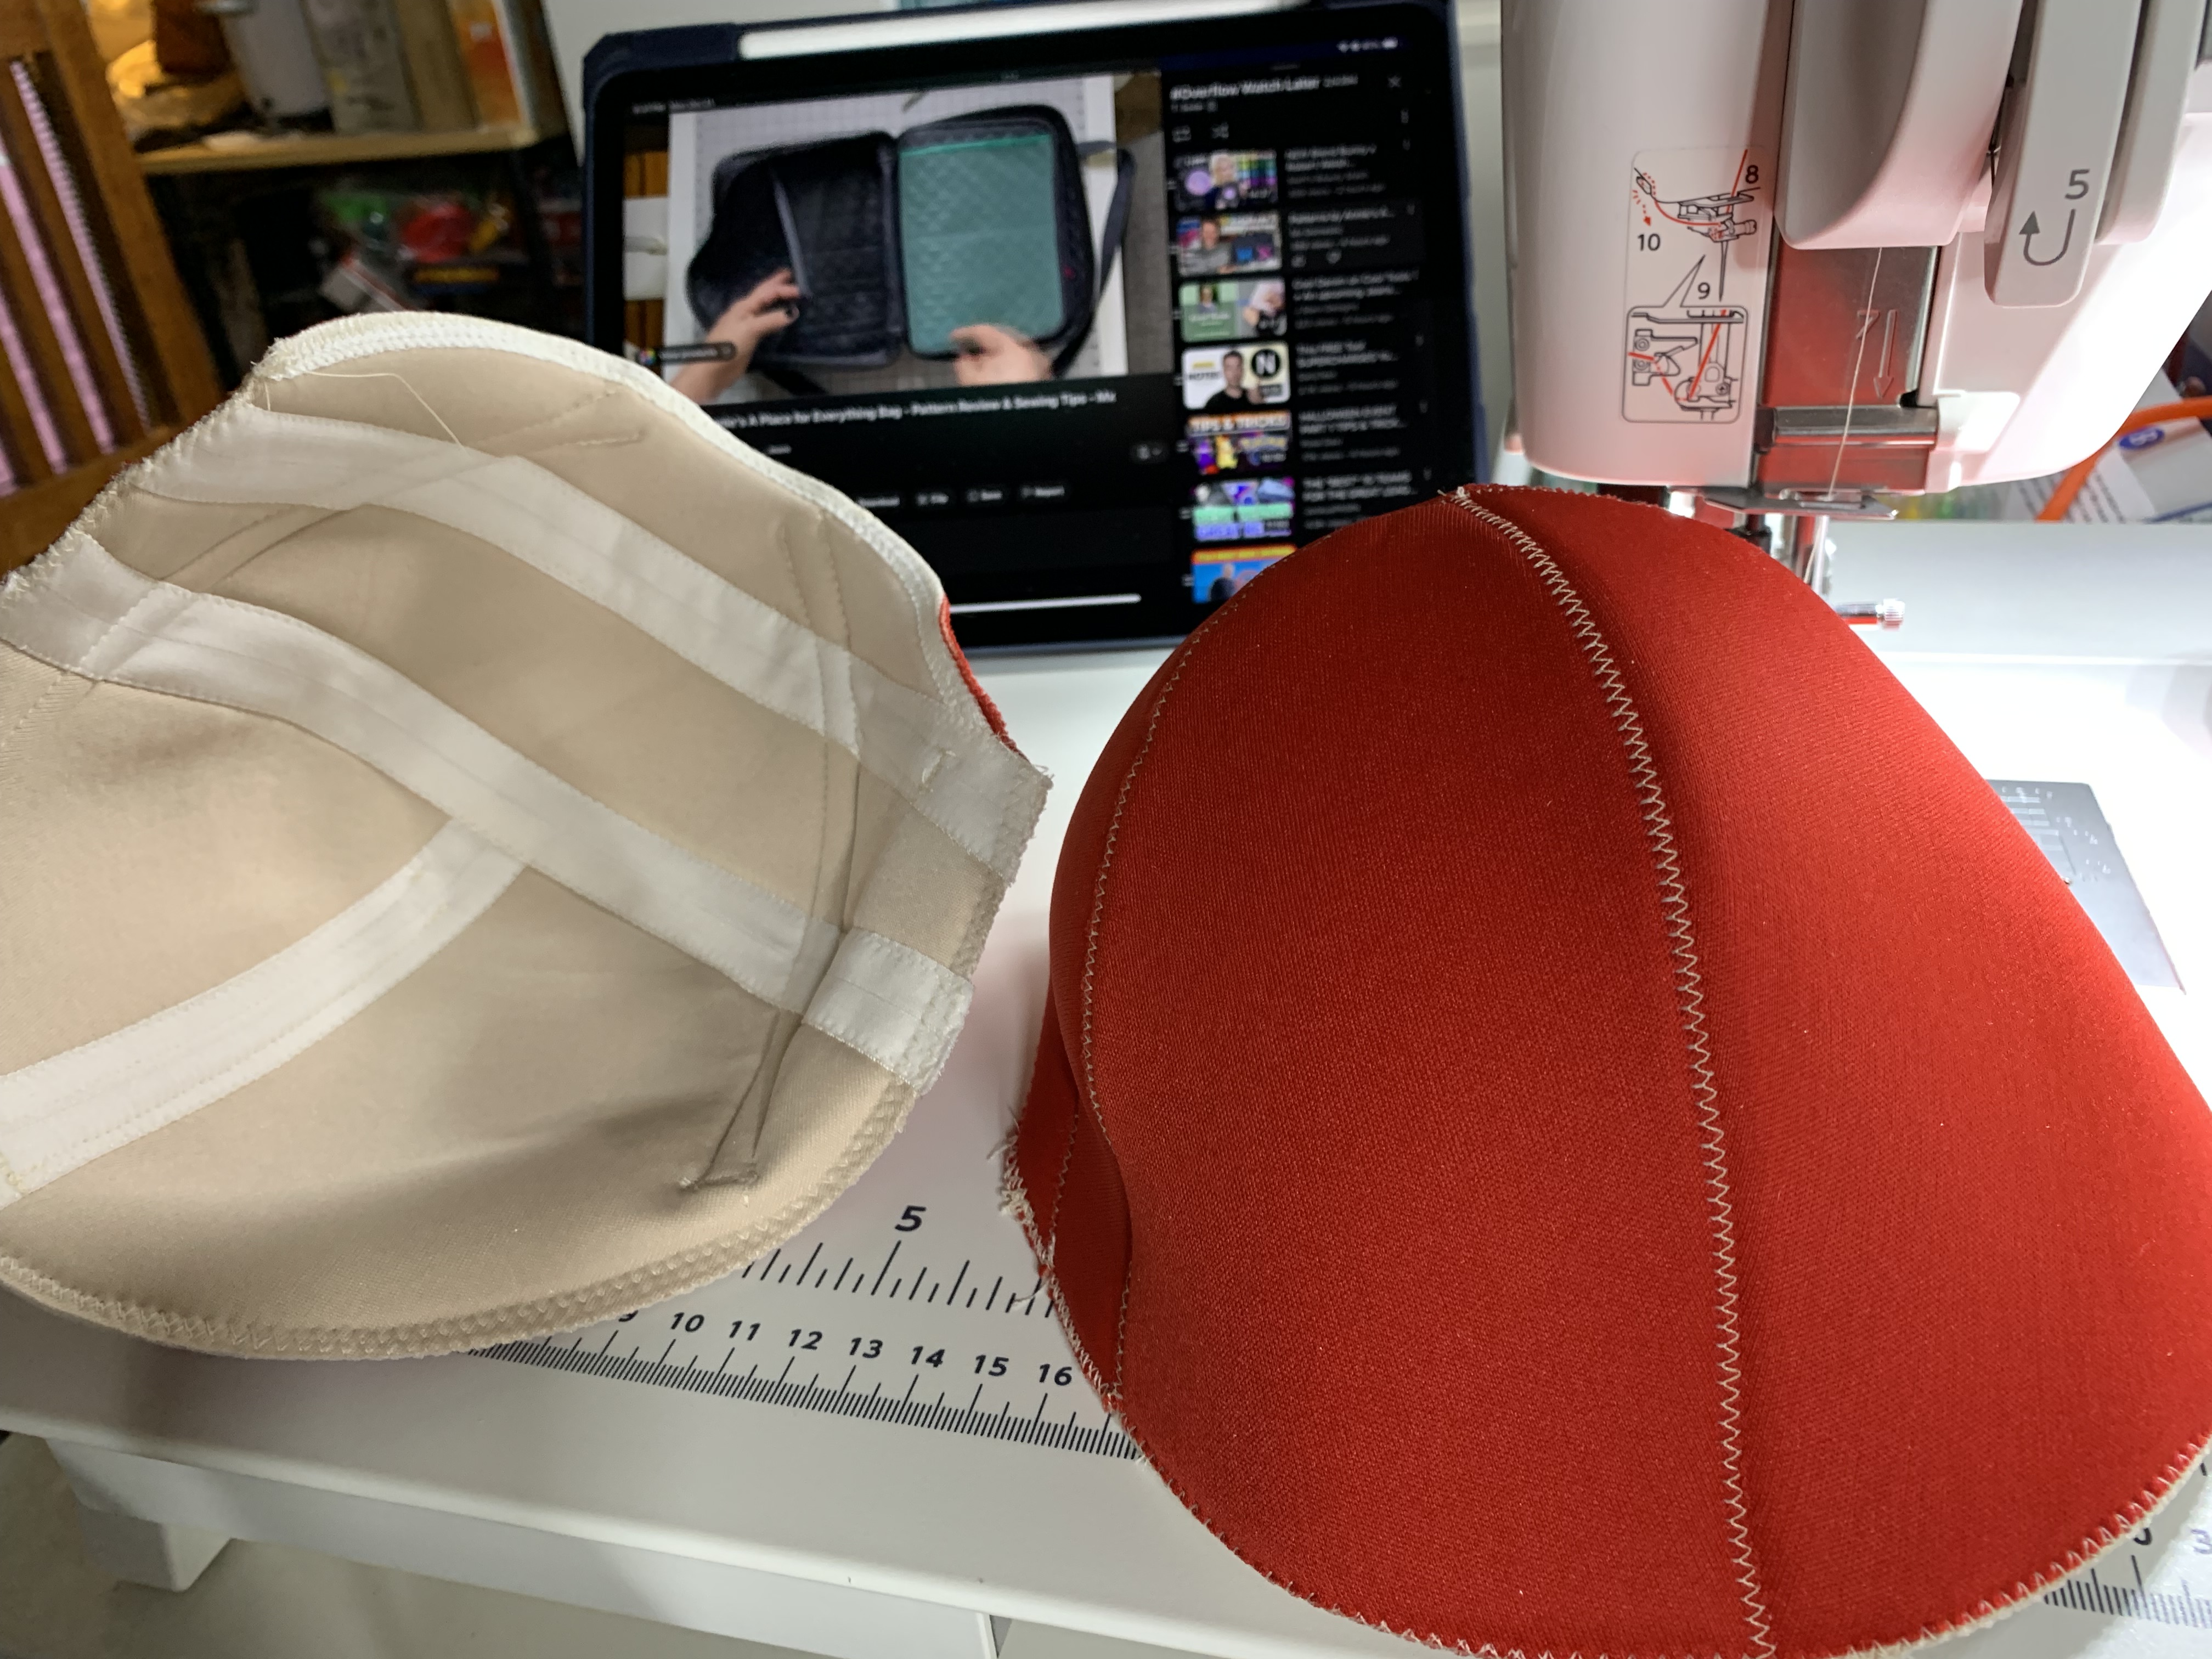
I was anxious that my fabric covers wouldn’t fit over all the foam but I used a satin spandex and it had the perfect amount of stretch – I was so relieved when I ended up with a normal looking cup!

I have to admit though, fussing with the boning was a huge PITA. I was using synthetic whalebone from Burnley and Trowbridge (why, you ask? Because I watch too many historical costubers who swear by the stuff, that’s why). I will admit though – this stuff is legit – by far the best plastic type of boning I’ve seen or worked with, and probably a significant part of why the bra feels so supportive.


I will admit too that I used what I consider to be the “good” channeling from Bra Builders, which I love for underwires because it’s so plush but might be a bit tight for the boning. I got it to work, but my hands are still sore from the effort. Next time I’m going to use “cheap” channeling for the bones (I have channeling from other sources that is much less padded and would probably have a slightly wider hole for the bone to pass through) and I’ll reserve the good stuff for the underwires.
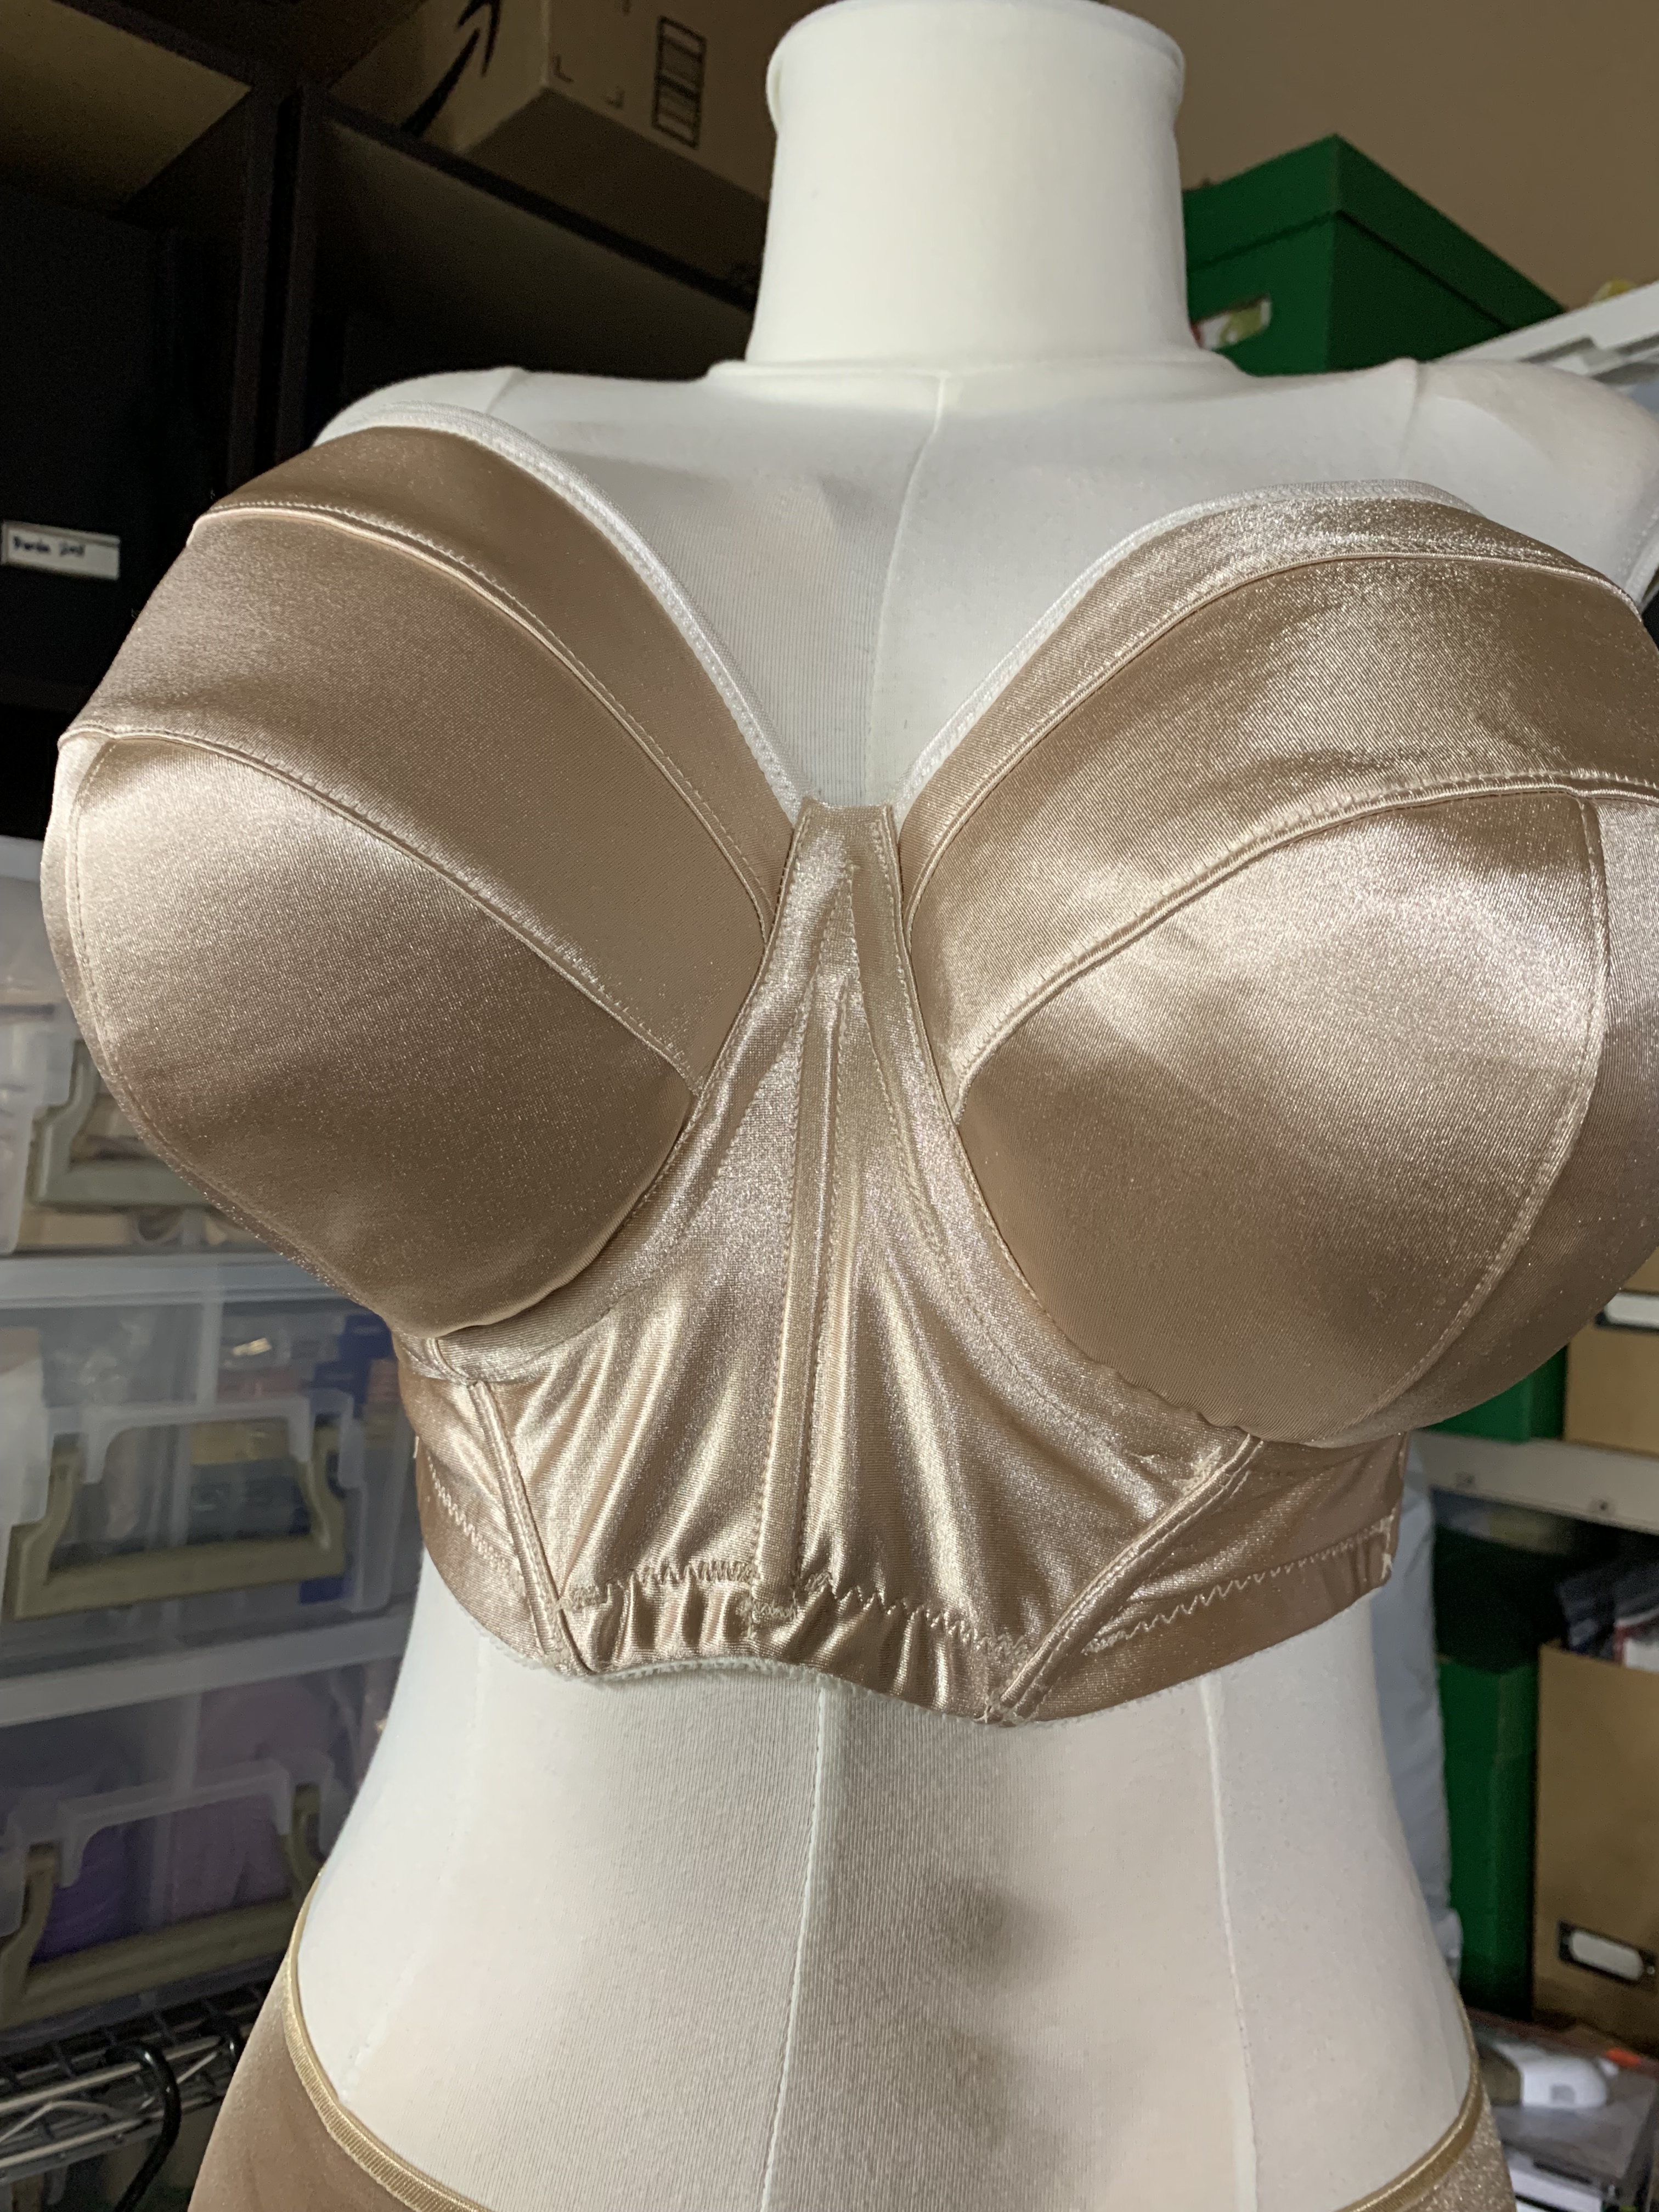
Wrangling the double-foamed and boned cups under the machine to attach them to the band (and add the channeling!) was such an endeavor I stopped documenting at that point to focus, so I really just have finished photos at this point. But here is my finished Marei!
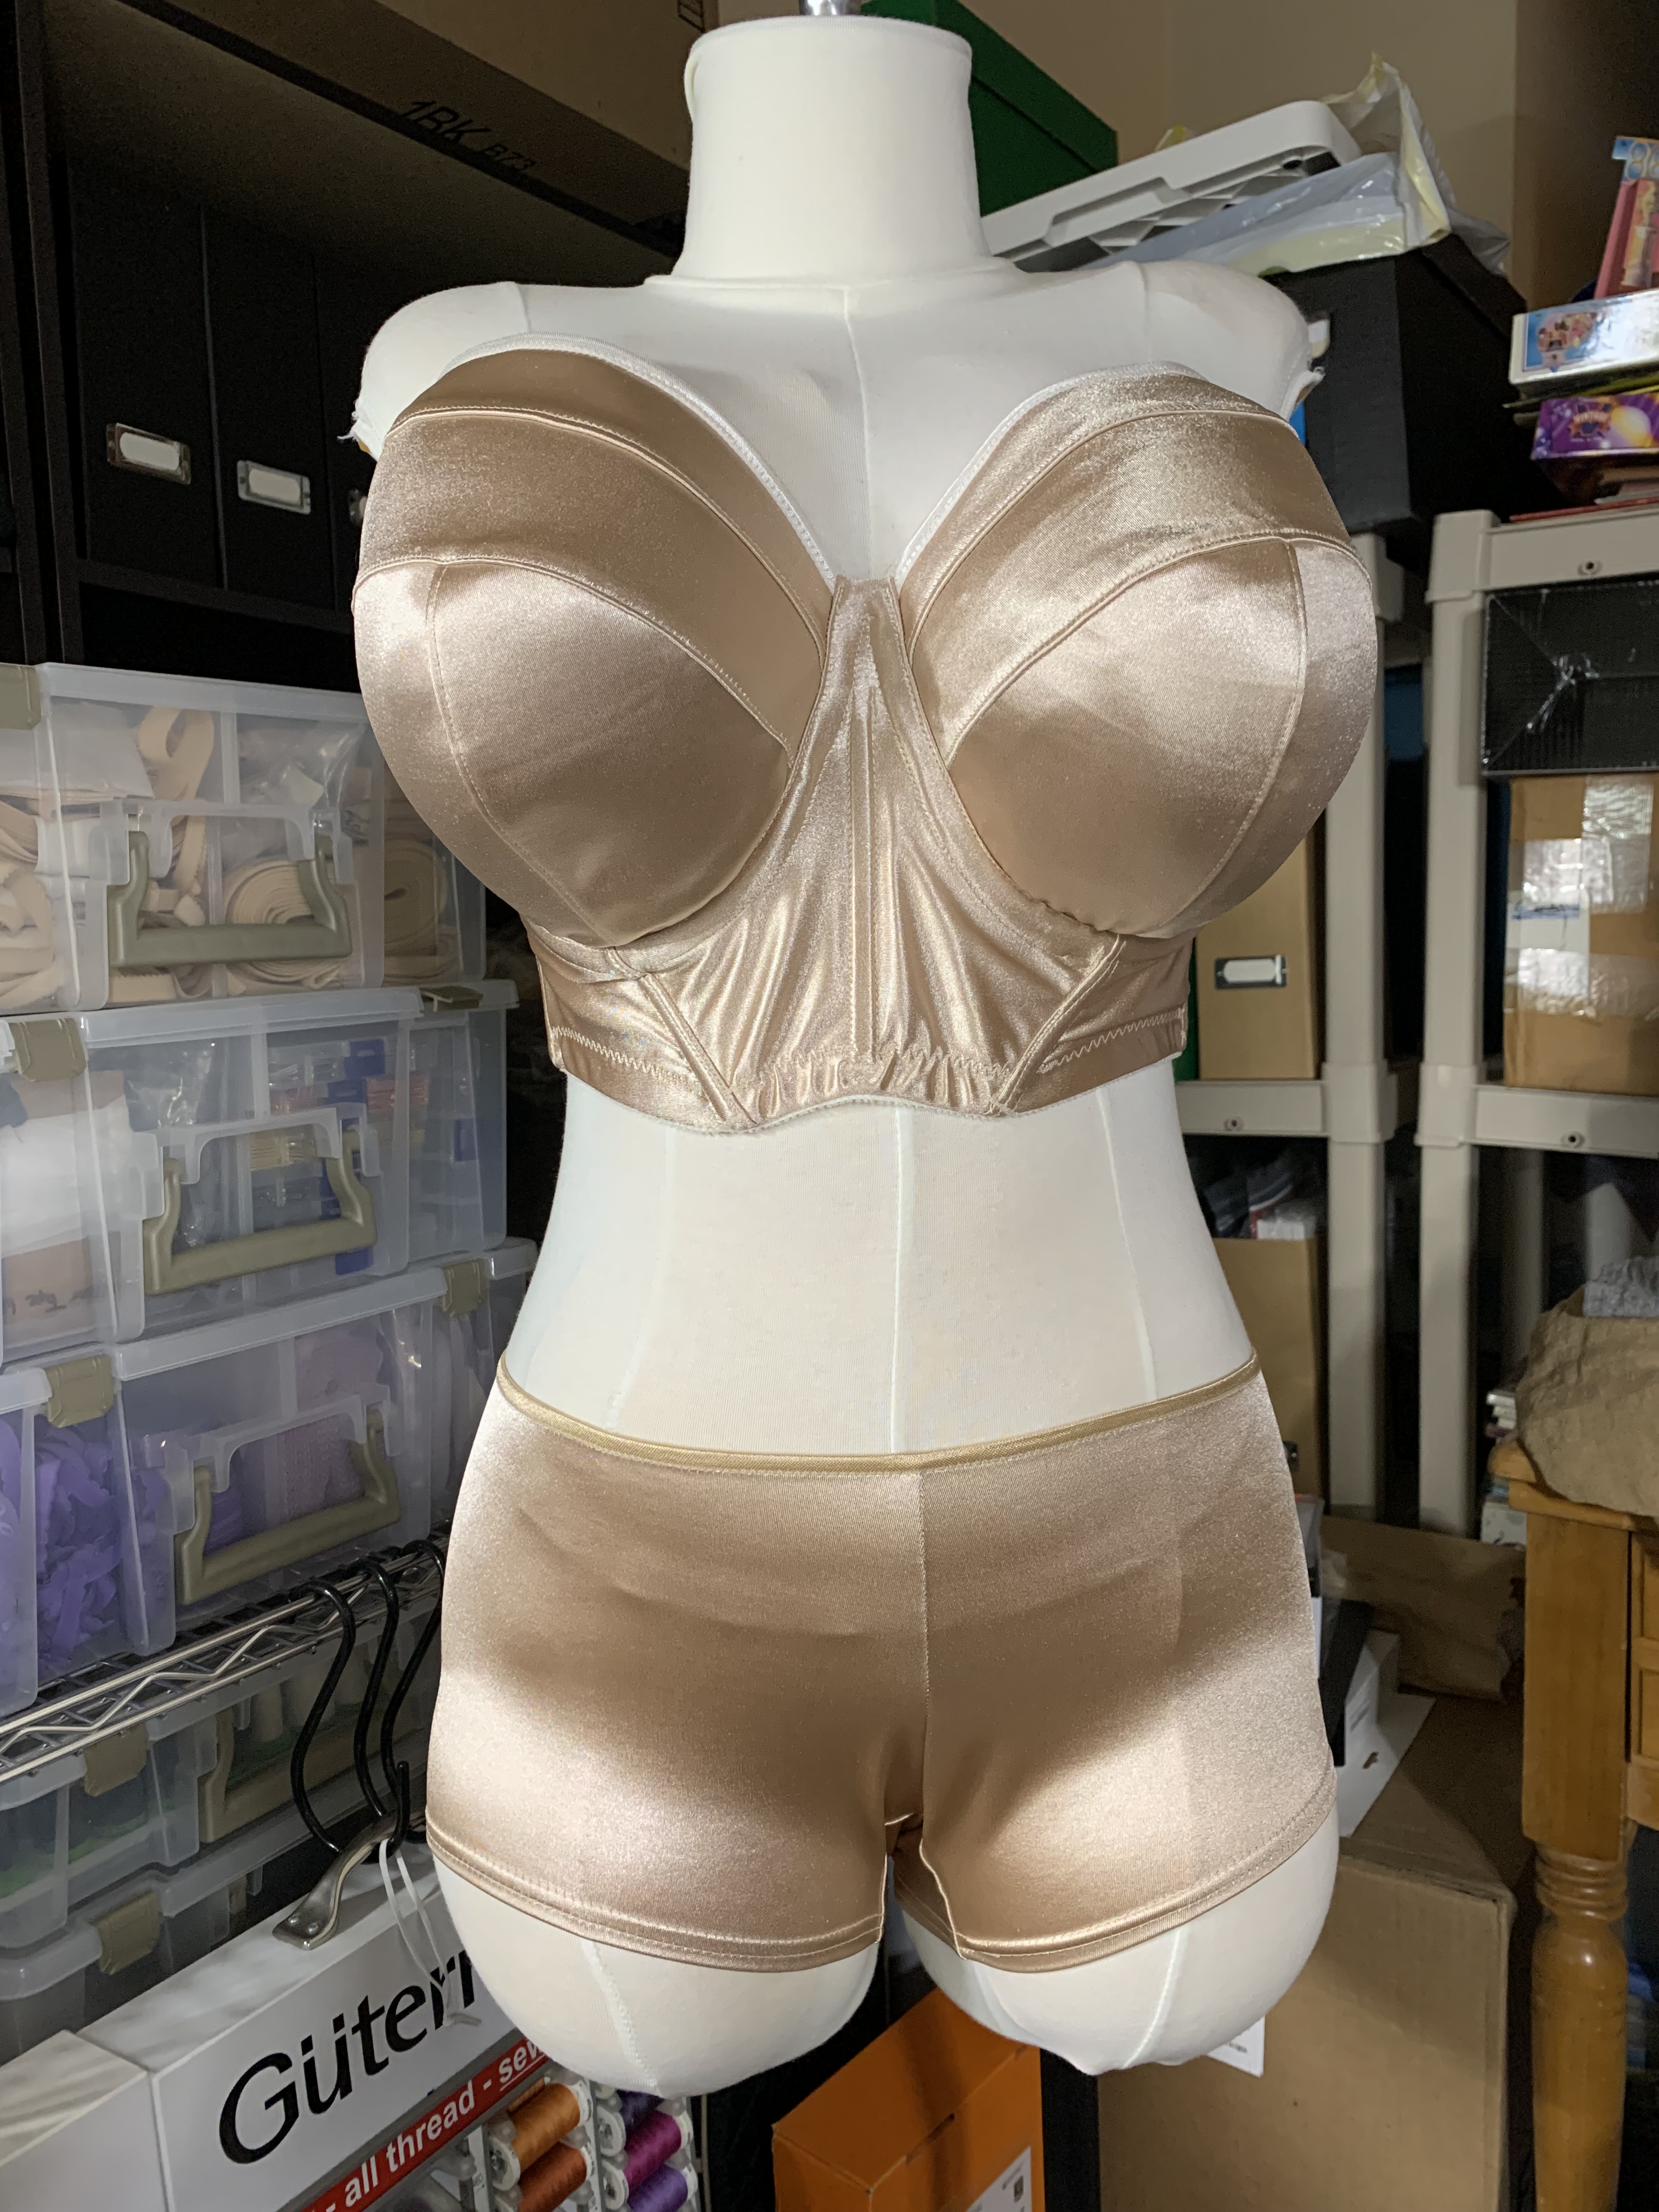


I am so shocked and pleased with how well it turned out! Here are some detail shots because I need to show it off some more:


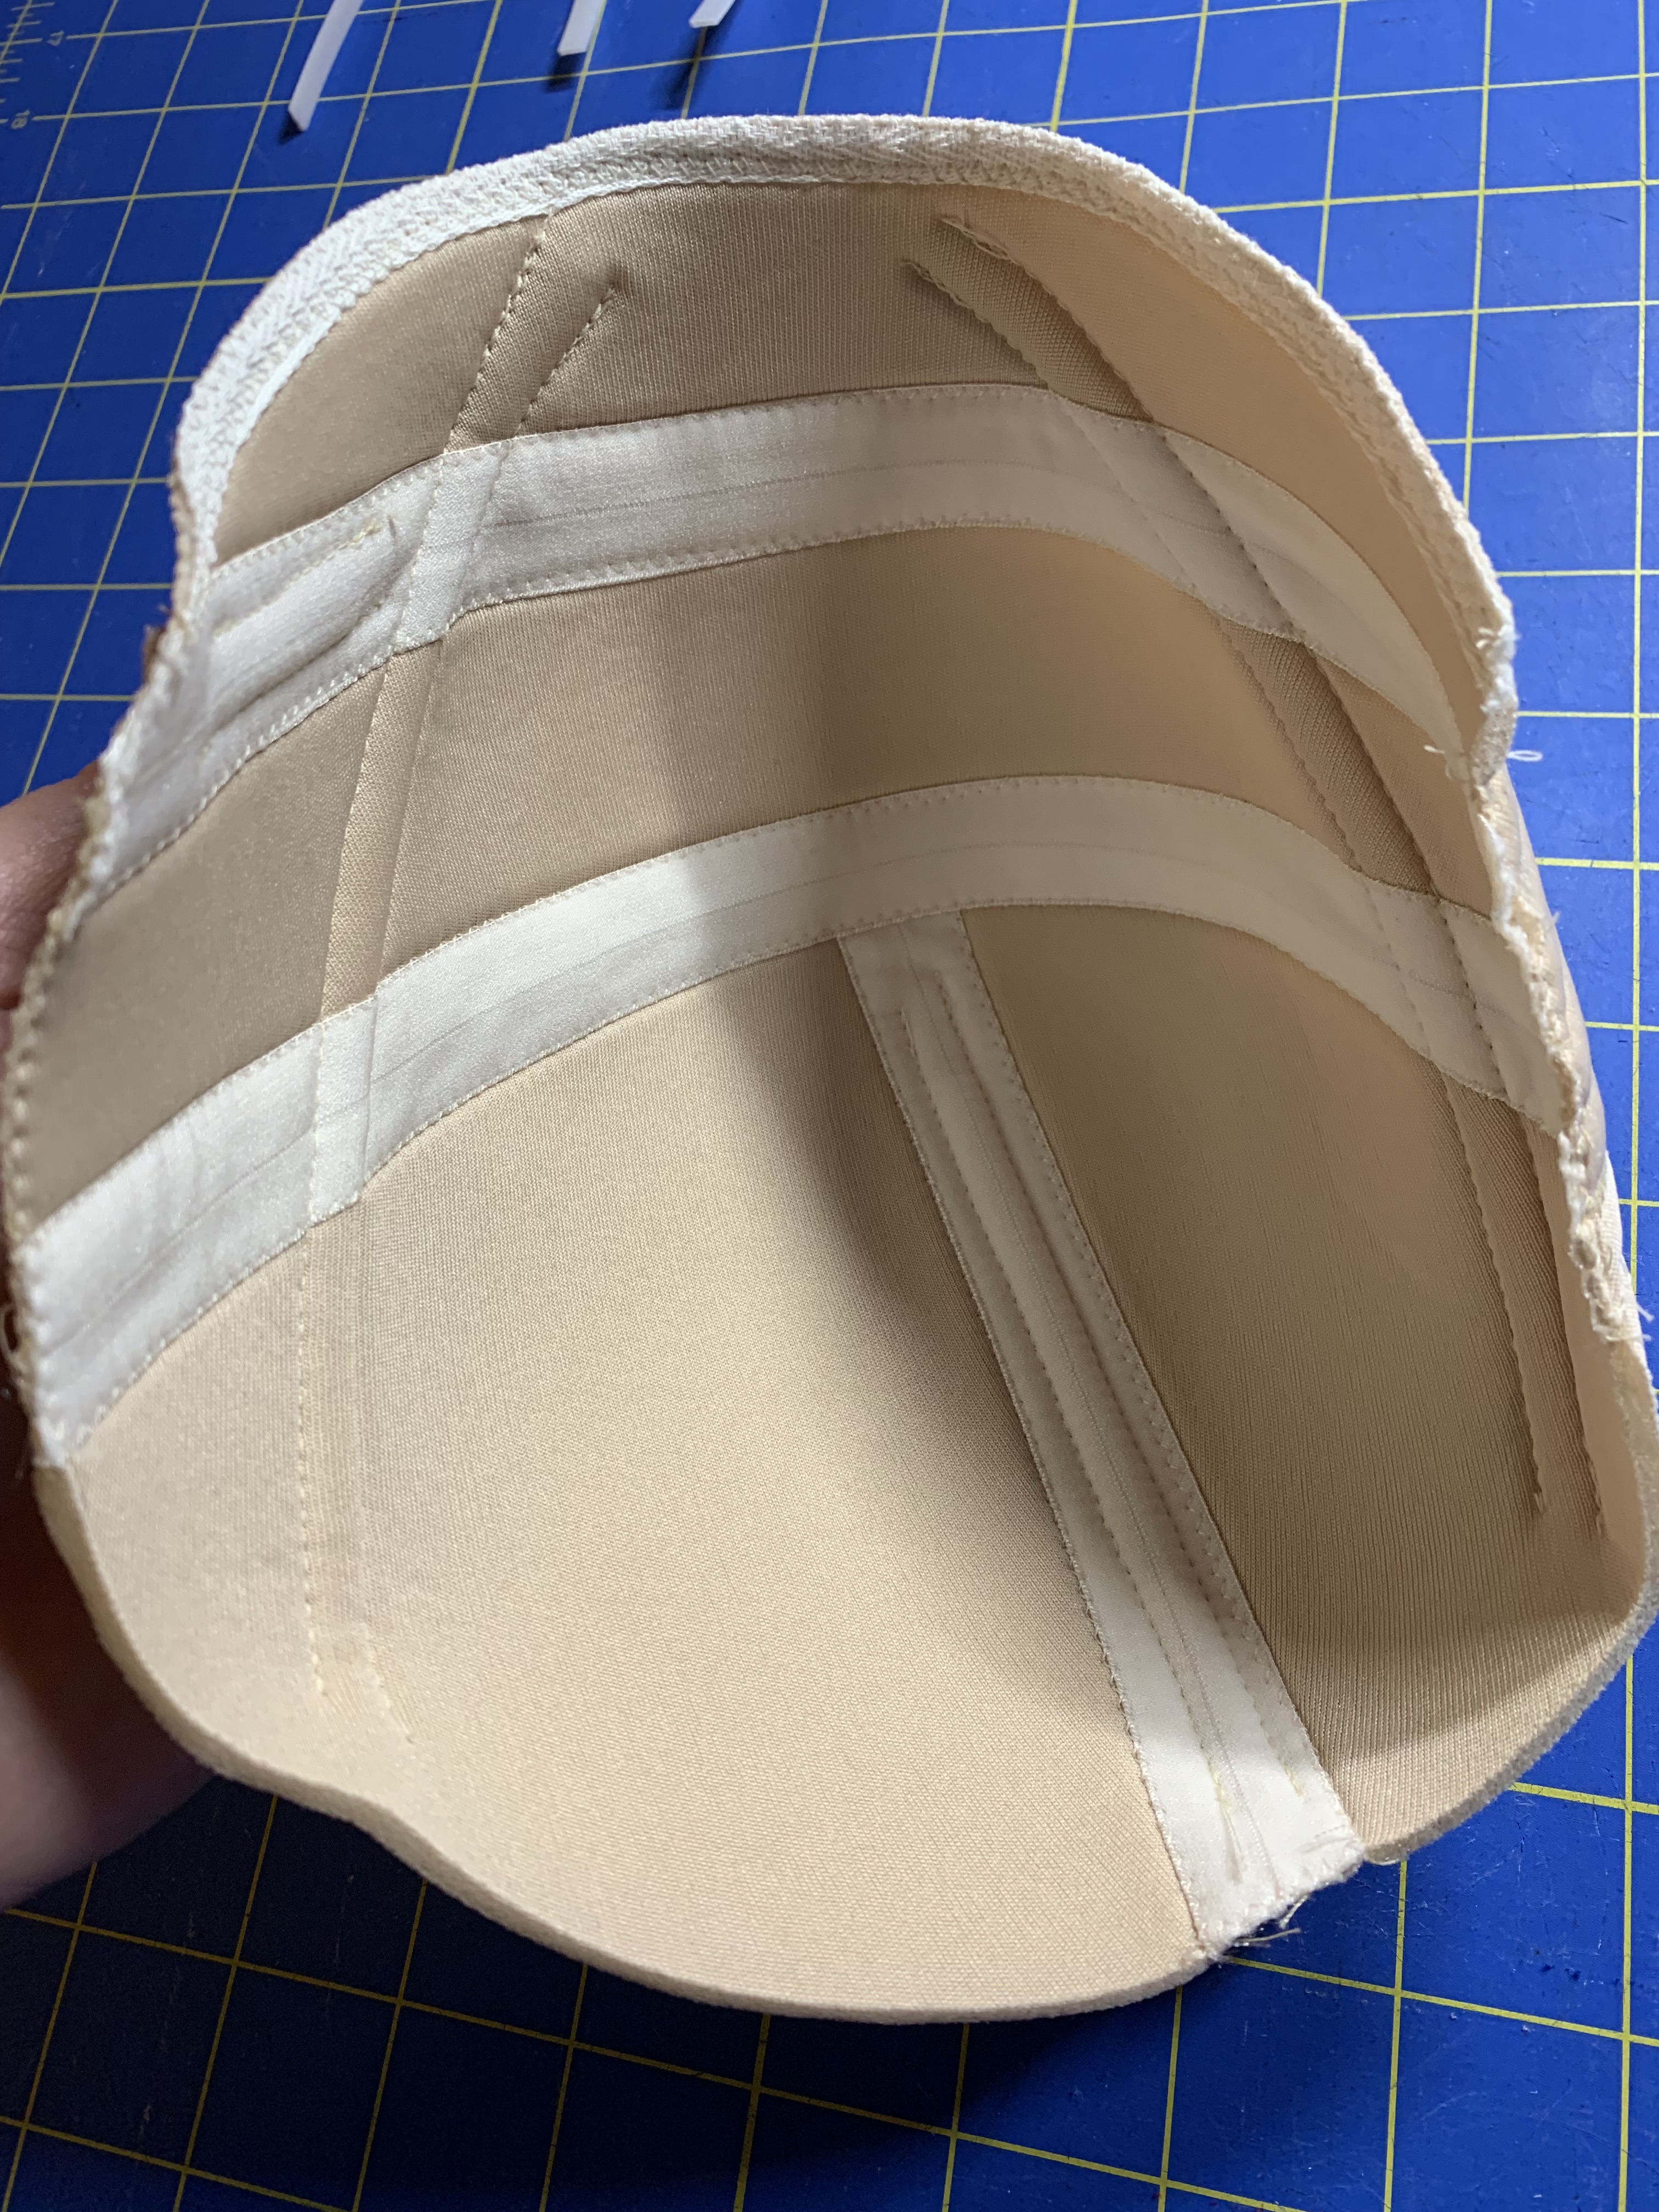
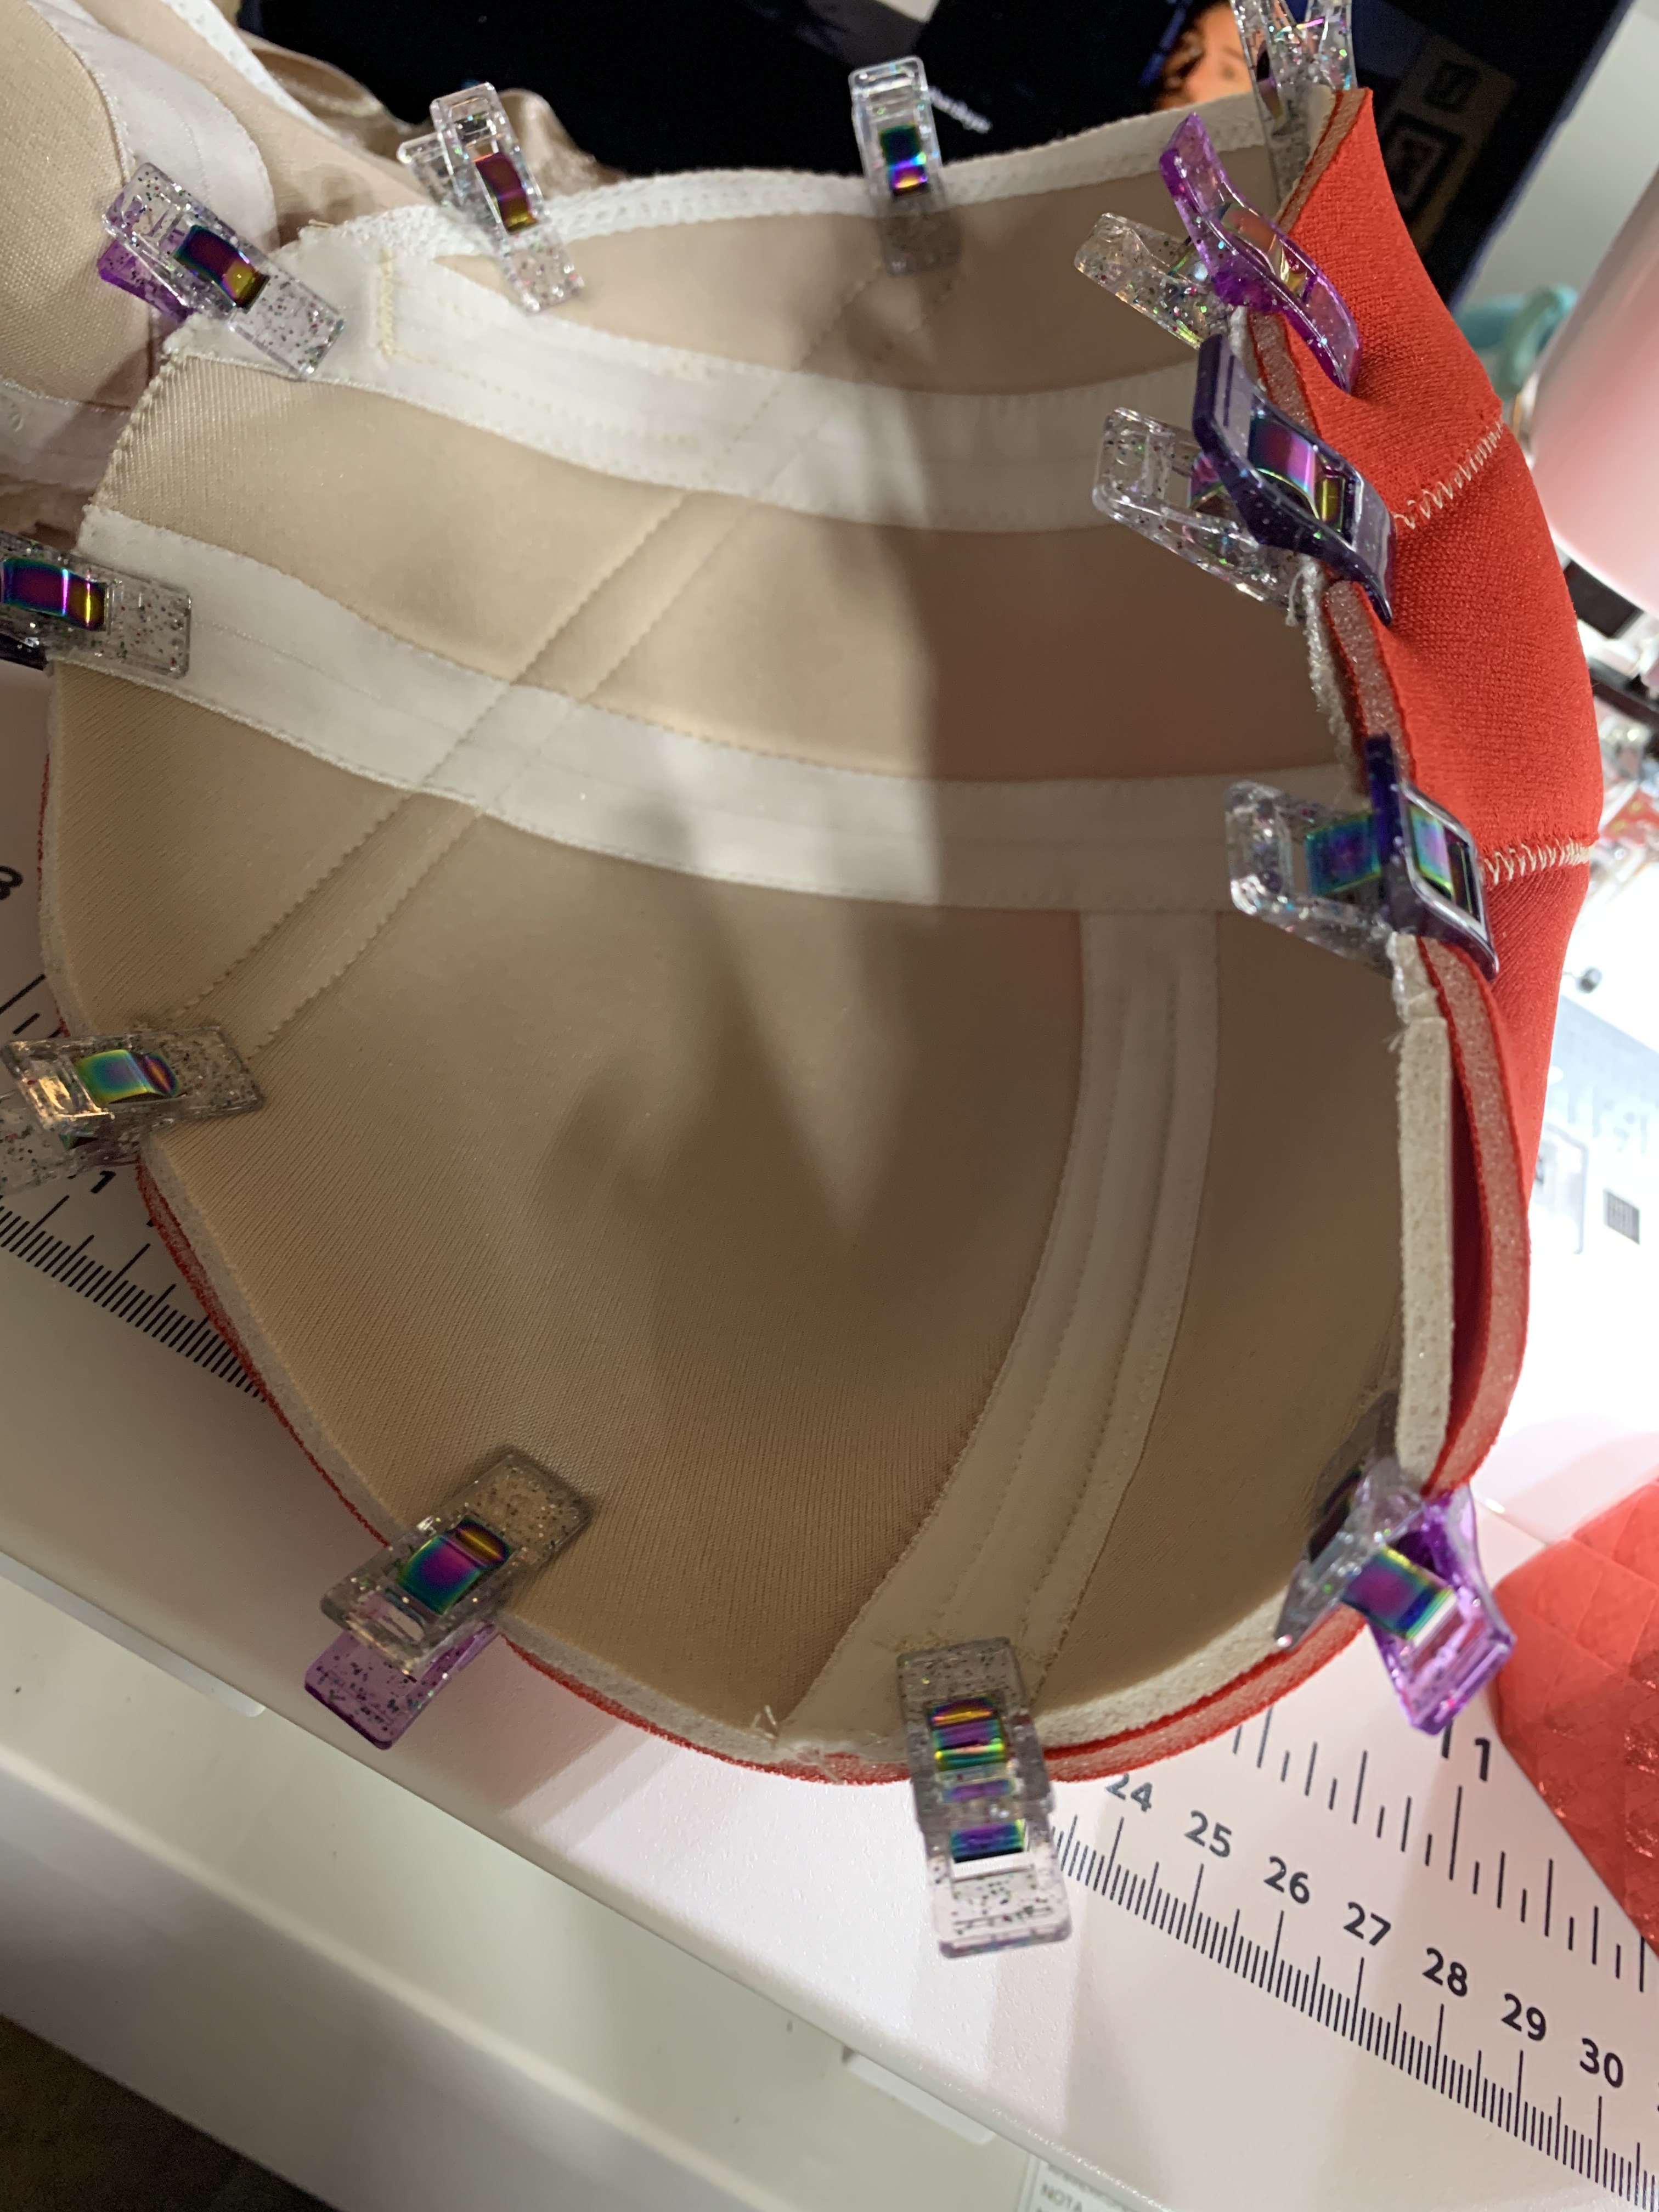
And here’s the inside – I think you can really see how much boning there is and how important it is for the support:
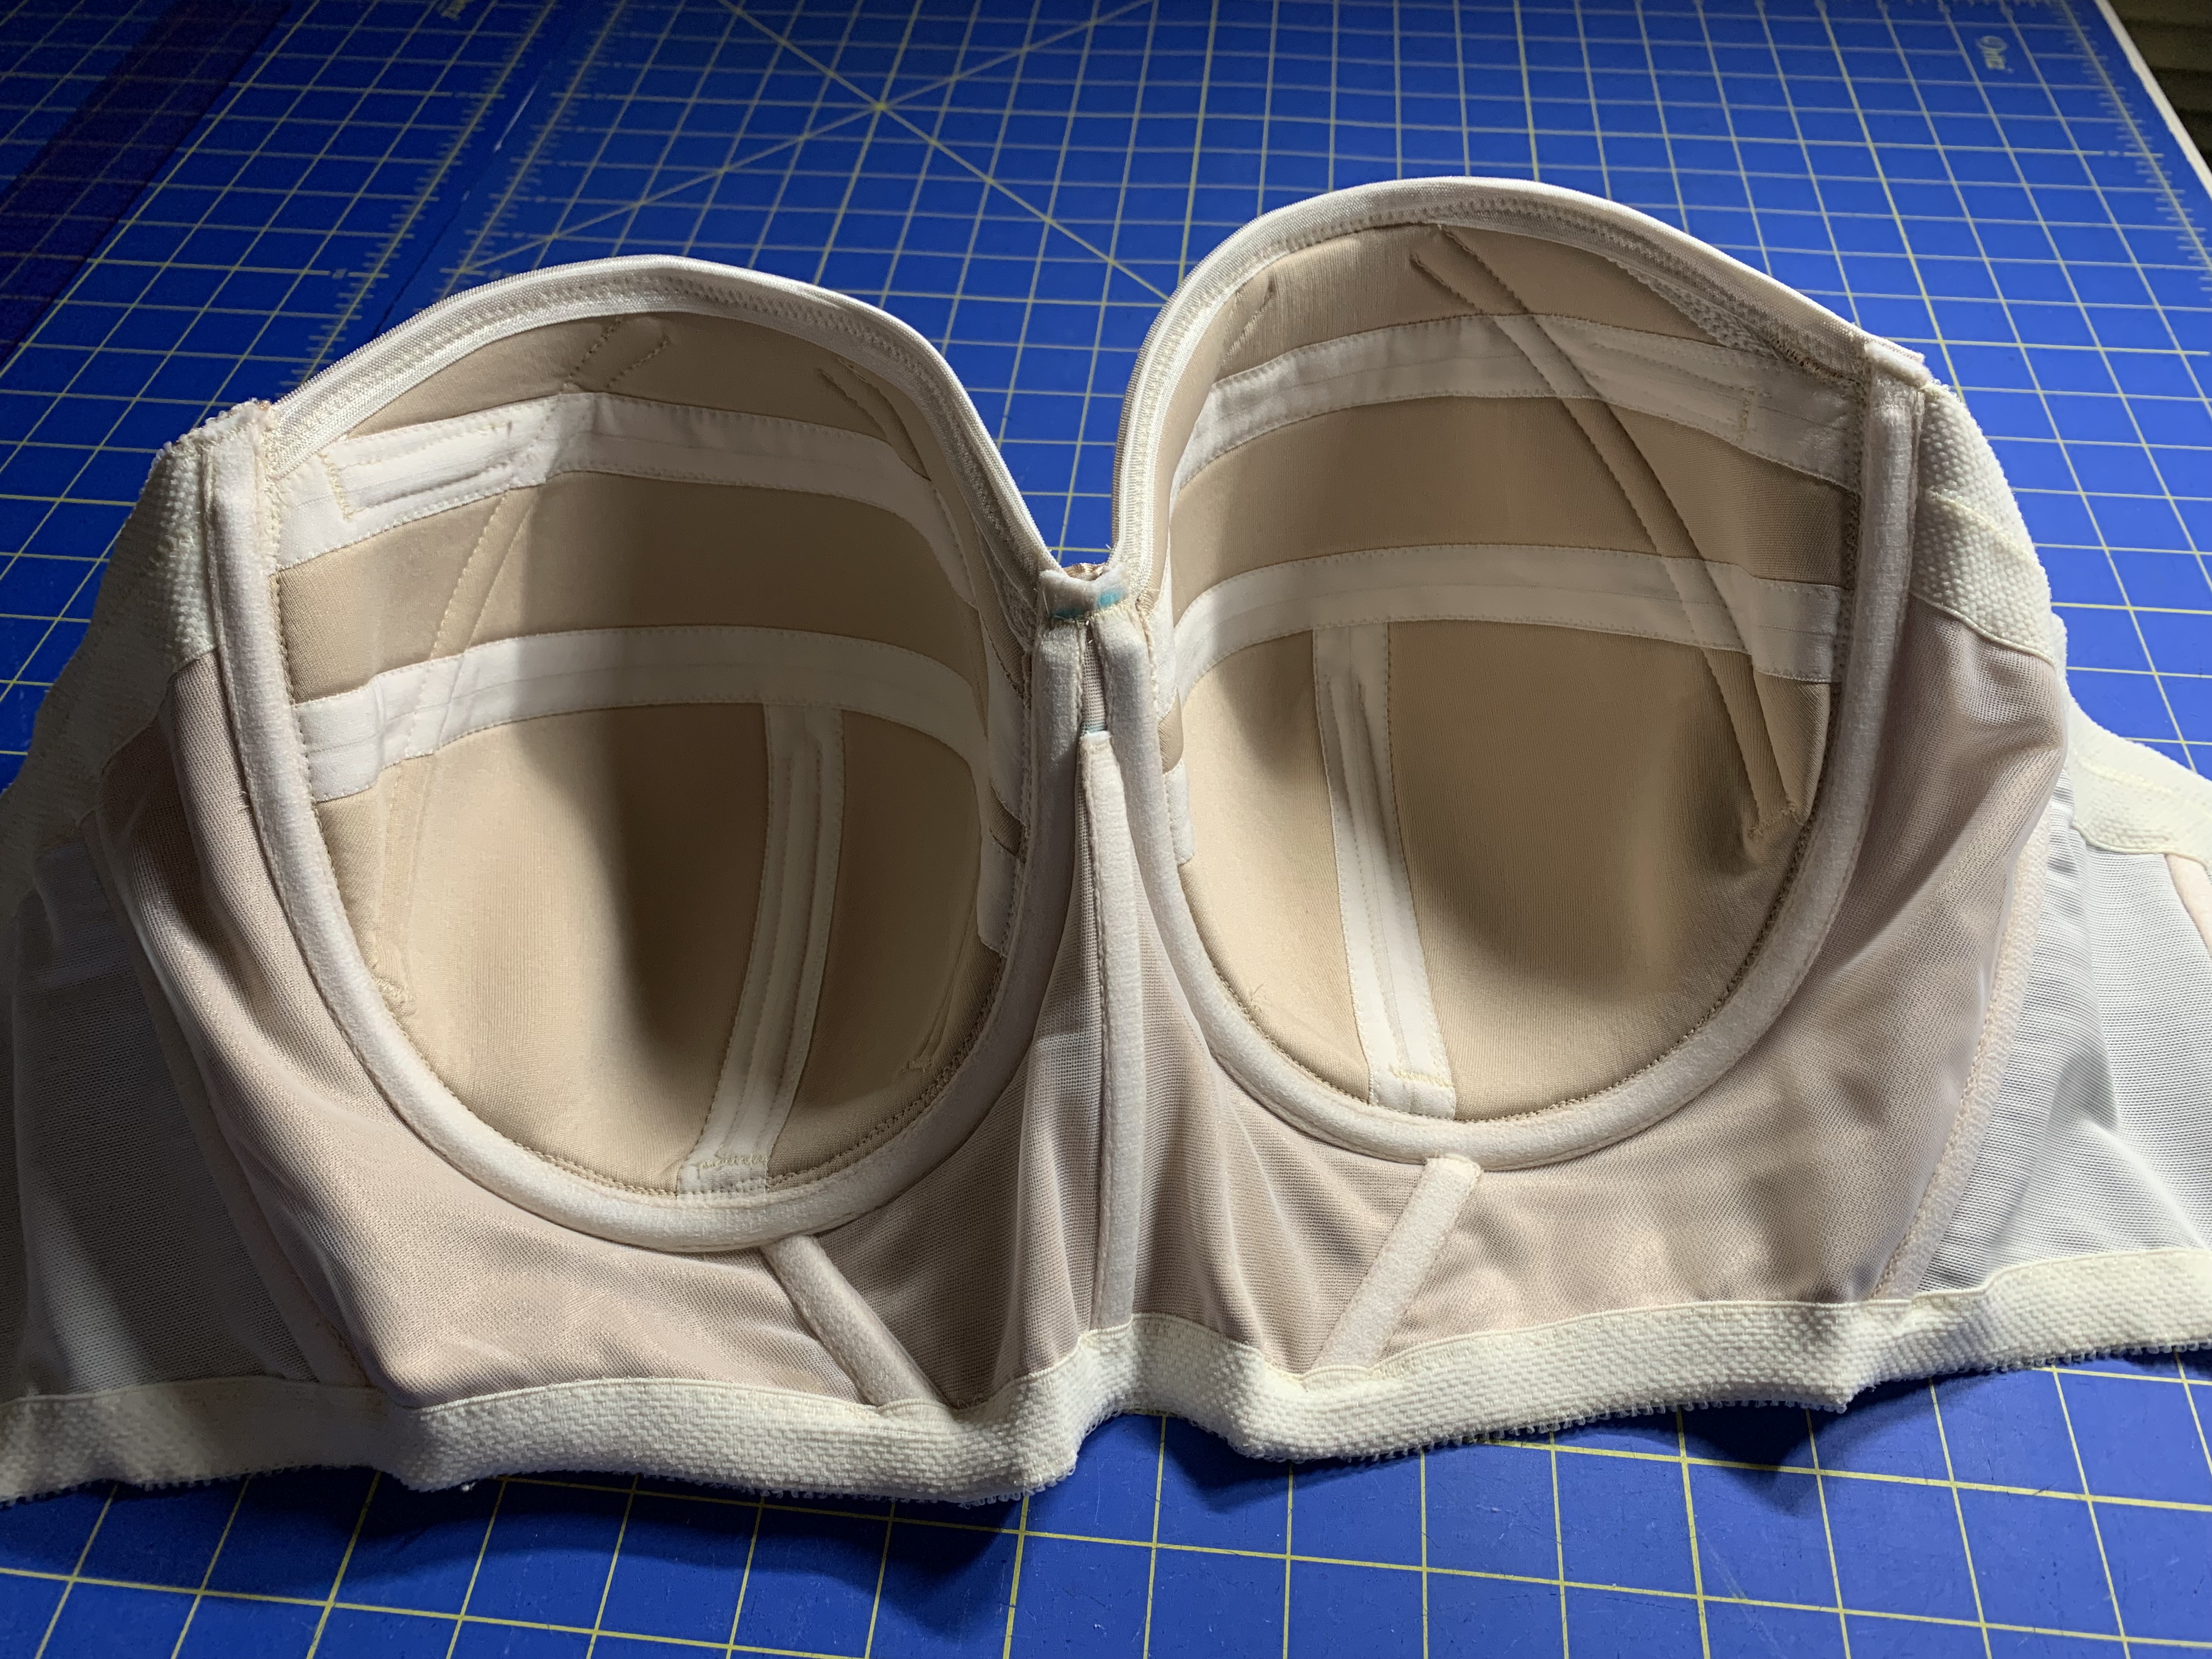
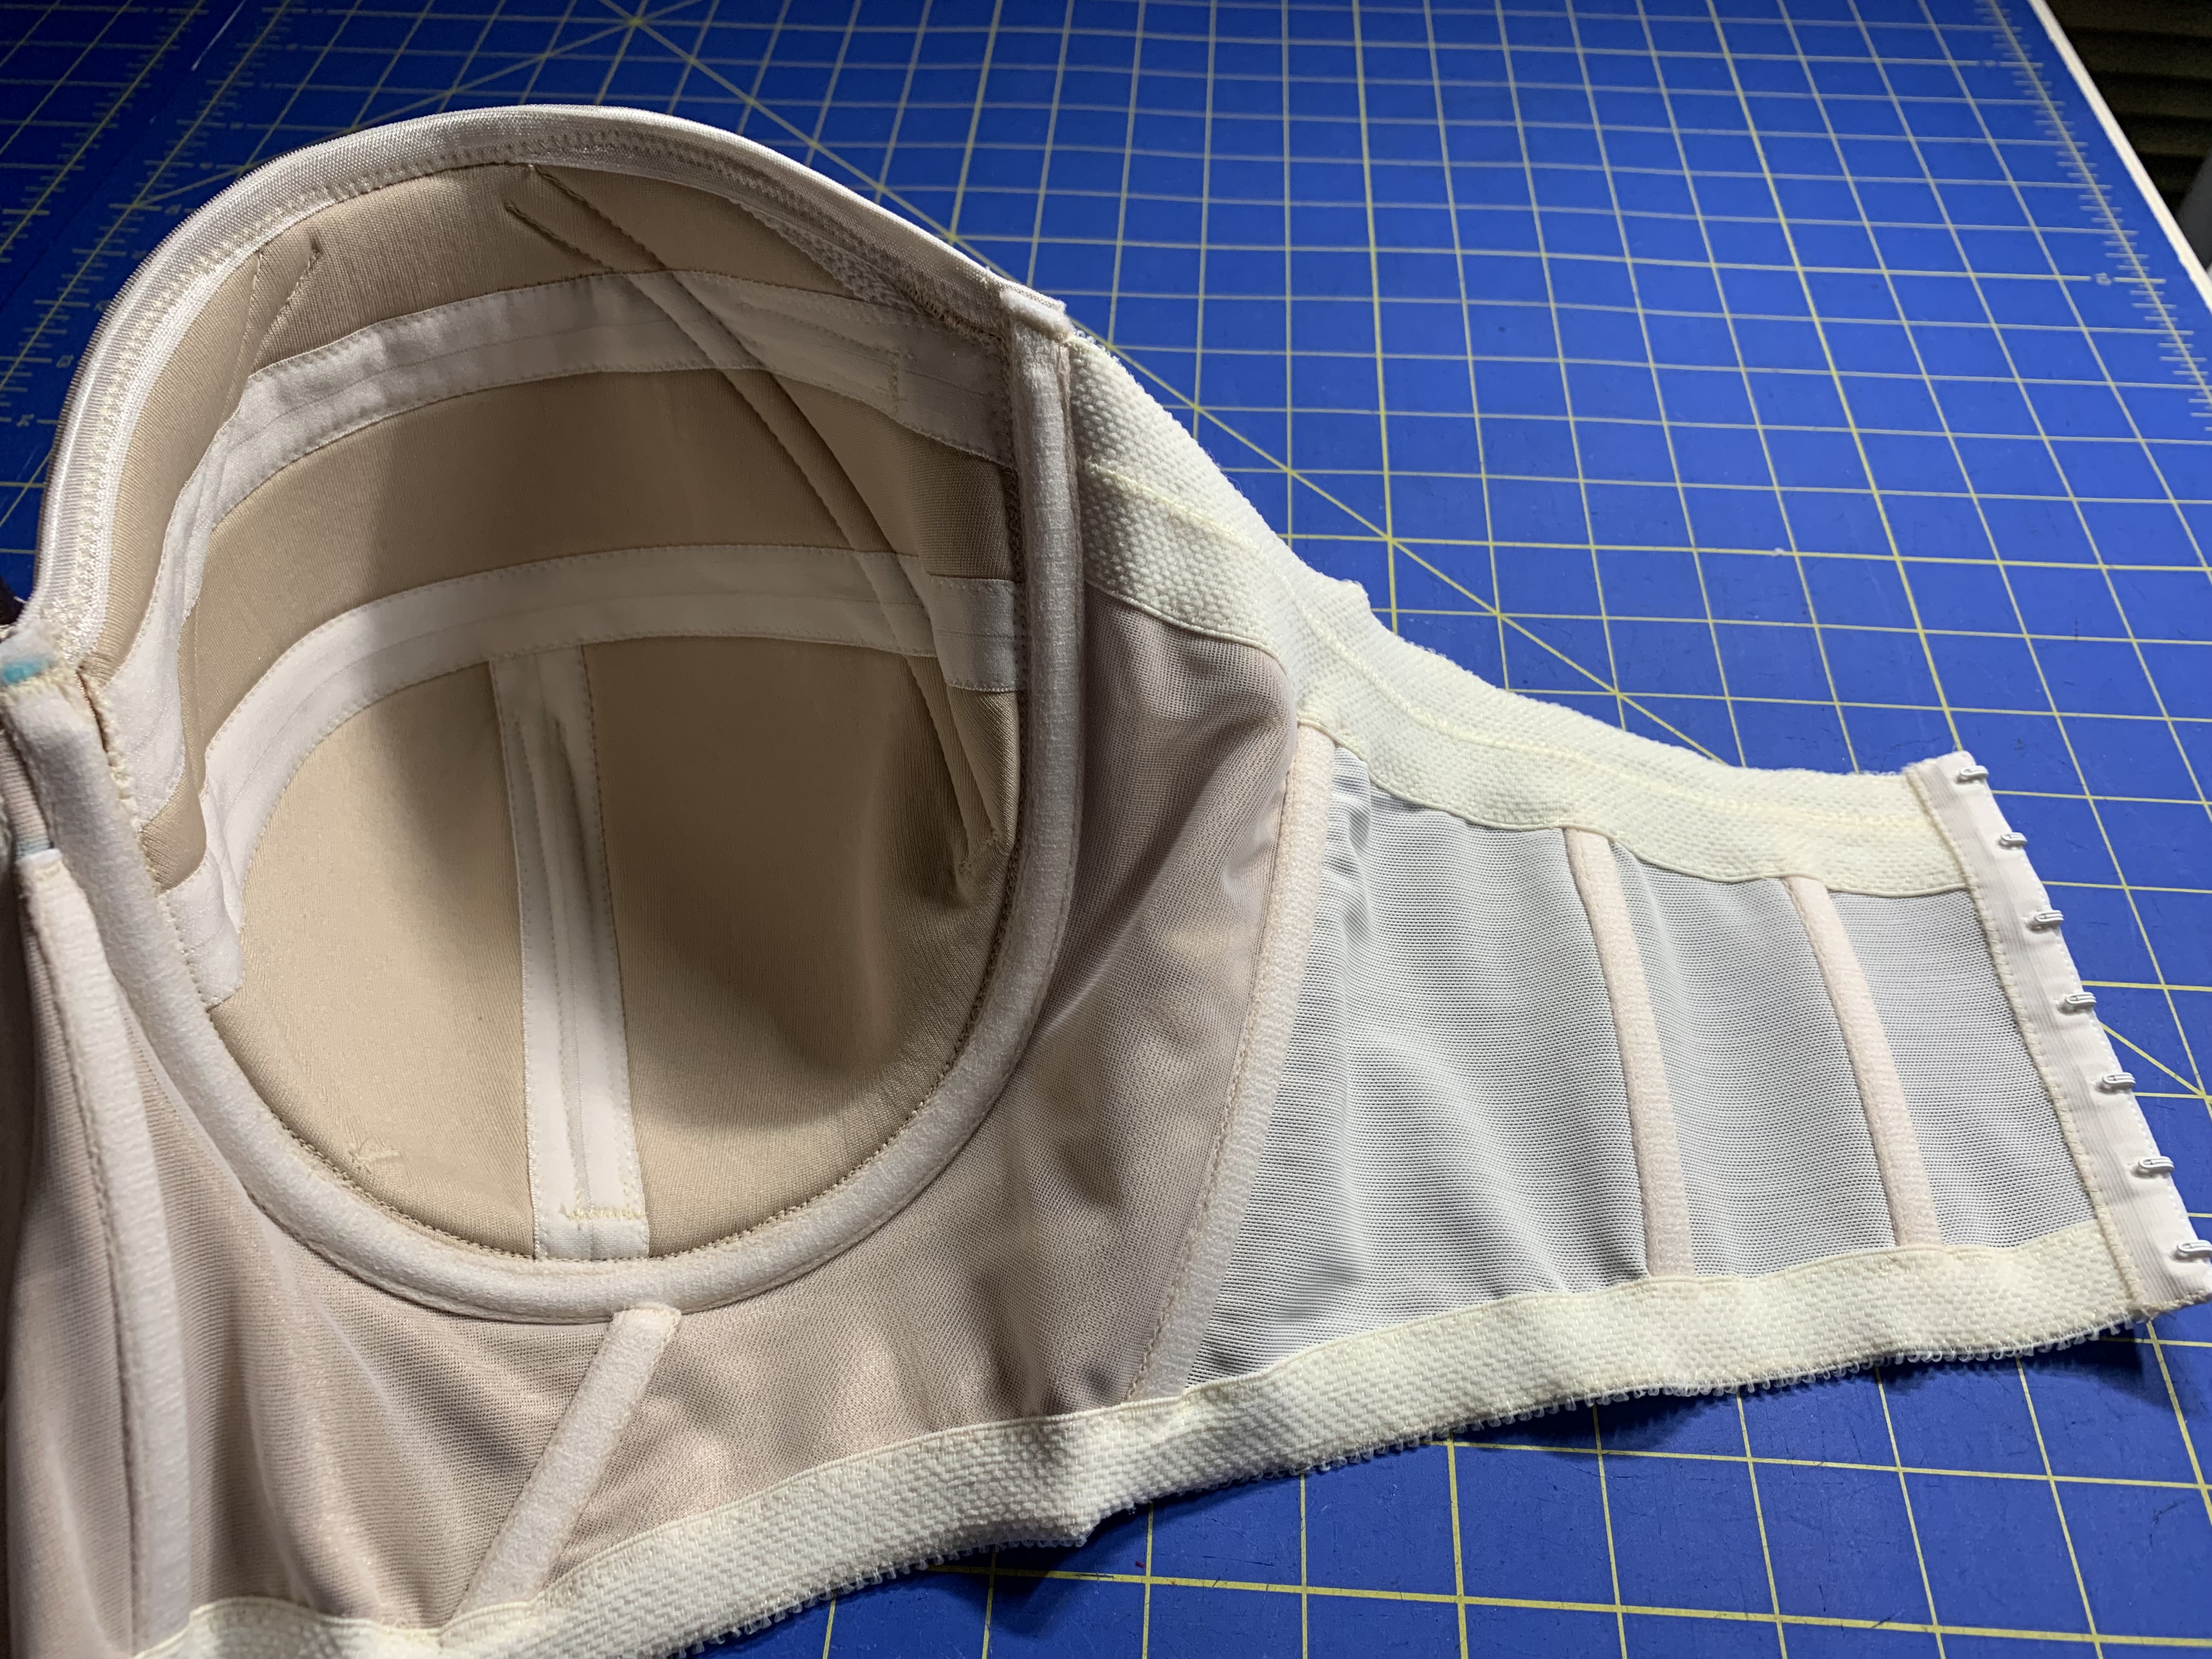
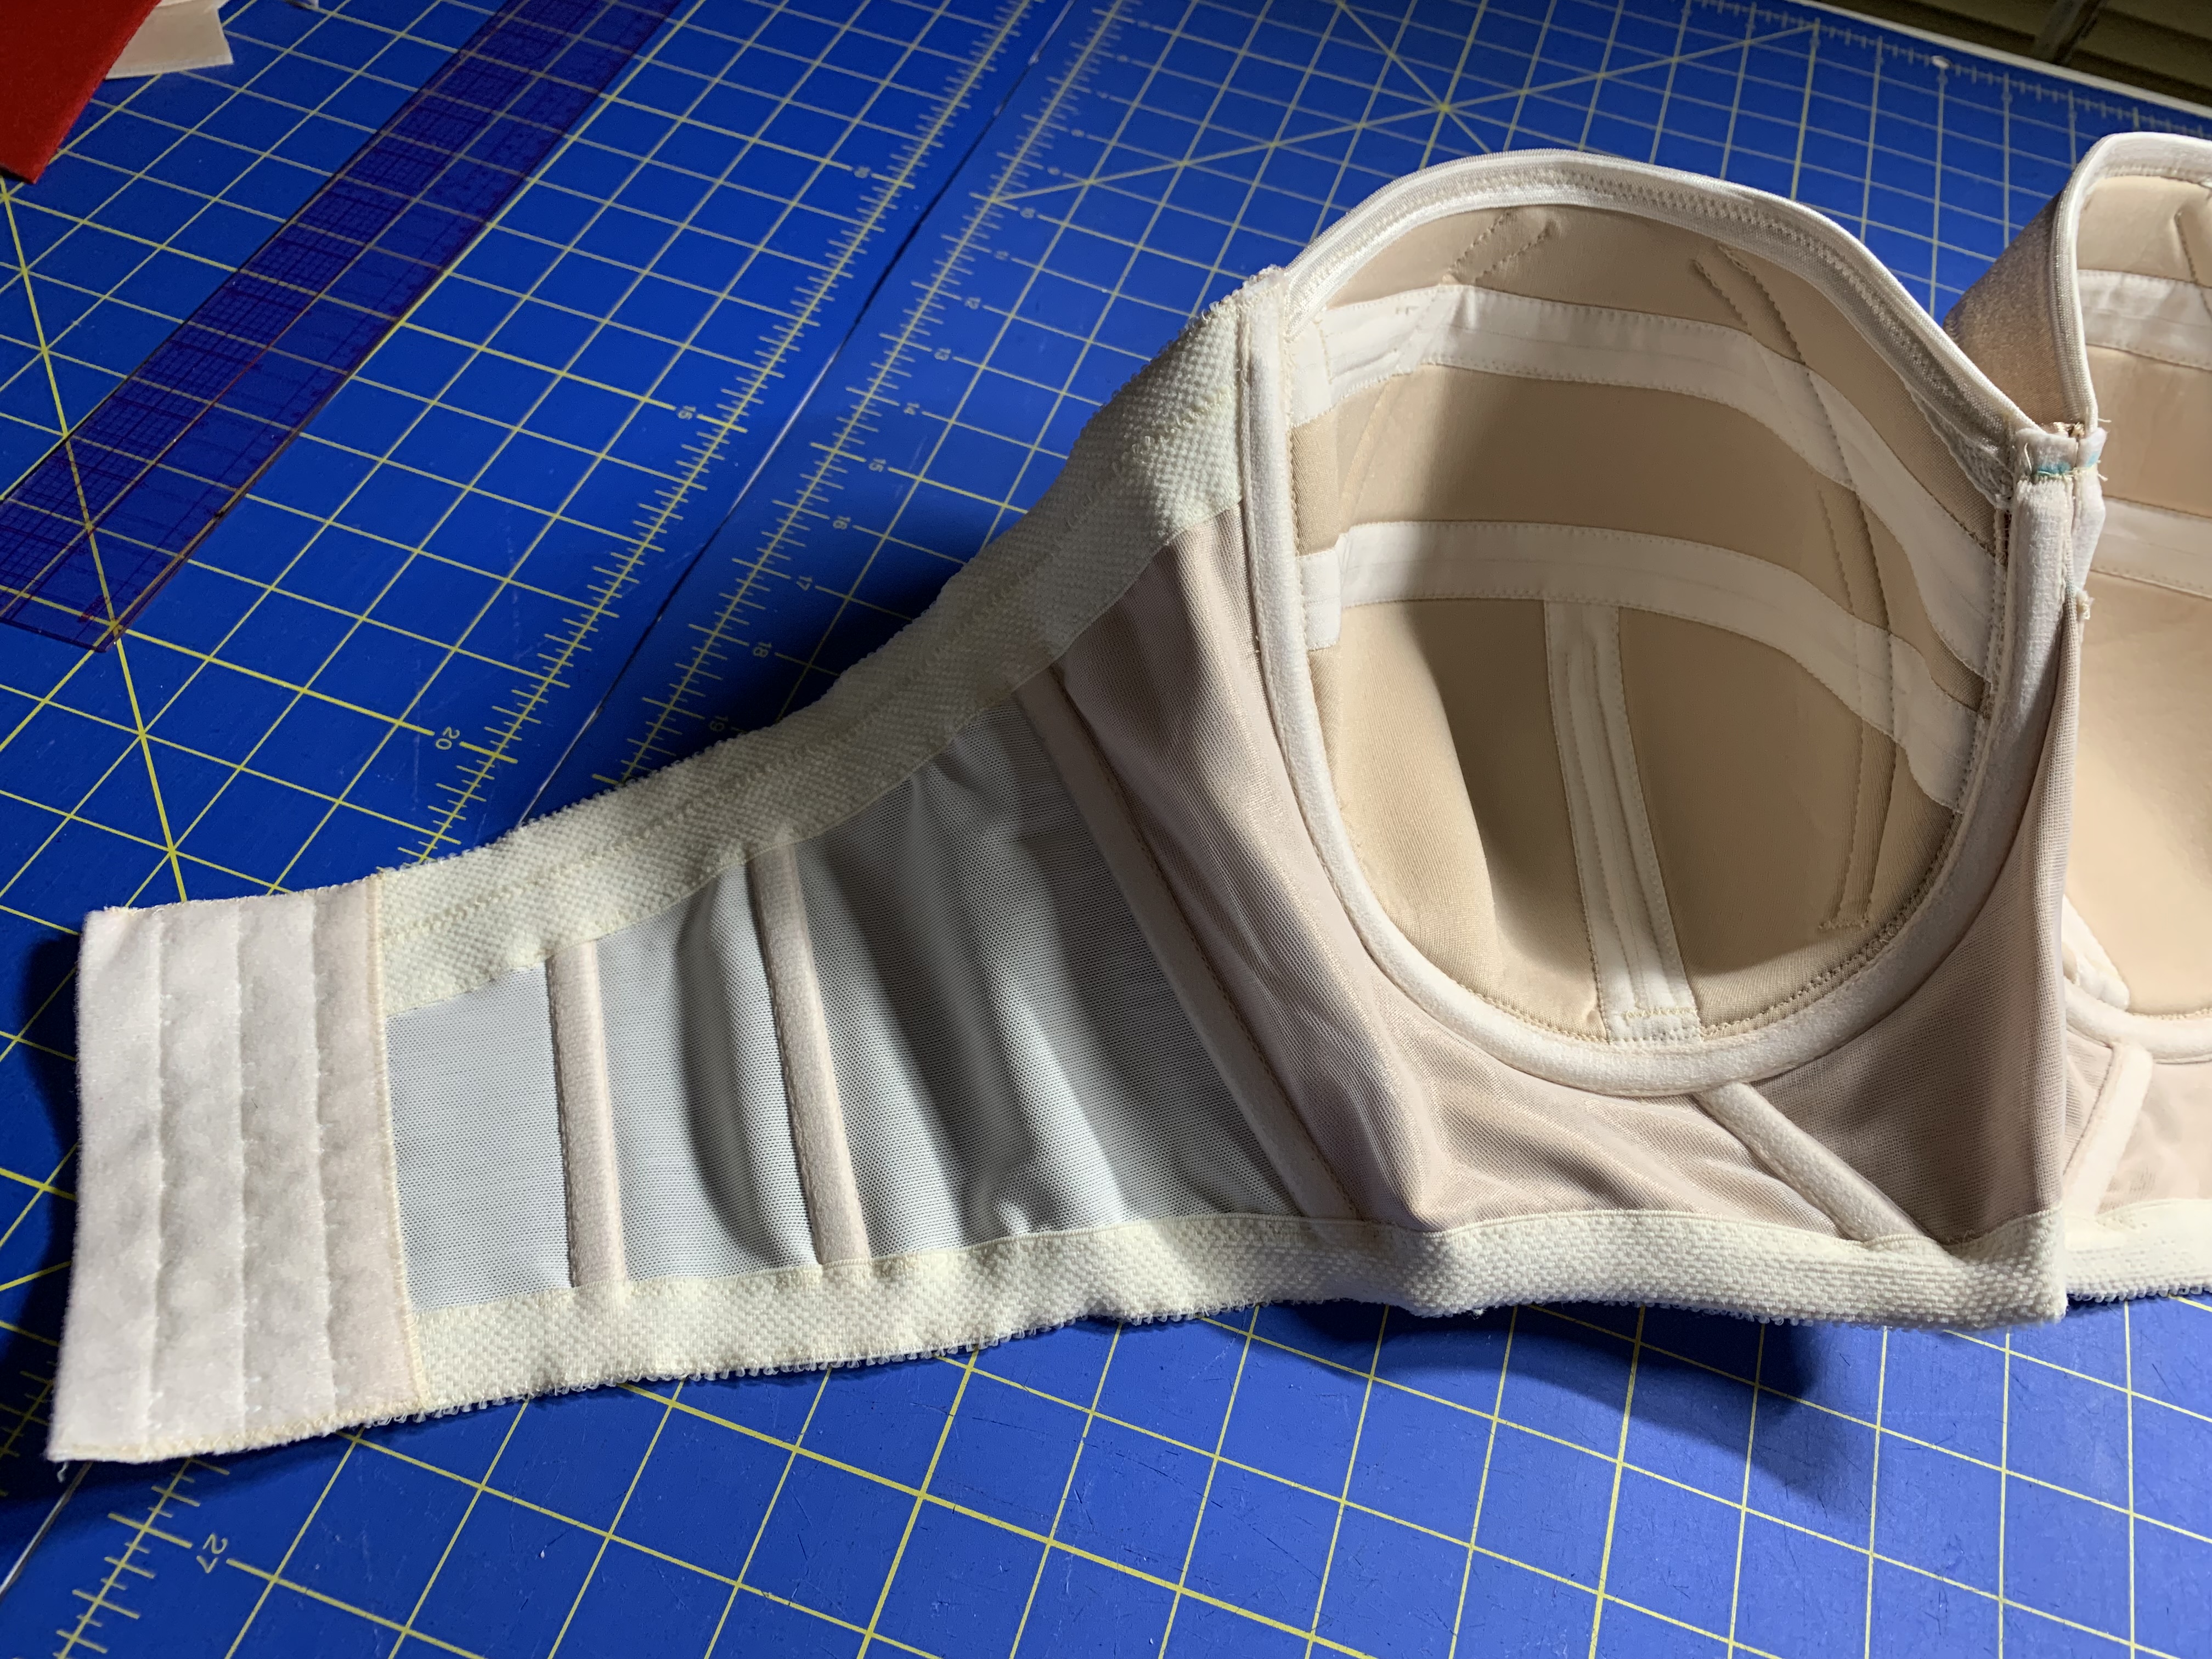
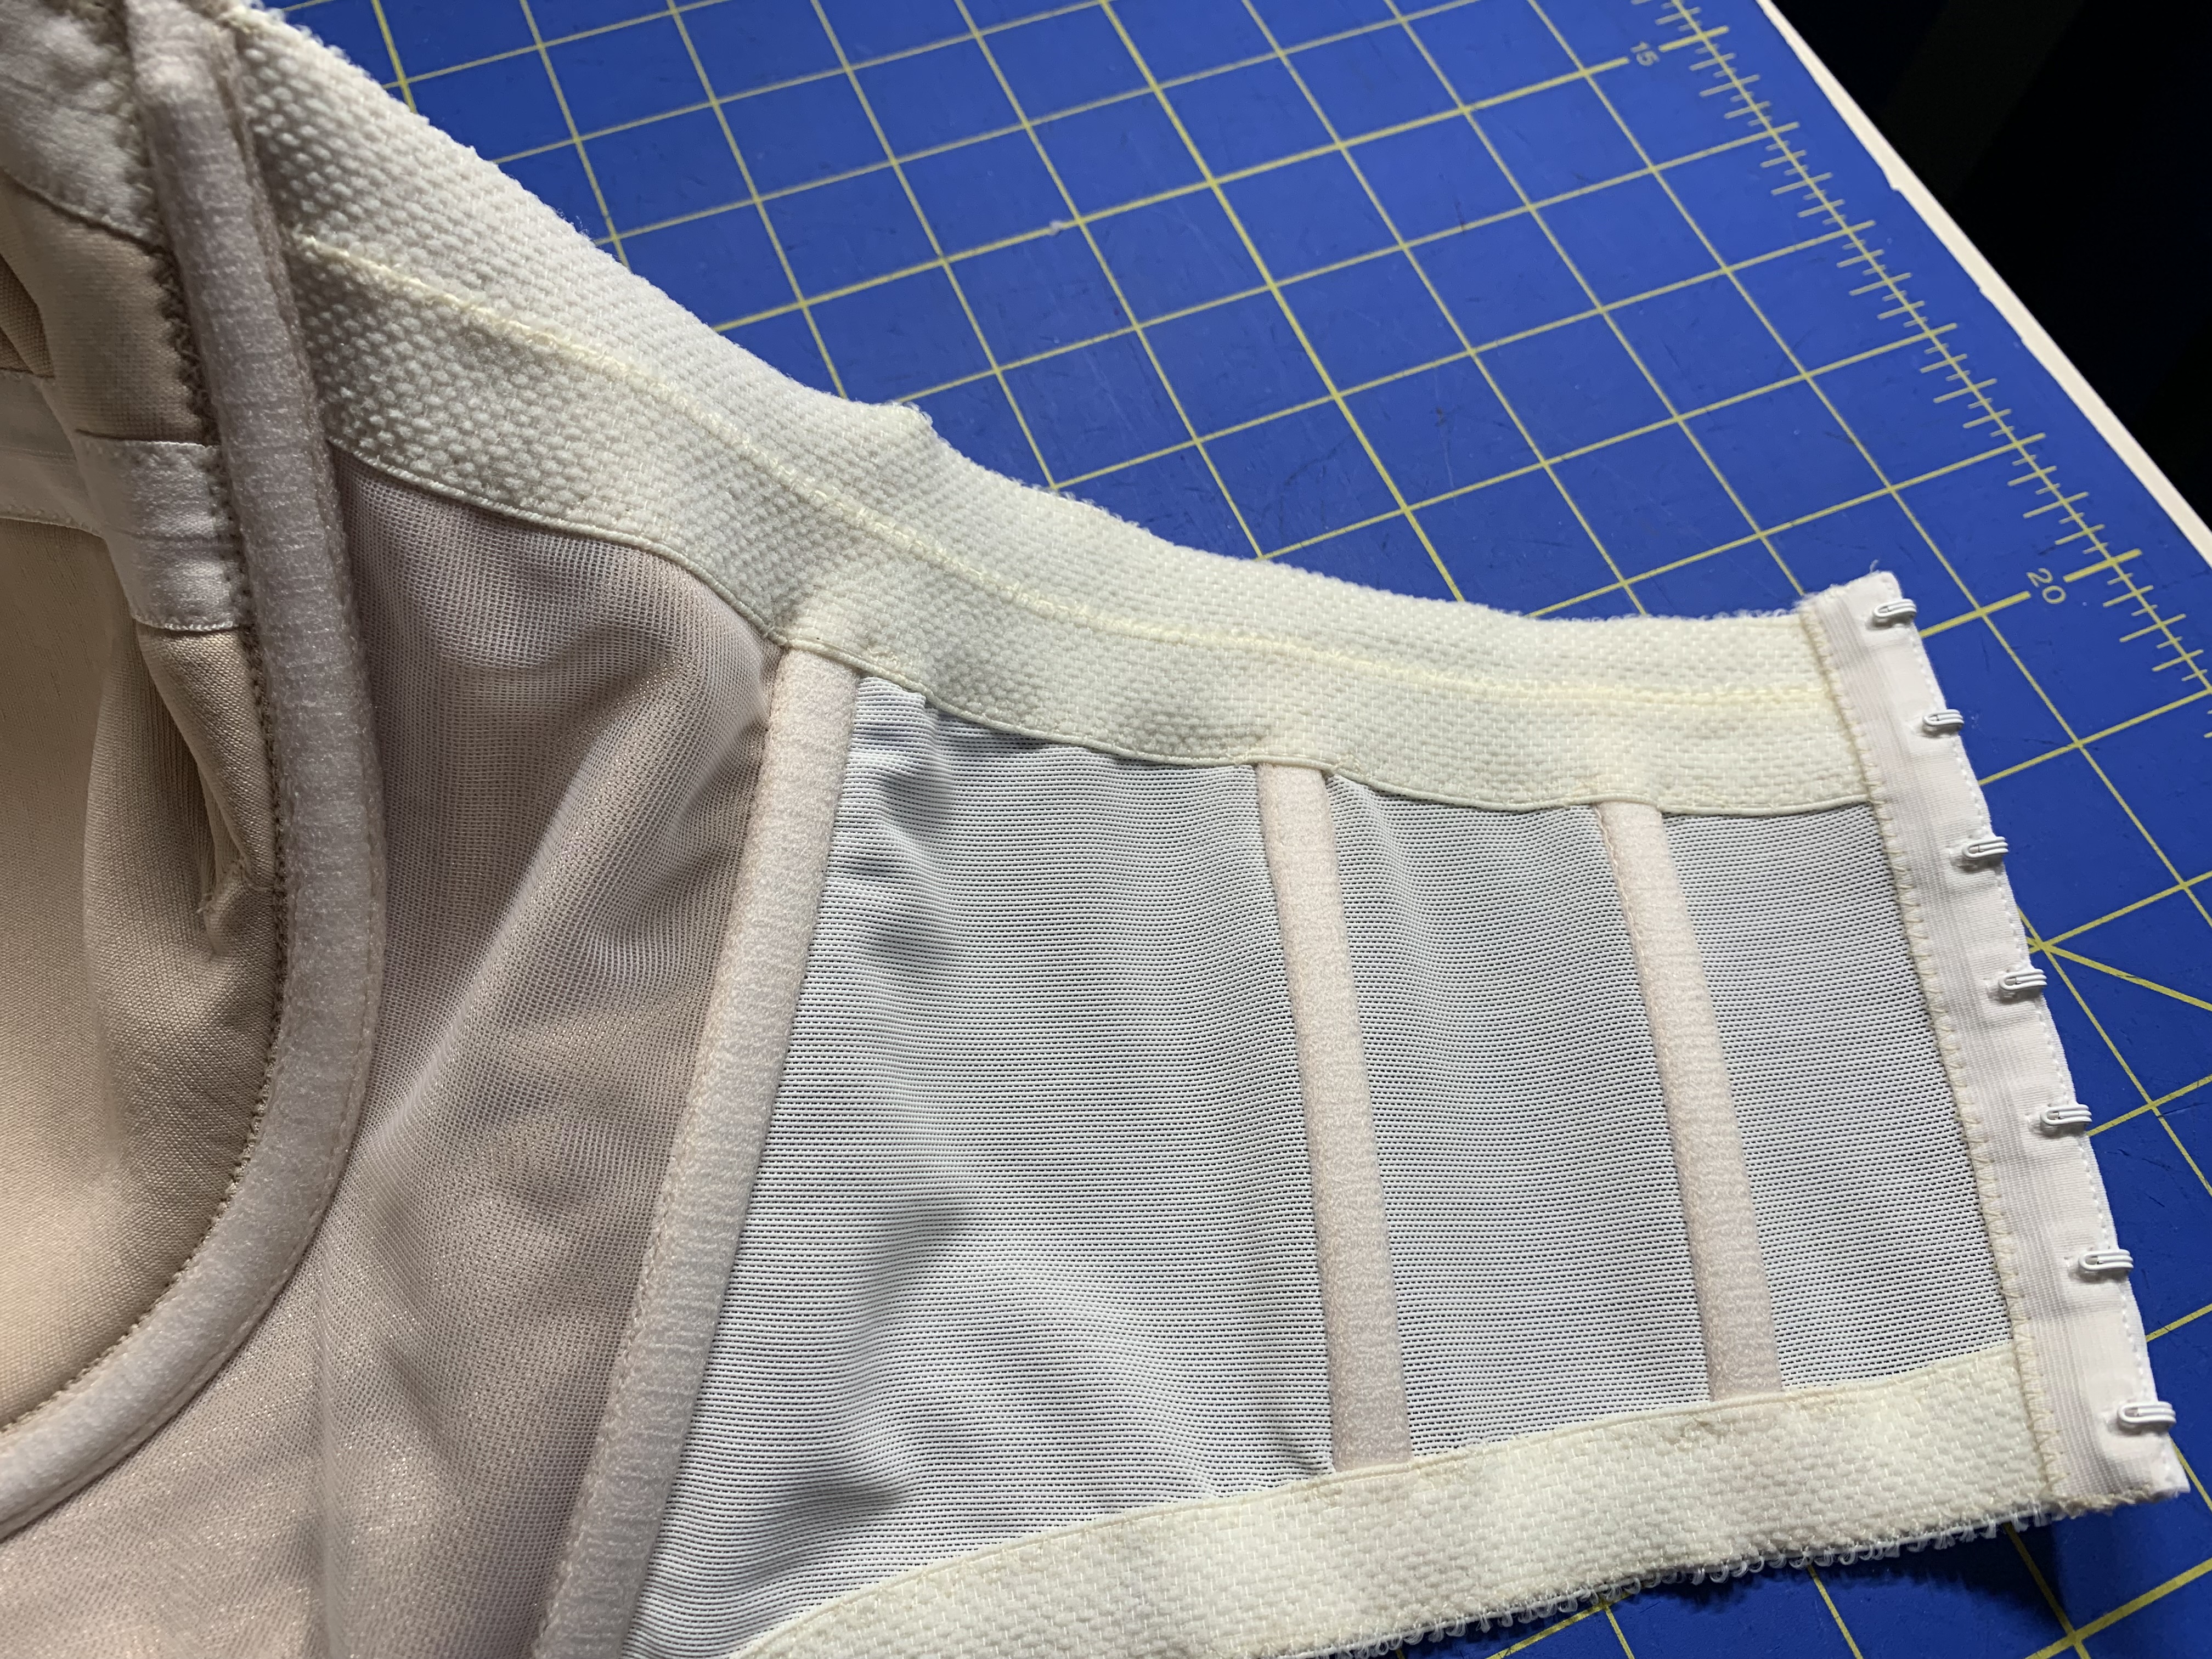
The pattern does a very smart thing where you sew two strips of elastic together to get an extra wide upper elastic band, and then you just jump over all the boning channels when attaching it. Since it’s so wide, the bones can’t escape, and the “jump” is so small the elastic doesn’t shift wither. I think I keep repeating myself, but I think the actual design of this pattern is fantastic. You can see from the photo below that the cups really do support themselves – there’s no extra padding in the photo, this is just the bra laying flat on the table:


I also made some matching Bravo Bottoms #2 in 2 styles to go with it – they are really smooth so I think they will be great under formal wear.
I really like this pattern and I’ve written a full review below. However, a disclaimer if you have sewn other bras: this pattern is a really fun way to stretch your skills, but you might need some supplies that aren’t part of a normal bra kit or stash. I ordered a lot of extra channeling, hook and eye tape for the back, I used multiple thicknesses of bra foam, and I used Porcelynne’s vertical extra long wires instead of the regular verticals which I use for my normal style bras, plus the boning from Burnley and Trowbridge. I definitely had to plan ahead to sew this and spent some time sourcing supplies, but it was a fun challenge and I really enjoyed sewing this pattern.
Official Pattern Review
Pattern Description: From the designer: “The Marei (Ma-Ray) Strapless Underwire Bra Pattern is a non-stretch strapless, longline bra pattern specifically engineered for larger cup sizes with built-in support structures. Choose from full coverage or demi versions. This is an advanced level sewing pattern, although achievable for tenacious intermediate level sewists. This pattern is available in all three size sets: A-DD, DD-GG or GG-KK (UK Sizing).”
Pattern Sizing: The pattern is sized for A-KK (2.9-9.1” BCD) cups and 26-52” bands. I made a blend of the 5.2” and 5.6” BCD size for the cups with the 36 band from the DD-GG size range pattern.
Were the instructions easy to follow? I thought the instructions for the pattern were overall really good, especially considering the complexity of the pattern. There were a few times I thought the pattern was missing steps only to realize they happened later in the order of construction. I believe LilyPADesigns also has a free sew-along course for this pattern on their website.
Did it look like the photo/drawing when you were done with it? Yes! I think it looked a lot like the line drawing and sample photos.
What did you particularly like/dislike about the pattern? I love having a supportive strapless bra pattern! The engineering on this pattern is very cleaver, and it’s much more supportive than any store bought strapless bra I’ve ever owned. I also really like the finished bra – it’s very stylish. Lily has also said that she “pre-omega adjusted” this pattern, which was great for me! This was the least amount of alterations I had to do on a bra pattern to get something wearable, and I’ve never been able to work from only 1 or 2 sizes in a pattern before (I usually have to blend multiple sizes for fit). My only dislike was that I found it challenging to get the boning into the bra channeling. I think this is because I used synthetic whalebone for the boning along with what I consider to be the “good” channeling from Bra Builders – I find it tends to be a bit fluffier than channeling I have bought from other sources. If I made this again I will probably go for the cheap (thinner) channeling for the bones and just use the good stuff for the underwire so it’s more padded where it sits above the rib bones but easier to insert the bones into the channeling.
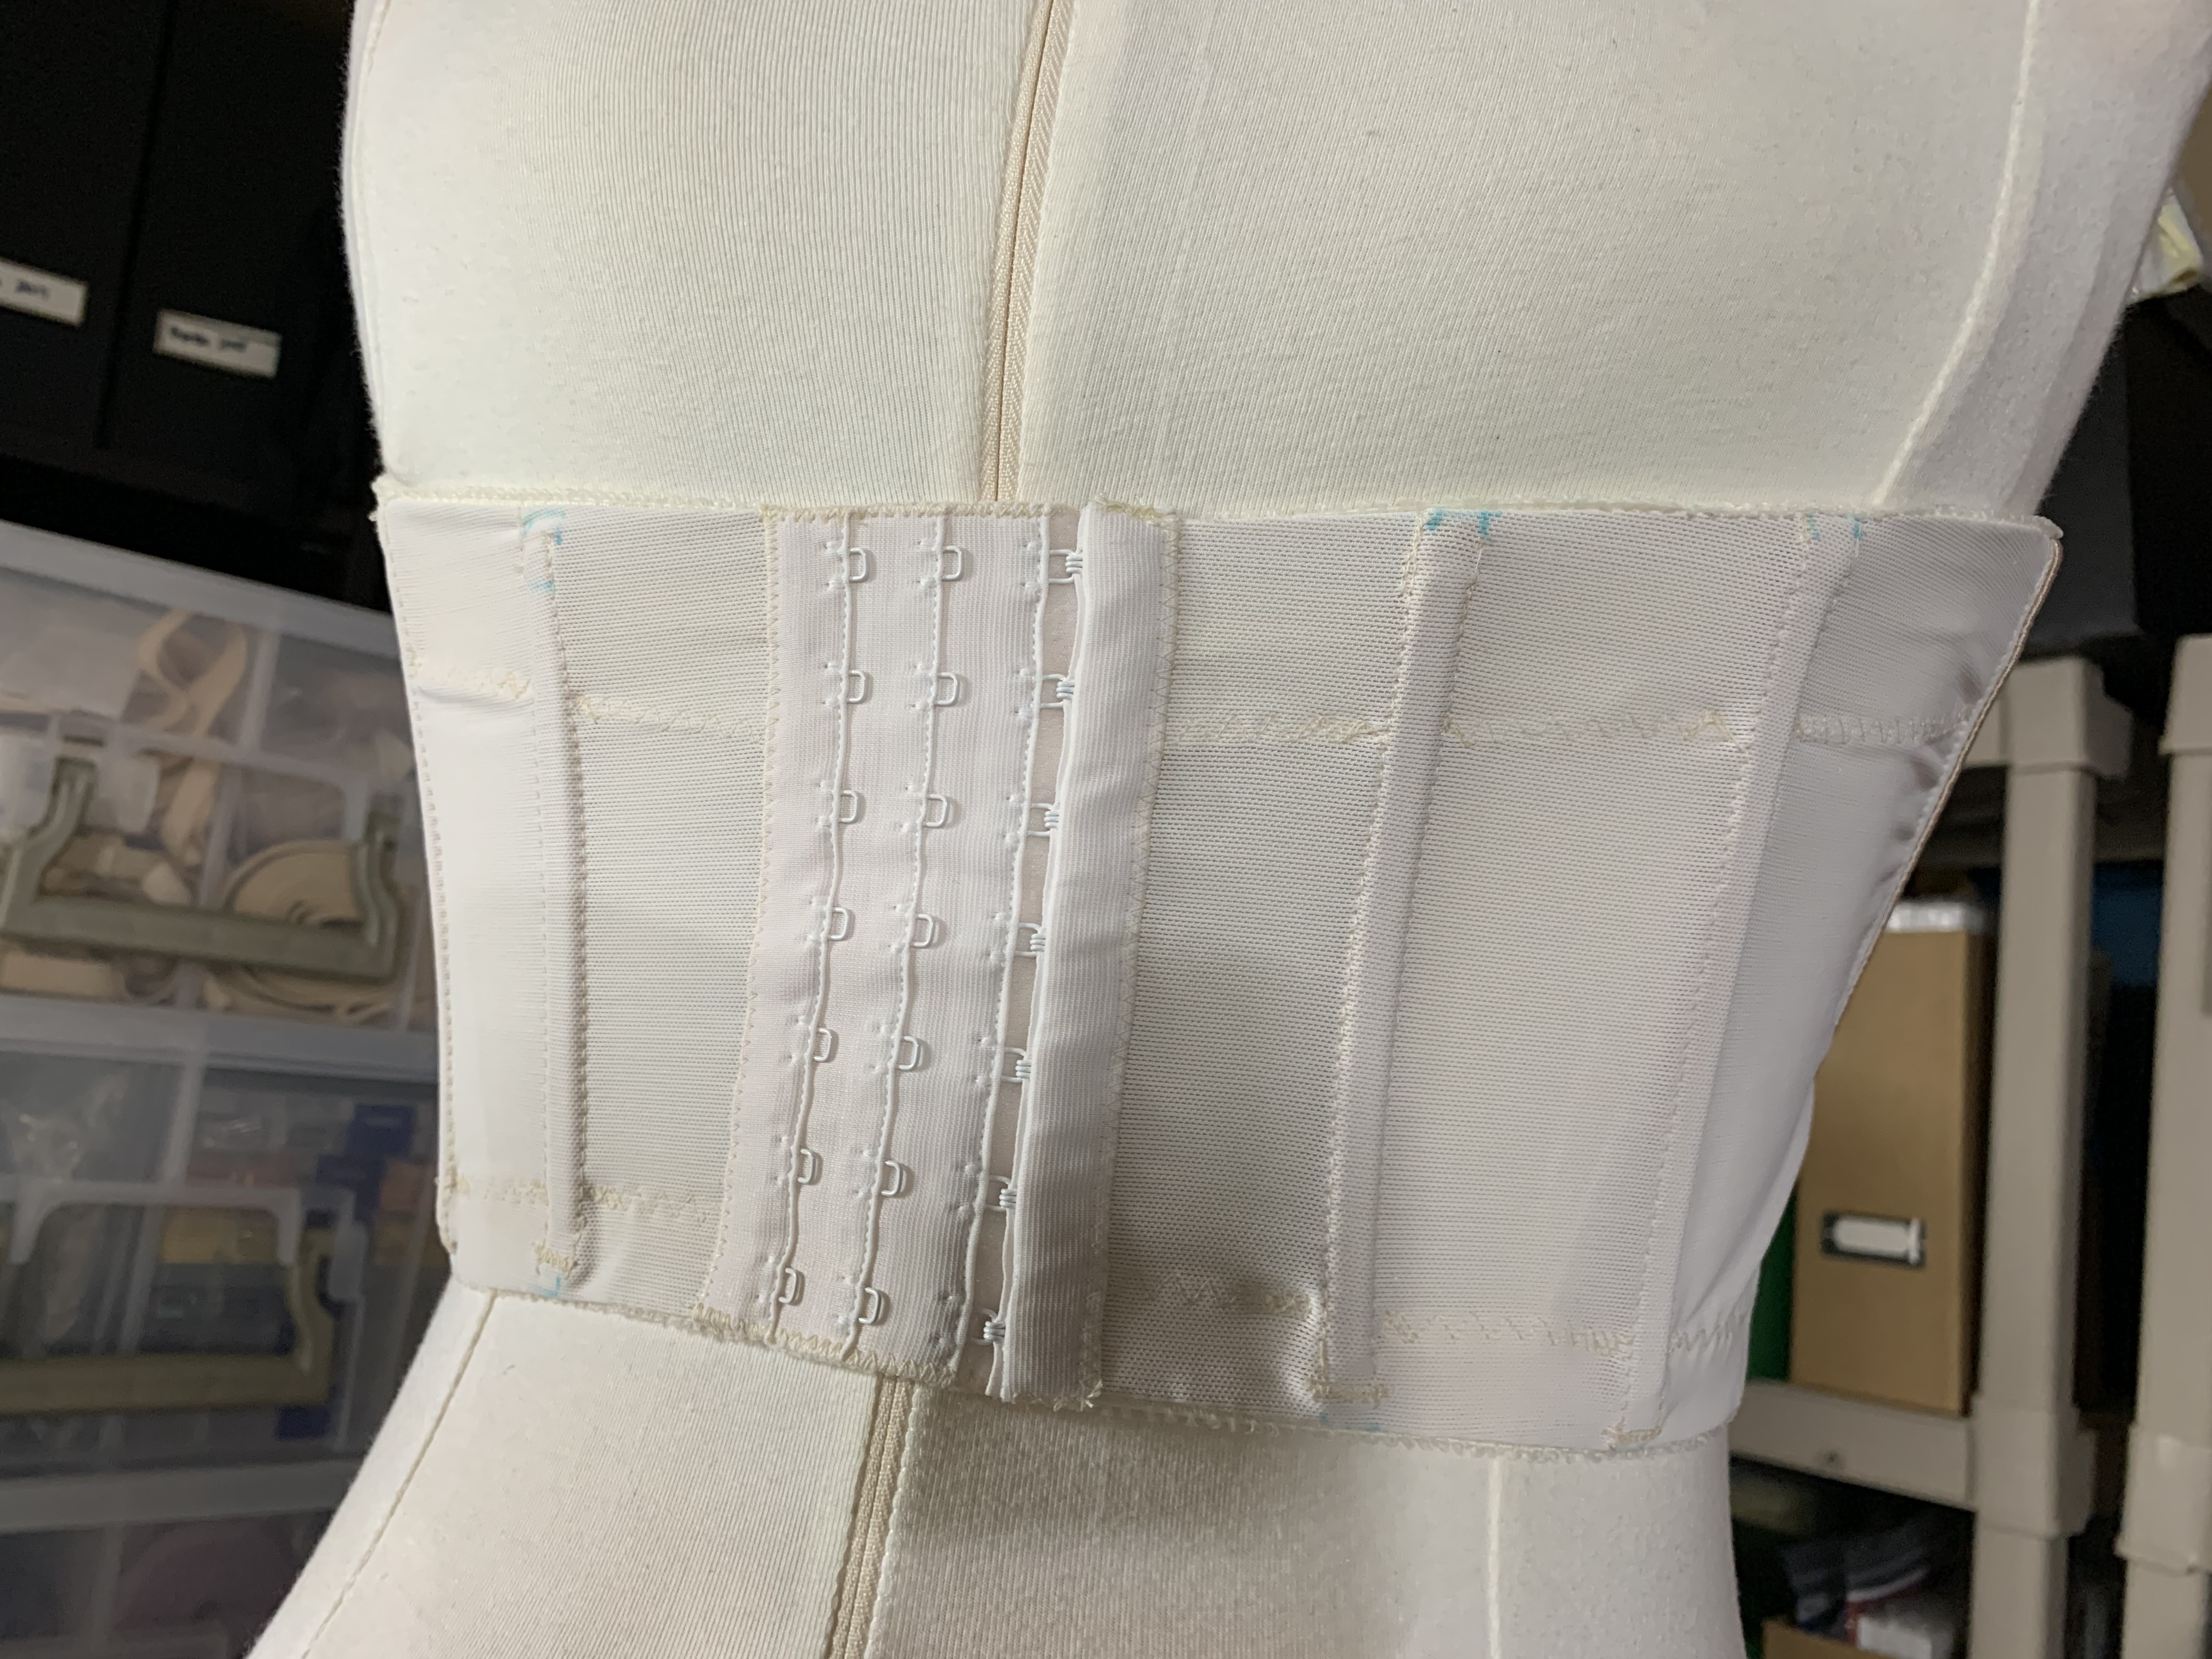
Fabric used: I used a satin spandex as the fashion fabric, with sheer cup lining and medium weight power net for the structural fabrics in the band. The cups are made of 2 layers of 2 different weights of bra foam, and a lot of wire channeling, synthetic whalebone, bra underwires, 3/4” elastics, and hook and eye tape for the back.
Pattern alterations or design changes you made: I did very few alterations! I took 1/2” out of the back band pattern because this has become a typical adjustment for me and it seemed prudent to do so here as well. I also did a tiny omega adjustment on the three lower cup pieces to blend the 5.2 wire line with the 5.6 BCD sizes to add a bit more projection, and I took out 1.5” worth of darts along the neckline edge of the upper cup. I think the neckline edge is still a bit long and I would like to take some more out of the pattern before making it again. Otherwise I am really happy with the results.
Would you sew this again? Would you recommend it to others? Yes and yes! I think this is a fabulous pattern and I definitely want to make another one in some “fun” fabrics (this was very utilitarian to wear under a sleek gown I’m planning to sew). I also really want to nail down a better fit because I would love to have some strapless options. I would recommend this pattern, but definitely to intermediate or above sewing levels. wrangling double-foamed, boned, large cups under the sewing needle required a bit of skill, and fighting with the boning was not for the faint of heart. However, I think the pattern is great, and I think the way it utilizes boning in the cups is fabulous. It’s super supportive and super comfortable and I can’t recommend it highly enough.
Conclusion: I’m so happy I tried this pattern! I feel like it provided a new sewing challenge, has given me a much needed item for my wardrobe, and has also helped me identify my actual size range in the LilyPADesigns patterns. Even though the fit isn’t perfect, I’m really happy with this project and I’m excited to have a strapless bra that I can actually wear!
So now I have a strapless bra – yay! Of course, it took me way too long to finish this part of the project because of the rest of the insanity of the month, so now I’m seriously reconsidering my ability to knock out a Vogue designer gown in 3 days, mostly because I know fitting this deceptively simple gown will (ironically) be a lot more work than fitting the bra was based off the flat pattern measurements I’ve taken so far. So…. I might be abandoning ship and jumping to a different (faster to sew and easier to fit) pattern that was already a half-finished project from a while ago. Gotta love the backup plans… even if they mean I don’t actually need a strapless bra for the end of the month event. But even if October has diverted my plans, I think I’m still committed to making Vogue 1616 in the near future, even if it is after the event I was supposed to wear it to. There’s always another event (there’s already multiple weddings happening next year), so I won’t mind having two fancy dresses in my closet, and I really want to make that gown because it’s stunning. But for now… on to a different project. Wish me luck and hopefully I’ll have something to wear in a few days!

This looks fantastic, and so helpful to see all the construction details and challenges.
You said you used ‘Porcelynne’s vertical extra long wires instead of the regular verticals’.
My main problem with RTW wireless bras is that the wire sticks into my underarm.
My boobs end in the middle of my underarm, and I’m short. I not only use Porcelynne’s short wires, I have to shorten the wires by another ½”-1″ for them to fit. This is also in line with the adjustments I have to make to the band, and the vertical Omega-like adjustments (side of cup), vs your horizontal ones (bottom of cup).
I’m wondering if your tall vs regular wire, means the short vs my extra short wire might work too.
LikeLiked by 1 person
I think the shirt v. extra short would work; the extra long wire is waaaaay too long for me generally but felt ok on the strapless to my surprise. This pattern has a super long wire line, so you might still need to adjust to a short wire but I think if the wire is just a bit longer than normal it should help support the cups.
LikeLiked by 1 person
Thanks. It’s hard to buy wires in Australia, because the ones I’ve found don’t provide pdf file with the wire sizes. I stashed up on porcelynne but postage is expensive to order more
LikeLiked by 1 person
Very interesting… I’ve seen a few corset-making videos, and this looks almost like it’s harder to make than a corset! Which makes me wonder whether one might as well just go for the full coverage of the latter? Though I suspect the strapless bra would be more comfortable to wear, with the elastic powernet in the back. As long as one doesn’t have the problem of the wires or waist-level elastic digging in. Oh well, it’s all academic for me, I will probably never make either a corset or a strapless bra as I don’t anticipate ever needing them. I do love the satin spandex, it’s such a nice champagne color.
LikeLiked by 1 person
oh my!!!!! you are walking my bra making journey. I read all you bra sewing posts in two evenings 🙂
thanks for sharing! your posts are really helpful especially when our measurements the same even wire size. I will be applying the same adjustments (I know it might not be quite right for me, but its a starting point).
Recently bought Desiree bra patter from Primrose Dawn – instructions WOW! includes all the alterations even how to change wire line shape.
LikeLiked by 1 person
Wow! I’ll have to check out that pattern!
LikeLike