I was really excited to make it to round 2 of the Pattern Review Sewing Bee! Of course, each round leads to a lot of craziness but sometimes the results of unexpected creativity under pressure lead to great results, and I’m really excited with what I made for round 2 – buttonholes!
When the challenge was first announced I pretty much made a face like this:

Because of course my first thought was to do bound buttonholes. At the very beginning I had a thought to re-make one of my very early sewing projects because I made bound buttonholes on the jacket and they were atrocious (I cleverly had the buttons covering the buttonholes in the blurry blog picture, but, trust me, they were really bad), and I thought I could do a much better version of that coat now. But, I also didn’t think I could execute a fully lined winter-ish coat in a week (at least not last week because I had a lot of other obligations that ate up a lot of my sewing time).
As I searched for another project, I was determined to avoid embroidered buttonholes because I wanted to showcase a different technique than in my first round project. And after last year’s elimination after Round 2 I was also determined to avoid pants because it seemed like it was just tempting fate. But after about a day noodling on some options I really couldn’t find a project that was speaking to me that would have any sort of really cool bound buttonhole that wasn’t basic or at least not an emphasis on the garment.
I felt stuck until I found some beautiful embroidered buttonholes on Etsy that I knew I had to use. And despite my initial desire to avoid pants, ultimately I ended up going down that route again as well. I think we were all getting a bit loopy pretty early on in the challenge because just as I was solidifying my design ideas this image showed up on the discussion forums and it resonated with my soul:
So, ultimately, I decided to give in, embrace the fact that I did actually want to do more embroidery projects this year, and actually embroider all the buttonholes. And by all, I mean 18. Yes, 18 buttonholes!
I wanted something to really highlight and emphasize the buttonholes, and here is what I came up with:


I really love the buttonhole details and I’m so happy with how the embroidery turned out. Now I really do want to embroider all the buttonholes!
Pattern Review
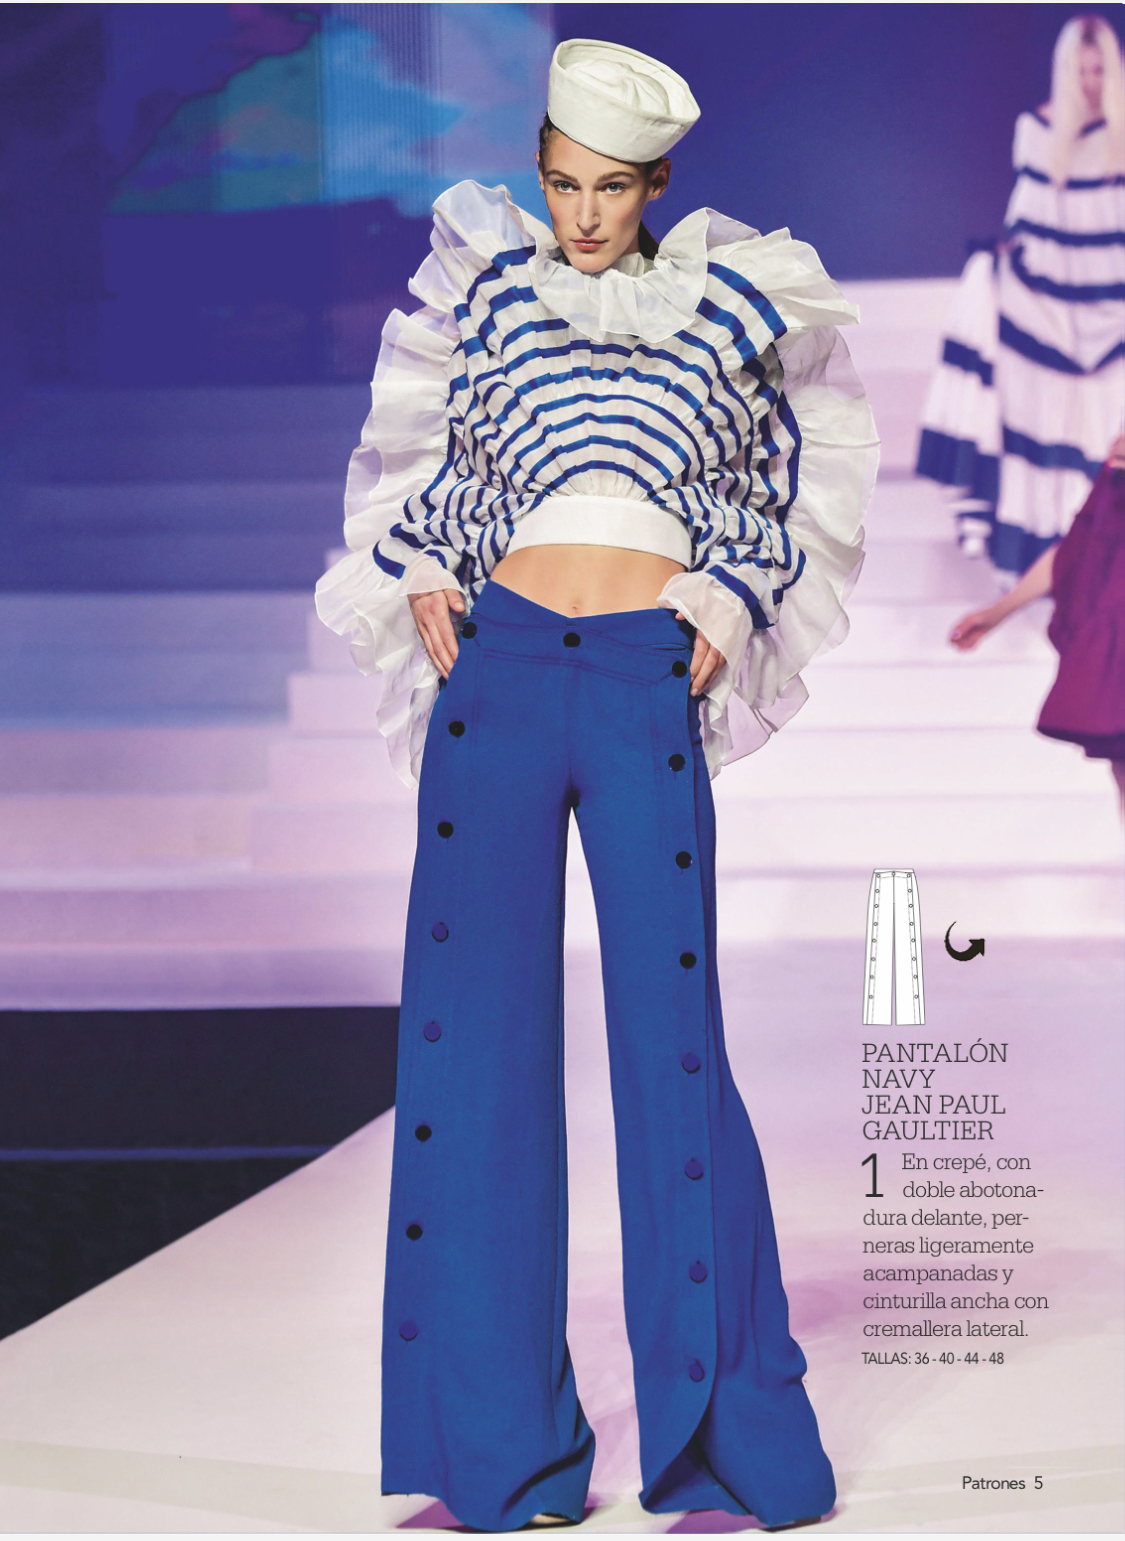
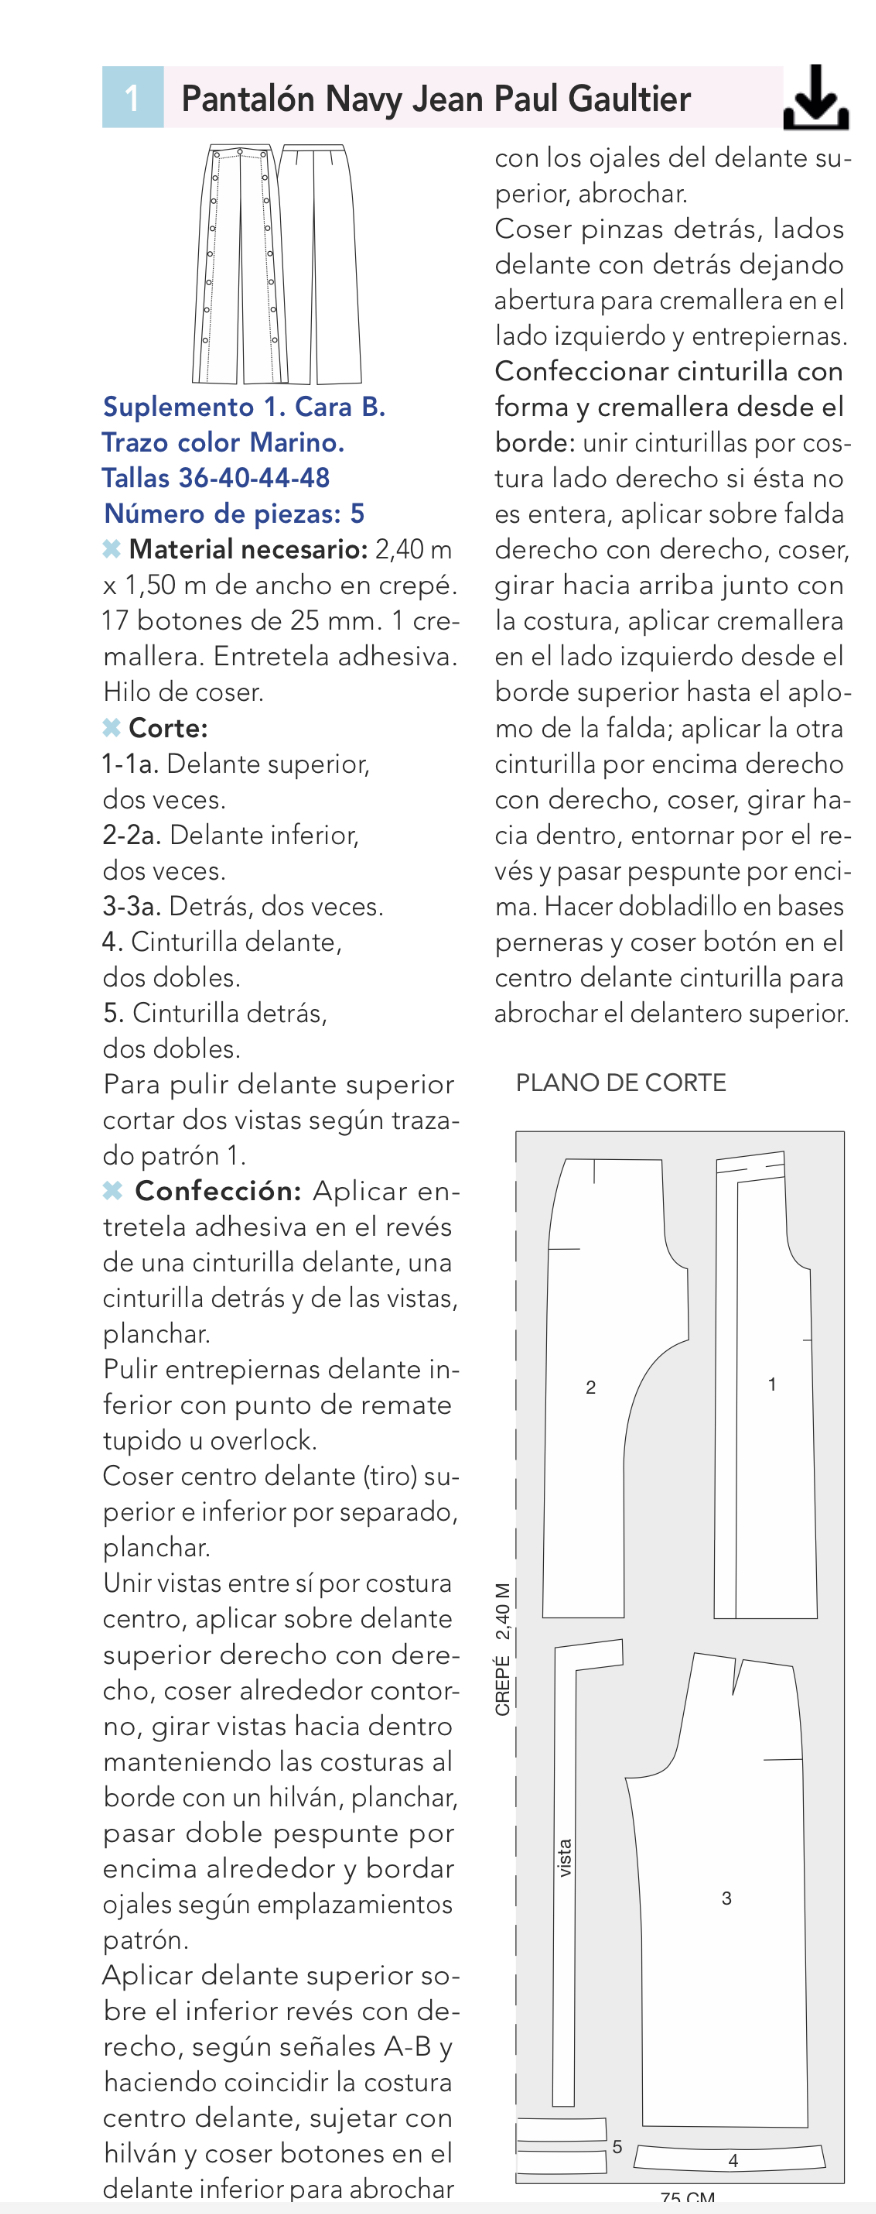
Pattern Description: Patrones titles this pattern “Pantalón Navy Jean Paul Gaultier” which I think translates into something like “Jean Paul Gaultier Naval Trousers.” The pattern description from the magazine translates to “In crepe, double-breasted at the front, slightly flared legs and a wide waistband with a side zip.” On the original pattern, these wide leg trousers feature 17 front leg buttons to keep the trouser front overlap in place.
Pattern Sizing: Patrones sizes 36-40-44-48. I traced the 48 but then used my self-drafted TNT trouser pattern (which I had previously drafted according to the instructions in the Threads Fit book) to adjust the sizing.
Were the instructions easy to follow? The instructions were in Spanish, so I had to translate them with Google Translate and what is left of my rusty high school Spanish. I have included the translated instructions in case they are helpful for future readers of this review who may want to try this pattern. I never really think that Patrones instructions are “easy” (truthfully they make me appreciate the detailed writings of Burda in comparison), but usually the general hints at order of construction are enough to point you in the right direction.
Did it look like the photo/drawing when you were done with it? I think that while I took the original design inspiration from the Patrones pattern, my version has a very different vibe. The overall silhouette is very similar to the runway image, but I really wanted to have a very different look than the typical naval aesthetic, so in that sense it looks a bit different.
What did you particularly like/dislike about the pattern? I think the style is very cool and was a perfect way to showcase buttonholes! I altered the pattern a bit to use 2 buttonholes instead of one at the center waist, so I ended up embroidering 18 buttonholes. I think the overall effect is just what I was hoping for, but it does take a long time to make them! Each of my buttonholes had either 5 or 7 color changes, and because of the spacing, I had to hoop them all separately. I think the buttonholes alone took at least 3 hours of actual stitch time, and took me at least 8 full hours to complete because of all of the color changes, thread breaks, and re-hooping. Because I re-drafted the pattern onto my self-drafted pants sloper, the fit is actually super comfortable, especially for high-waisted pants. As of now I don’t have any dislikes, but perhaps we will see how I feel on a cold or windy day since these pants have a lot of ventilation in the front!
Materials used: For the main fabric I used a black cotton sateen with a little stretch that I had in my stash. I really wanted a black fabric to make the contrasting buttonholes pop, and I like how the slight sheen gives the style a dressier look. For the construction I also used a medium-weight interfacing for the button band facings, the back of the buttons, and the outer waistband. I used a bit of scrap bias tape to finish off the inside waistband (my favorite finishing technique!), and a black invisible zip that I had to shorten from my stash. Because I needed so many matching buttons for this project, I ordered a 60-pack of buttons from Amazon to make sure I got them on time (my local stores NEVER have 18 matching buttons in stock and a trip to LA was not feasible this week). I really like these buttons and will definitely use the rest on other projects. For the embroidery I did the unadvisable thing of gambling on a lot of unknowns. The buttonhole design is one I purchased off Etsy from a previously unknown to me seller (RoyalPresentEmb), and I used an unknown brand’s multi-pack of metallic threads to get all the colors I would need at an affordable price (New brothread). Happily, this gamble paid off as both the buttonholes and thread worked out beautifully, but I will say I am now a solid convert to Team Thread Net. I never really understood it before because I didn’t see that they made much difference, but with this brand of thread I found it to be indispensable for minimizing thread breaks. It definitely didn’t run as smoothly as Superior threads have done for me in the past, and I did have to deal with some thread breaks. However, over the course of making 18 buttonholes it really wasn’t as bad as it could have been, and I have to say that the result is stunning. I don’t think it is possible to accurately capture in photos how shiny and beautiful this embroidery is.
Pattern alterations or design changes you made: Since I combined the pattern with a self-drafted trouser pattern I can’t really say exactly what changes I made, but I will say that I’m sure I added several inches to the hip and waist, and completely changed the shape of the crotch curve. I think my back waistband ended up being more curved that the original, and my front waistband was actually a bit straighter, possible because my trousers might be slightly higher waisted. One definite design change I made was to do 2 buttonholes at the center front instead of only one, mainly to use another lovely buttonhole embroidery design.
How does this design meet the requirements of the challenge? I really wanted to do something to make the button holes the most impactful design feature. I originally planned to avoid embroidered buttonholes because I wanted to use a different technique, but while I was looking for inspiration I saw these peacock buttonhole embroidery designs and I knew I had to use them for this project. I love the colors of peacocks and the designs of peacock feathers, and I really wanted to make something that made this design element the star of the garment. When I was looking through patterns I thought that this style of trouser would do exactly that. Every buttonhole on the pattern is “functional” in that they all open to allow buttons to pass through. I actually find that the embroidered buttonholes are much better quality than any I’ve ever done with a regular sewing machine. Because of the way these trousers are constructed, the top 6-8 buttonholes are “functional” in that they are necessary for the trousers to retain their shape and be a wearable garment. Without these buttons, the front overlap of the garment would essentially hang down from the crotch and inseam, and the lower front leg would be exposed. Because they are so high waisted, I also included the original pattern’s side zip to easily take off the garment, but I used an invisible zip so as not to take away from the buttonhole feature. In choosing this pattern, I really wanted to get away from the nautical theme of the original design because it felt too obvious, so an ornate embroidered trouser style seemed very appropriate way to make this change and emphasize the most important design element, the buttonholes.
Would you sew this again? Would you recommend it to others? I’m not sure that I need a lot of elaborate button-front trousers in my wardrobe, but I do think this pattern is really cool and I would recommend it. I will say that if you get the Patrones app you can get a lot of patterns pretty cheaply. The downloadable PDFs are an interesting compromise; you have to both print and tile the PDF pages and trace them; but because each Patrones pattern only prints onto 9 pages it isn’t too bad to attach the PDF print-outs, and because each print-out only has 1 design, it isn’t that bad to trace either.
Conclusion: I think this might be the most “me” thing I’ve made in a long time. It’s definitely my favorite thing that I’ve made since the start of the pandemic, and easily my most inspired. I think I really had to stretch my creativity to figure out a way to really meet the goals of this challenge, and I’m so happy with the result! It’s something I never would have made without the Bee, but it’s also something that I will totally love to wear to a fun evening out or a slightly dressier event, and I think really is the kind of garment that I know I will enjoy having in my wardrobe.
Is this garment a “Triumph of Individual Style”? Yes! I love how these trousers fit into my favorite color palettes, but also my desire to have a slightly more elevated style. I love them and I’m so excited to wear them out soon!
Of course, now is the time to wait and see what the judges decide, but I think this is the first time I really and truly feel like I don’t care if I make it to round 3 with this garment. While I would be happy to move on, I don’t feel like I made something “just for the Bee” with this one and I’m so thrilled with the result. While I’ve been happy with my other Round 2 designs in the past, and while I have definitely worn those garments and enjoyed them, many of them were definitely for the Bee first, and for me second. With this project, I feel like it is absolutely for me first, even though it is something I never would have thought to make without the challenge parameters of the Bee. I think this is why I love the Bee so much, and why I try to participate when I can. It really encourages me to find new and different ways to be creative, and I always feel like I “level up” with these sorts of challenges. In this case, I now have a new favorite buttonhole technique and I want to sew all the buttonholes!
Pattern Instructions
Supplement 1. Side B.
Marine color stroke.
Sizes 36-40-44-48
Number of pieces: 5
Necessary material:
- 2.40 m x 1.50 m wide in crepe.
- 17 buttons of 25 mm.
- 1 zipper.
- Adhesive interfacing.
- Sewing thread.
Pattern Pieces
- 1-1a. Front upper, twice.
- 2-2a. Lower front, twice.
- 3-3a. Back twice.
- 4. Waistband in front, two doubles.
- 5. Waistband behind, two doubles.
- a. To finish the upper front, cut two button band facings (views) according to pattern 1.
Preparation:
- Apply self-adhesive interfacing to the wrong side of a front waistband, a back waistband and the button band facings (views), iron.
- Finish crotches at the bottom with a close-fitting or overlock stitch.
- Sew top and bottom center front seam separately, iron.
- Join button band facings (views) to each other by center seam, apply to top front right with right, sew around outline, turn facings (views) inward keeping seams to edge with a basting, iron, pass double stitching around it and embroider buttonholes according to pattern placements.
- Apply upper front over bottom according to markings A-B and matching the center front seam, fasten with baste and sew buttons on the bottom front to fasten with the buttonholes on the top front, fasten.
- Sew darts at the back, sew sides front to back, leaving a zipper opening on the left side and sew crotch.
- Make a waistband with a shape and a zipper from the edge: join the waistbands by sewing the right side if it is not complete, apply to the pants right sides together, sew, turn up along with the seam, apply a zipper on the left side from the top edge to the poise of the pants; apply the other waistband over right to right, sew, turn in, turn inside out and topstitch.
- Hem the bottom of the legs and sew a button in the center front waistband to fasten the top front.

Just wow! Good choice in leaning into your strength, embroidery is so beautiful done well and I can just see the pants with a lot of different colored tops to highlight the embroidery! Hope you move to the next round
LikeLiked by 1 person
Thank you! There are so many great entries it would be an honor to move on.
LikeLike
Wow! I love your embroidered buttonholes. What cool pants.
LikeLiked by 1 person
Thanks!
LikeLike
Soooo good! I would have been totally uninspired by this challenge topic but you’ve totally nailed it!
LikeLiked by 1 person
Thanks!
LikeLike
Thank you! It took a lot of thinking and planning to get to this point, but I’m really happy with how these turned out!
LikeLike
They are amazing pants!!! I love them, and they look so, so stylish. Excellent interpretation of the brief. Good luck in the competition!
LikeLiked by 1 person
Thank you!
LikeLike
These are fabulous – reminds me of when you made those dramatic sleeves for an earlier Bee 😀
LikeLiked by 1 person
Thank you! That was also a round 2 design so I’m hoping this one also impresses the judges like the sleeves did.
LikeLike
Wowser!!! These are fabulous and you have really created something spectacular which is a huge strength of yours – well done! I’d be amazed if these don’t get you through to the next round too. How wonderful. And lots of luck – my fingers are crossed for you!
LikeLiked by 1 person
Thank you! Fingers are crossed!
LikeLike
These are awesome and I need the pattern immediately. Such an imaginative take on the original design too.
LikeLiked by 1 person
Thanks! You can get the pattern from the Patrones app if you can’t get a full copy of the magazine. It makes PDF taping tolerable actually 😱
LikeLiked by 1 person
Thanks! The Patrones app is brilliant, I wish Burda would do something similar
LikeLiked by 1 person
Same! There was a time I swore I would always want the full paper magazines but now that they are doing so many reprints, I would much prefer a digital subscription offer and pick and choose my purchases. Plus the tracing is soooooo much easier when you only have one set of lines on the paper, and the ability to screenshot instruction pages and put in my pattern notes is the best.
LikeLiked by 1 person
Brilliant, I love it!
LikeLike
Congratulations on round 1!
I can see why you couldn’t let your idea “go”. (And I understand why you felt the way you did when you heard “buttonholes”.) Fabulous not-sailor pants!
You really seem to shine under pressure. I can see this working well for you in skating. Is this also a job-related strength?
LikeLiked by 1 person
I don’t know if I would call it a “strength” exactly… my crashes from adrenaline highs can be kind of epic and not in a good way.
LikeLike
I’ve noticed that strengths and weaknesses are often closely related 🤣 ! (I’ve also noticed that people are often their own worst critic. 😘 )
LikeLiked by 1 person
Absolutely stunning! Love the colors. Good luck!
LikeLiked by 1 person
Thanks!
LikeLike
This is so creative – really impressive and a proper statement piece!
LikeLiked by 1 person